Archive🔗
Archive playback🔗
To play the camera archive, expand it to full screen in view mode and tap the  toggle button.

At the lower part of the screen, there is an archive fragment panel overlaying the timeline.
To navigate within the archive, touch the timeline at the desired time point.
You can scroll the timeline left or right.
The following commands are available in the archive playback mode:


 : Archive playback control (back/pause/forward).
 : Fast forward or rewind by 15 seconds.
 : Date and time selection.
 : Timeline scale control. Gestures are available.
 : Archive playback speed control.
 : Frame saving to the device.
 : Archive export to the device.
 : Video stream selection.
Tapping the button will open a calendar where the date and time of the archive can be selected.

The  Date tab displays archive recordings for the current month. The presence of archive recordings is displayed in the calendar with a blue indicator for each date when a recording was made to the archive.
When opening the calendar, the current date is highlighted in blue. If switching to another date, that date will be highlighted in blue, and the current date will be highlighted with a blue frame.

To switch between calendar months:
Use buttons:
 and
and  .
.Expand the list above the calendar and select the month and year needed.

Warning
In the calendar, it is possible to select a year that was no more than 10 years ago from the current year. For example, if the current year is 2024, then the last available year will be 2014.
Warning
If the calendar page does not fit entirely on the screen when operating in landscape orientation (horizontal position), it can be scrolled up and down.
The archive time is selected in the  Time tab. In this tab, you can change the time (hours, minutes, seconds, AM or PM) by scrolling.

Note
To save the changes, tap the Apply button.
After the changes have been applied, it is possible to view the archive recording for the date and time specified in the calendar.
Archive export🔗
To enable camera archive export mode, tap the on-screen button .
Note
This button is available if the user has the rights to view and export the archive.
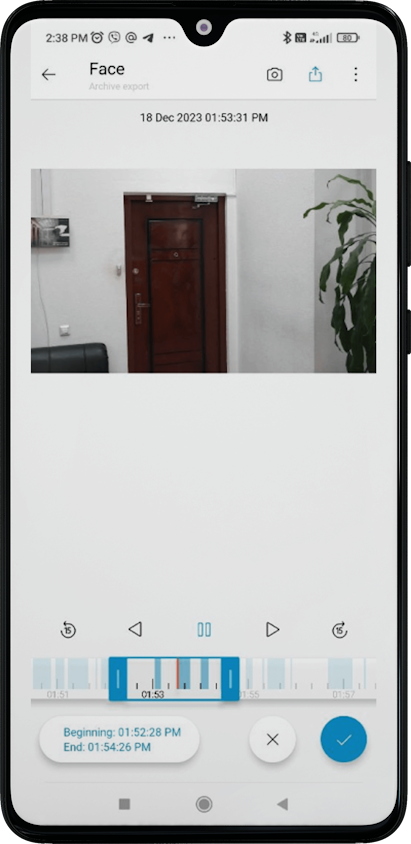
The archive is paused while playback remains available. Markers appear on the timeline, allowing users to select a segment of the archive for export. By default, a video segment from -60 to +60 seconds from the current time is highlighted.
Note
In the export mode, you can select a fragment of the archive and save it to your device in the .mp4 format.
The maximum fragment size is 5 minutes. The intervals on the timeline automatically adjust to the screen size so that a fragment of 5 minutes fits on the screen.
Two labels appear on the screen, showing the temporal boundaries of the fragment, along with two buttons. Pressing the checkmark initiates the export with the set parameters. Export starts in the background, and the user receives a notification window indicating the start of the export.
To set the date and time of the exported archive, as well as to determine the duration of the exported fragments, tap the button displaying the time boundaries of the fragment:

The calendar will open, displaying the following tabs: Date, Time and  Duration.
The date and time are selected in the same way as in archive playback mode.
In the Duration tab, it is possible to specify the duration of the exported archive fragment.

Warning
When exporting, the duration of an archive fragment can be from 1 second to 5 minutes inclusive.
Warning
If a duration of more than 5:00 was specified, the minute and second values will be automatically converted to valid values based on the latest changes:
If seconds were entered last, the minutes value will automatically change to an acceptable value. For example, a duration of 5:10 was entered, with seconds entered last. In this case, the value will automatically change to 4:10.
If minutes were entered last, the seconds value will automatically change to an acceptable value. For example, a duration of 5:10 was entered, with minutes entered last. In this case, the value will automatically change to 5:00.
If the duration 0:00 was specified, the minute and second values will be automatically converted to valid values based on the latest changes:
If seconds were entered last, the minutes value will automatically change to an acceptable value. For example, a duration of 0:00 was entered, with seconds entered last. In this case, the value will automatically change to 1:00.
If minutes were entered last, the seconds value will automatically change to an acceptable value. For example, a duration of 0:00 was entered, with minutes entered last. In this case, the value will automatically change to 0:01
Saving exported video files🔗
The video files are saved in a folder named Eocortex created within the Files directory. User permission is required for saving.
Export archive with timestamps🔗
The archive is exported without timestamps by default.
You can configure this feature in the application settings by selecting Export archive with timestamps.
The mode with timestamps significantly reduces the amount of video received but increases the load on the server. In the enabled mode, a timestamp is superimposed on each frame, the permissible error of which is 1–2 seconds. The export speed is 300–400 frames per second.
Video with time stamps is needed to restore the chronology and picture of events.
Warning
Exporting H.265 video may increase the video generation time and server load.