Actions🔗
Turn on recording🔗
Turns on the recording to archive.
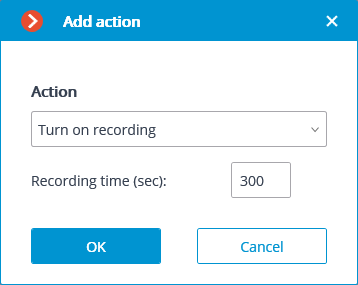
Action parameters:
Recording time (seconds): sets the recording time during which the recording to archive will be performed.
Warning
This action will not be performed if the continuous recording to archive is in progress on the channel, or if the continuous recording mode has been set.
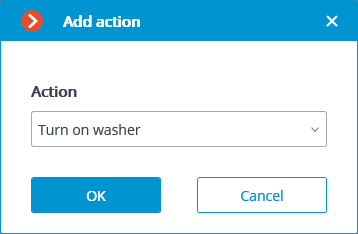
Turn on washer🔗
Activates camera washer.
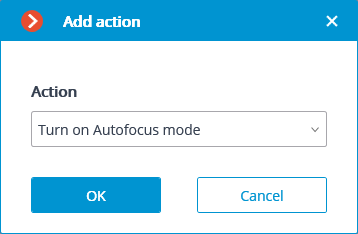
Turn on Autofocus mode🔗
Activates camera autofocus.
Play audio on camera speaker🔗
Transmits the audio file specified in the settings to the camera speaker.
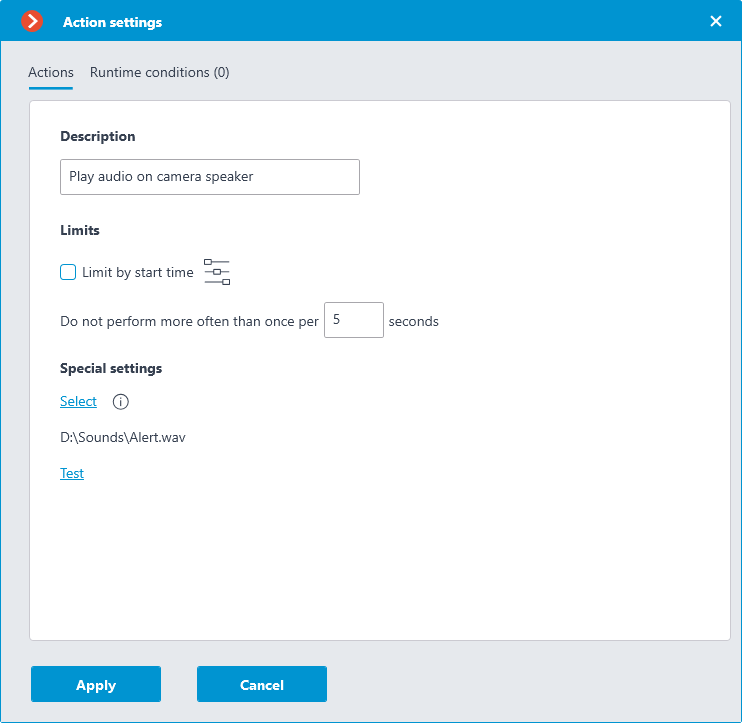
See more information about setting up this action.
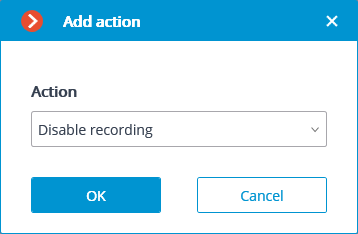
Disable recording🔗
Disables recording to archive triggered by automation scenarios or user actions in the Eocortex Client application.
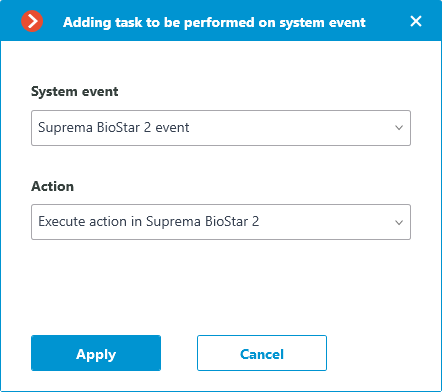
Perform action in BioStar 2🔗
Sends a door control command to the BioStar 2 ACS.
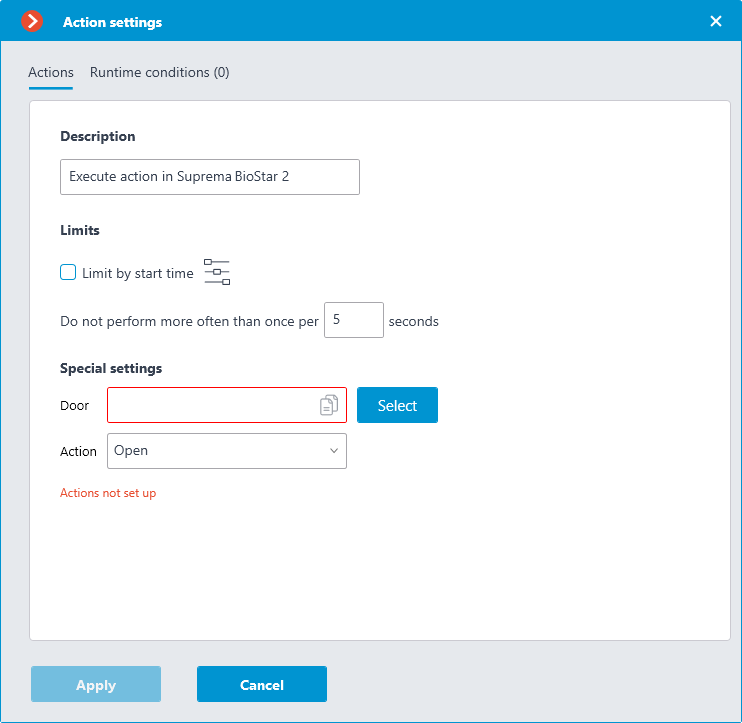
In the window that opens by clicking Apply, the Special settings section allows selecting the door to interact with, and selecting the action to be performed when processing the scenario.
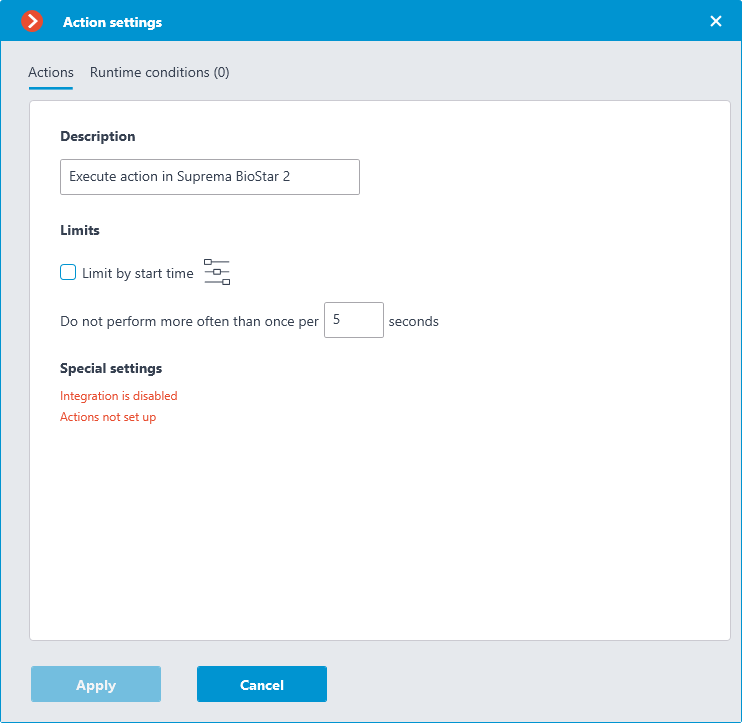
Warning
If the settings for integration with BioStar 2 ACS on the Integrations tab are not set, are incorrect or are inactive for the selected camera, the corresponding message will be displayed instead of the action settings in the Special settings section.
Door selection
Clicking the Select button next to the Door field opens the device selection window. To load the list of doors available for interaction, the connection to BioStar 2 ACS will be established with the credentials that were specified in the Integrations section.
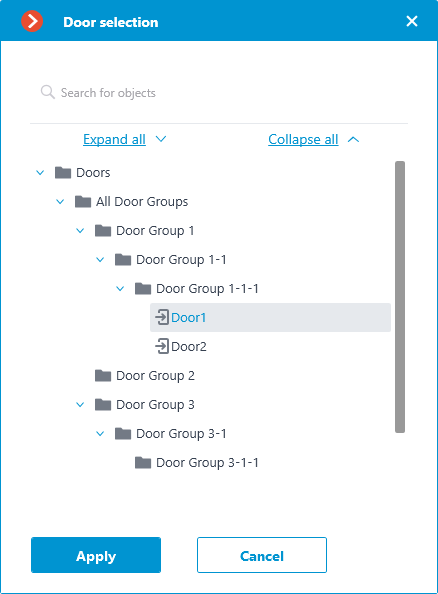
The Door selection window allows selecting the door from the list, for which the action should be performed. It is necessary to select a specific door, selecting a group of doors at once is not possible.
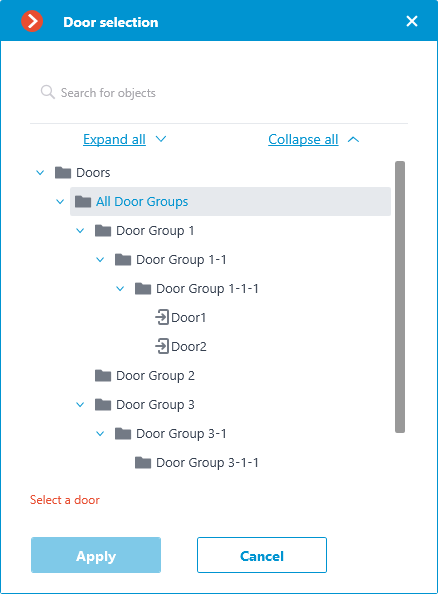
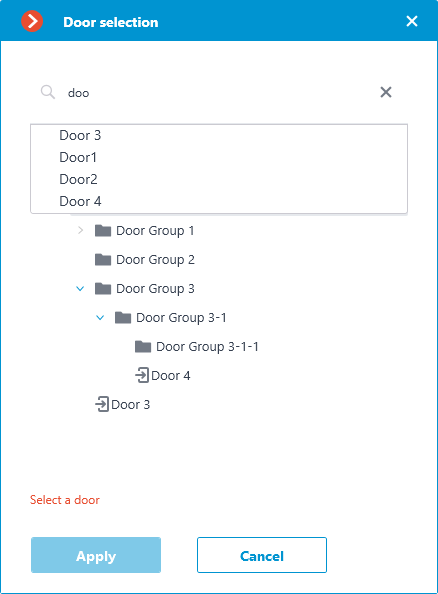
For easy navigation to the right door, the text search by its name is available at the top of the window. Select the desired door and click Apply to confirm.
Once the door is selected, the previously inactive  Copy button, located in the Door field, becomes available. Clicking this button saves to the clipboard the name and ID of the selected door, which can be used later for diagnostic or automation tasks.
Action selection
The Action drop-down list provides a choice of actions to be performed on the selected door. The following options are available:
Open — temporarily opens the door.
Release — removes the manual door lock/unlock.
Manual lock — manually locks the door. The door remains locked even if the user is successfully authorized.
Manual unlock — manually unlocks the door. The door remains open without the need for user authorization.
Clear alarm — removes the alarm state from the door.
Action test
Once the door and the action to be performed are set, the previously hidden Test action link that triggers a test run of the settings becomes available.
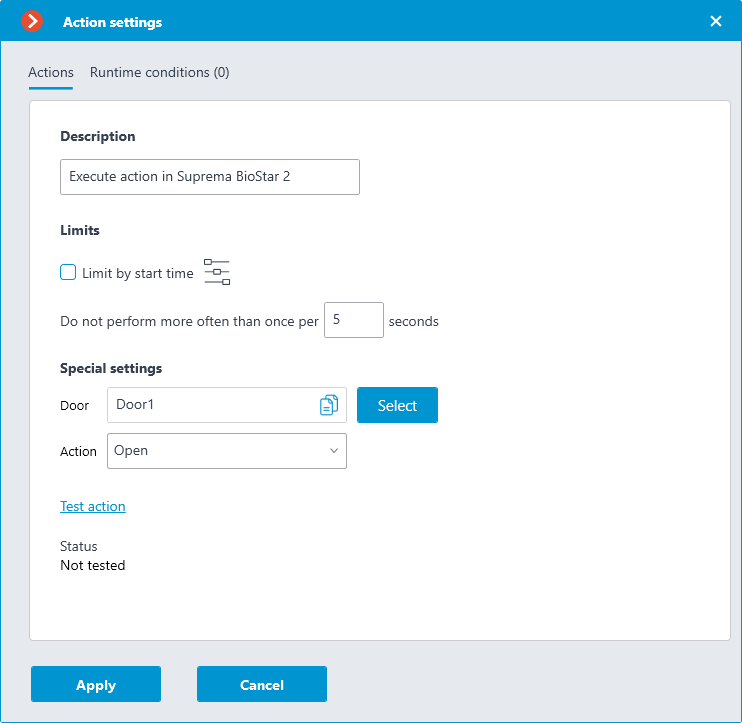
The current state will be displayed in the Status field as one of the following results:
Not tested — the settings were not checked, the functionality of the configured action is unknown.
Testing... — test run is performing according to the specified settings.
Connection succeeded — test run is successful, the settings are correct.
Request timeout — the command to run the action has not been sent to the ACS within the specified timeout period (by default, 100 seconds). Check if the integration settings are correct and if the BioStar 2 server is available.
Unknown error — test run of the action has failed for unknown reason. Detailed information about the error can be found in the Eocortex Server logs.
Alarm generation🔗
Alarm generation action generates a camera alarm.
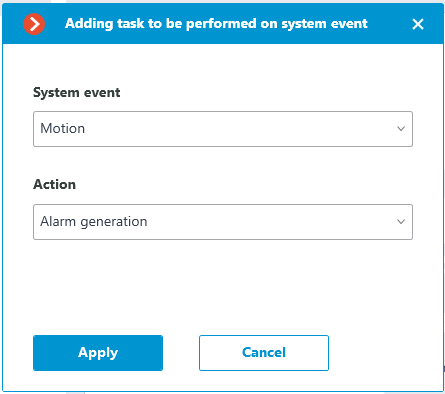
Action options:
Actions tab🔗
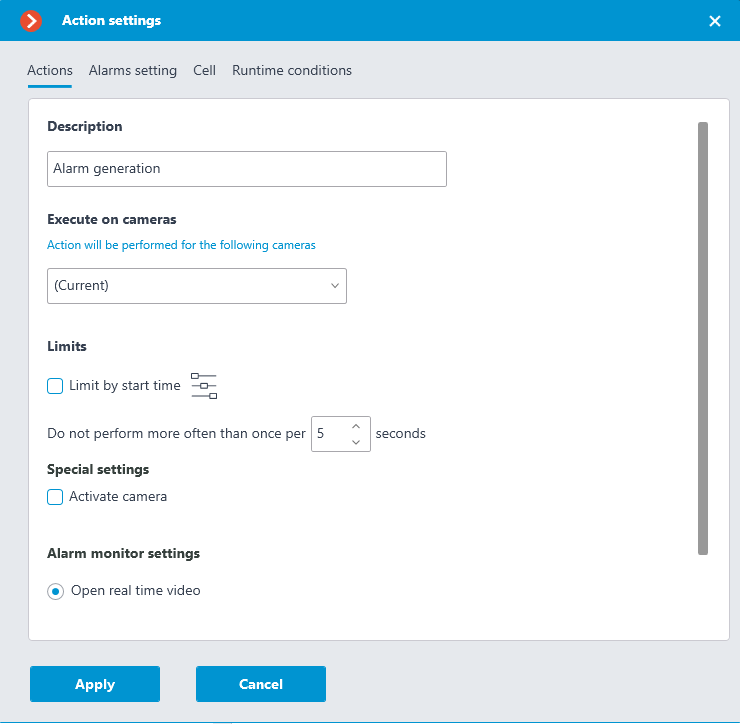
Description: Actions description.
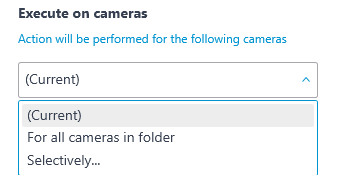
Execute on cameras: Allows you to specify on which cameras the action will be triggered.
Limit by start time: Allows to limit the start of an action by time.
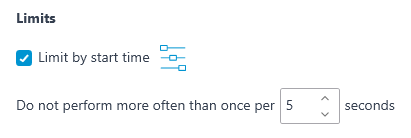
Clicking the
 button opens Limit scheduled action start:
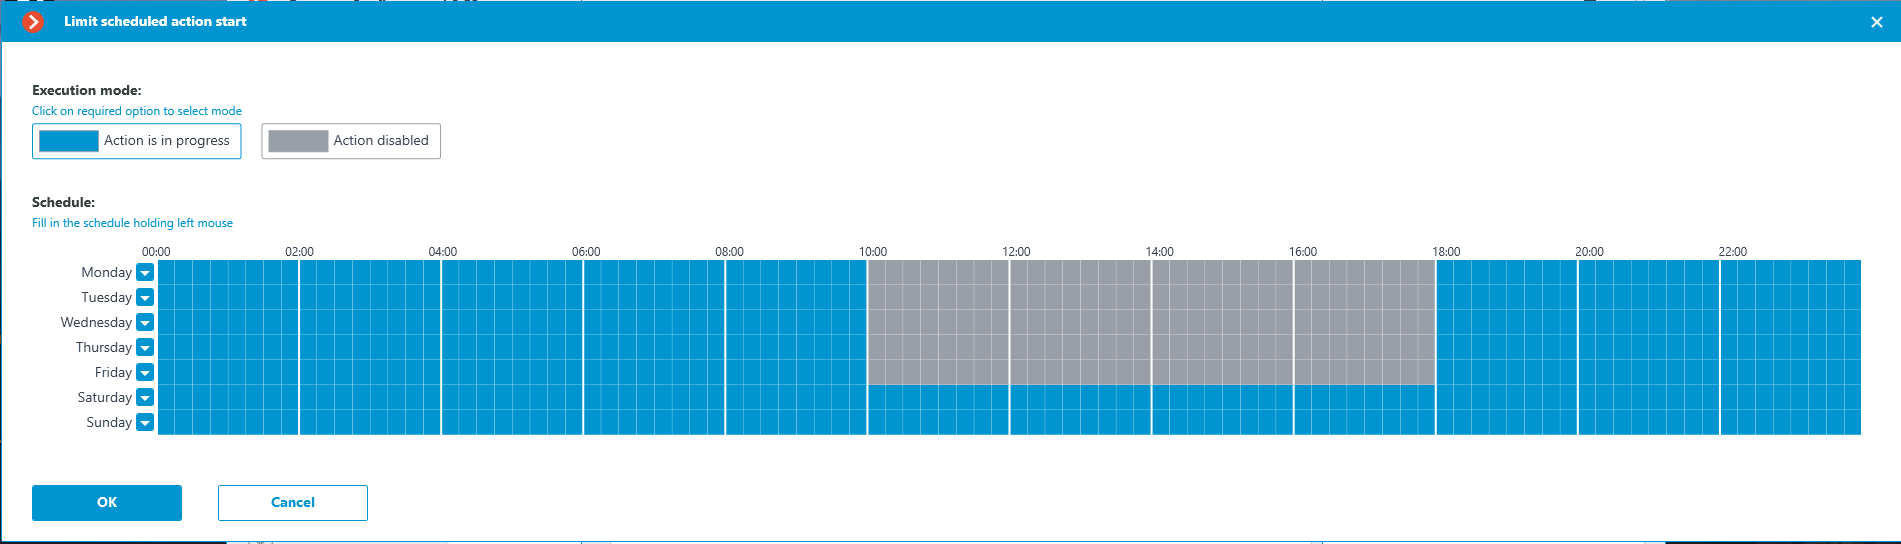
Activate camera: If the camera is displayed in the Eocortex Client application in live view, the camera cell will be activated.
Open real time video: If camera is opened on the alarm monitor, it will be open in real time.
Open archive: Opening the camera on the alarm monitor will cause it to open in archive playback mode. The playback will be played back from an earlier point in time, with the shift set in Time shift when opening archive, sec.
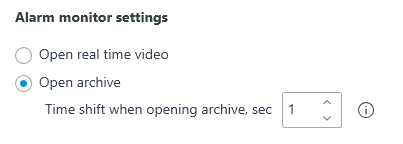
Note
It is recommended to set the shift value to at least 10 seconds.
When playing back the archive with shift, it is recommended to use the Always On recording mode for the selected channel.
Warning
Successful playback of the archive with shift requires synchronization of date and time settings of the server and client devices.
Alarm settings tab🔗
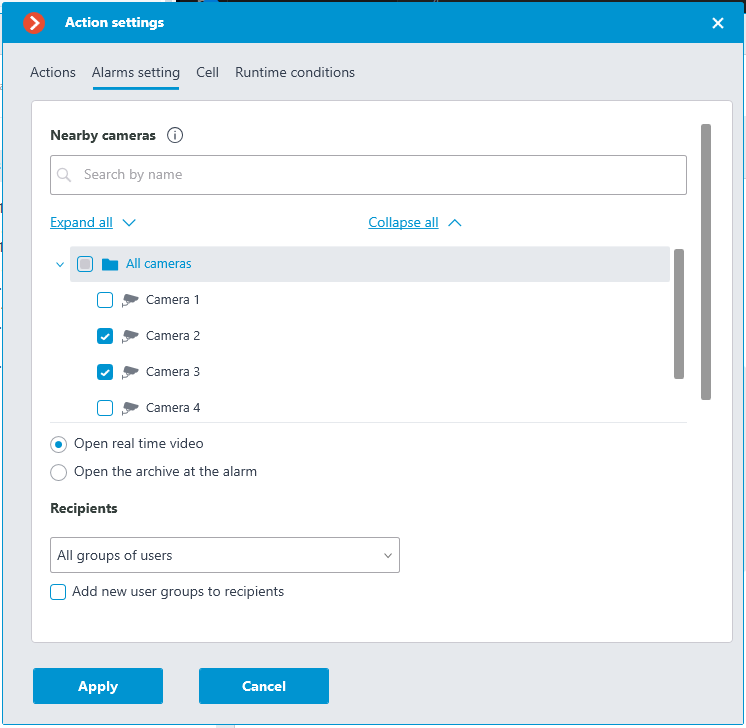
Nearby cameras: Selecting the cameras installed next to the camera where the alarm occurred. When an alarm occurs on this camera, the selected cameras can be opened in the client application in an optimal grid. For each alarm, a total of 262 such cameras can be defined.
After selecting cameras, it is necessary to specify how they will be opened. There can be two options:
Open real time video
Open the archive at the alarm
Recipients: A list of user groups that will be able to see the alarm.
Warning
An alarm event in the event log is not associated with any visual alarm indicators and is displayed to all users regardless of their group list settings. For more information about displaying alerts in the Eocortex Client application, see Alarms in the guard mode.
Note
When the Add new user groups to recipients option is enabled, all new user groups will be automatically added to the list of recipients of this alarm. If the option is disabled, new user groups will not receive this alarm.
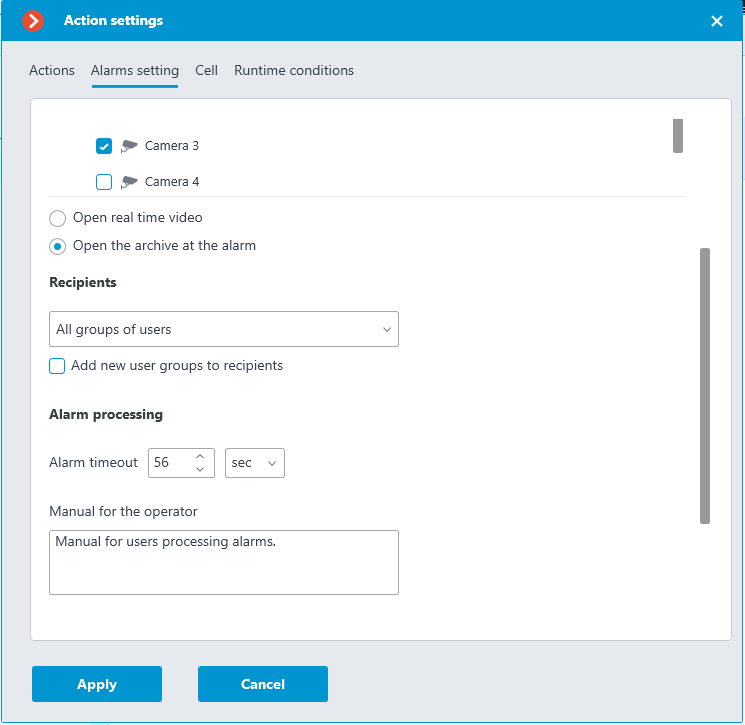
Alarm timeout: The time during which the alarm must be processed. After this time the alarm will be considered as missed.
Manual for the operator: Manual for users processing alarms.
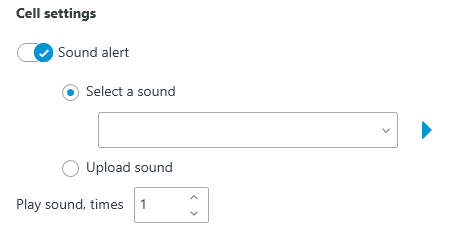
Cell tab🔗
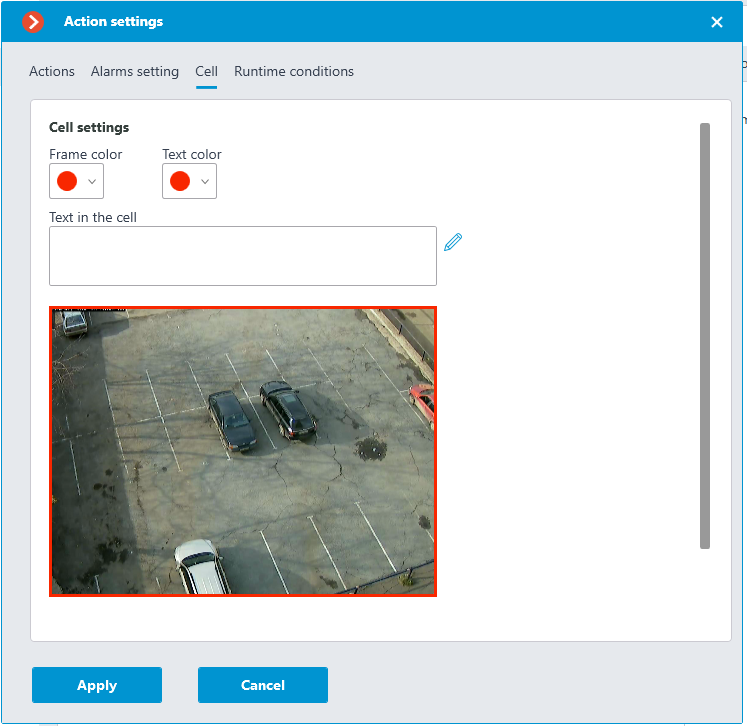
This tab configures how the alarm will be displayed in the client application: the frame cell color, the alert text color, the text itself. Also on this tab you can select one of the application-supplied sounds or upload your own sound file for sound notification.

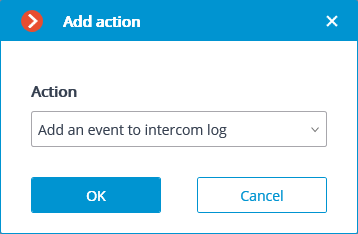
Add an event to intercom log🔗
Add the current door phone event to the Event log.
Run external application on server🔗
Launches an external application on the server.
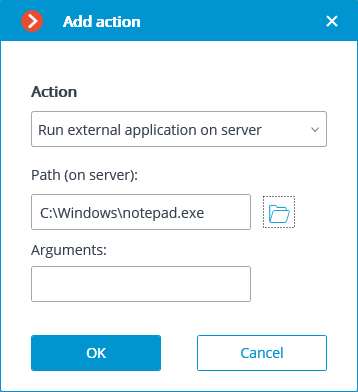
Warning
The Windows operating system does not allow the background services to launch the applications with graphical user interfaces. That is why such applications will not be launched from Eocortex Server using this action. At the same time, a record regarding the launch of the application will be made in the Eocortex Server event log, because the operating system prevents the independent execution of the application when attempted.
Action parameters:
Path:: sets the path to the application located on server.
Warning
The application to be launched must be located in the Scripts subfolder in the startup folder of Eocortex application. The application will not start if located in any other folder.
Arguments: to launch an application with the command line arguments, these arguments are to be entered in this field.
Set main stream for archiving🔗
Enables the mode of recording the main stream of the set time interval to archive. It is used in the case when the recording of alternative stream to archive has been set for the camera.
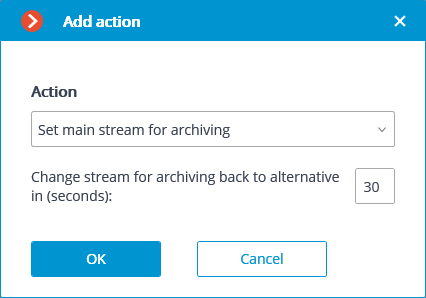
Action parameters:
Change stream for archiving back to alternative in (seconds): sets the period of time for which the recording of the main stream to archive will be enabled.
Disable frame skipping when recording to the archive🔗
Disables frame skipping when performing the recording of the preset time interval to archive.
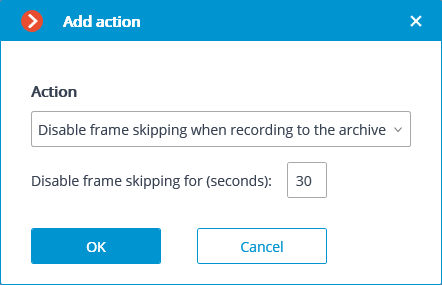
Action parameters:
Disable frame skipping for (seconds): sets a time interval for which the frame skipping will be disabled while recording to archive.
Open door Paxton Net2🔗
Sends a door opening command to Paxton Net2 access control system (ACS).

When setting up the action, configure the following parameters:
Paxton Net2 server address: IP address or domain name of the Paxton Net2 server
REST port: Port for sending REST API requests to the Paxton Net2 server (usually the same as SignalR)
Username: Name of the Paxton Net2 account used for connection
Password: Password of the Paxton Net2 account used for connection
Client ID: Identifier contained in the Paxton Net2 license filename
Door name: The door name as it is set in the Paxton Net2 ACS
Send HTTP request🔗
Sends an HTTP or HTTPS request to an external system with HTTP API.
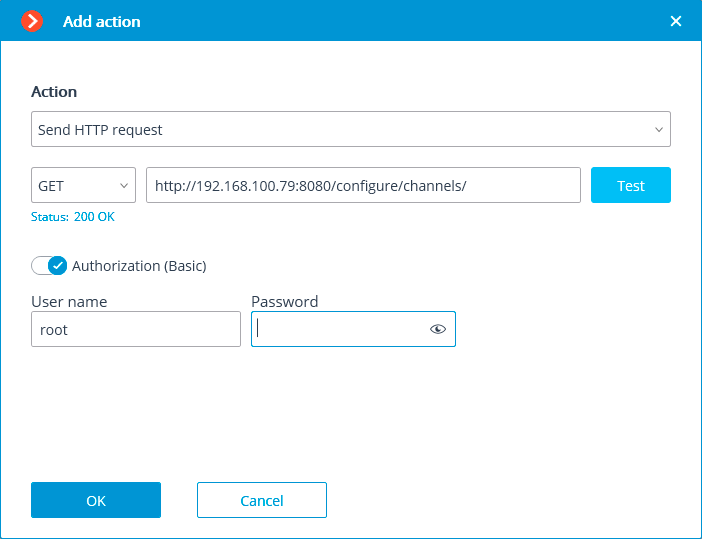
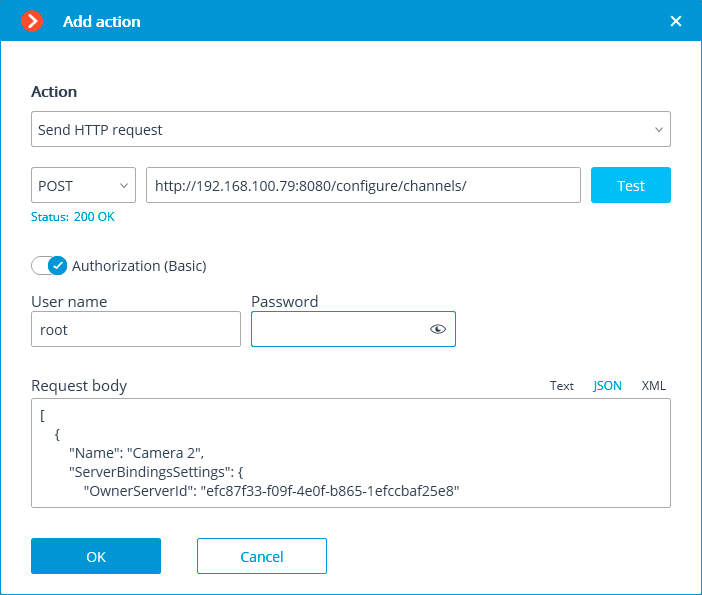
Action parameters:
The dropdown list allowing to select a request type: GET, POST, PUT or DELETE.
The field for entering the text of a request.
The Test button sends a request. The status of implementation of the test request is shown under the field with the text of the request.
The activation of the Authorization (Basic) option allows to specify the username and password for sending the request using Basic authorization.
The field for entering the body of a request.
Send Push notifications to mobile devices🔗
Sends Push notifications with the preset text to the mobile clients connected to servers.
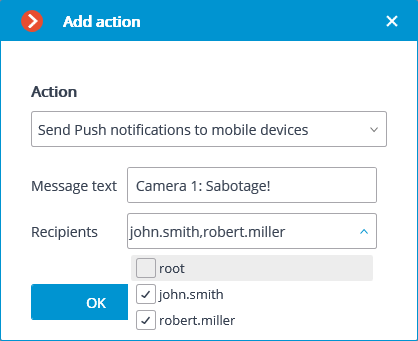
Action parameters:
Message text: allows setting the text to be sent in the notification.
Recipients: allows setting the recipients of the notification.
Send to messenger🔗
Sends a message through the connected messengers.
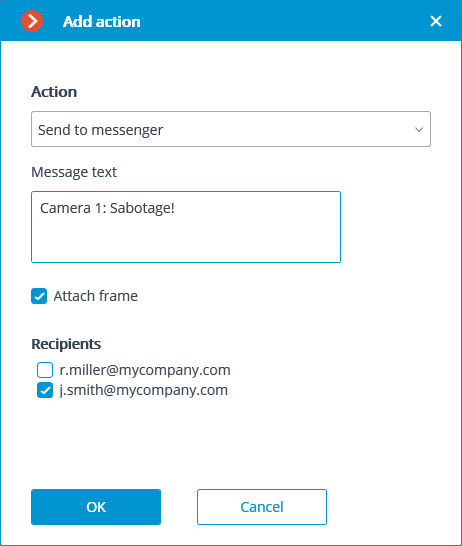
Action parameters:
Message text: the text of the message to be sent via messengers. Use of template variables is supported.
Attach frame: attaches the current frame.
Use frame from archive: a frame from the archive is attached.
Attach link to the map — the option that allows to attach a link to the location of the camera on the map to the end of the message text. For this purpose, the camera must be located on the map in the Maps section. The link will be sent to the service (Google, OpenStreetmap), which is configured in the system.
Recipients: the list of messenger users in which it is required to mark the recipients of the message.
Note
When sending messages created by the Face recognized event to the messengers, the image of a face from the archive at the moment of recognition will be attached to the message, and the reference image from the database will also be attached for comparison. Whereby, regardless of whether the Use frame from archive option is enabled or disabled, the archived image will be attached. At the same time, the message will not contain the image of the face if there was no corresponding image in the archive at the moment of recognition. Moreover, the message will be sent only in case the settings of the conditions of the execution of action by event contain Identified | Equal | Yes setting.
Send report by email🔗
Draws up a report and sends it by email.
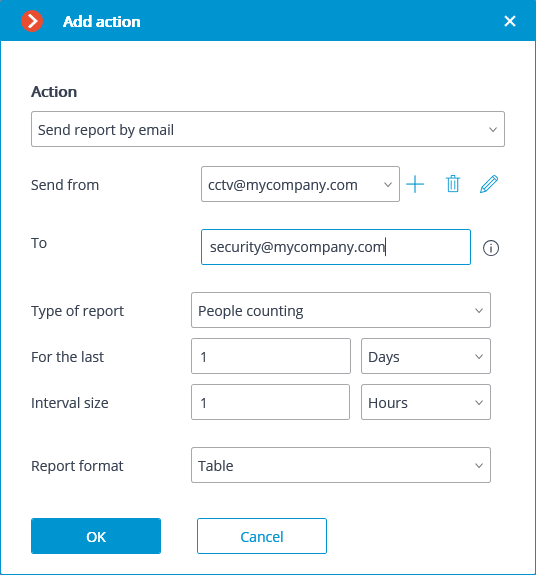
Warning
Settings for this action have been moved to the  Video analytics section.
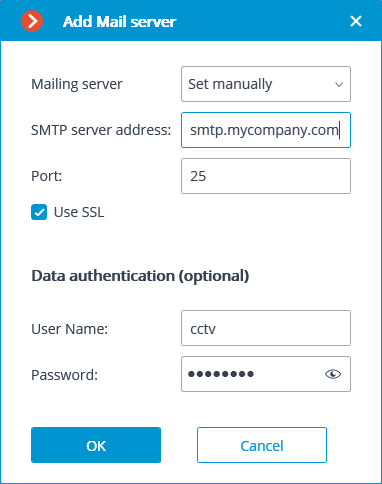
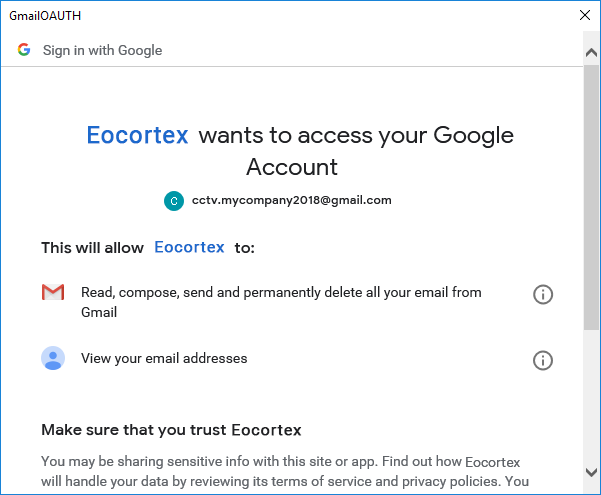
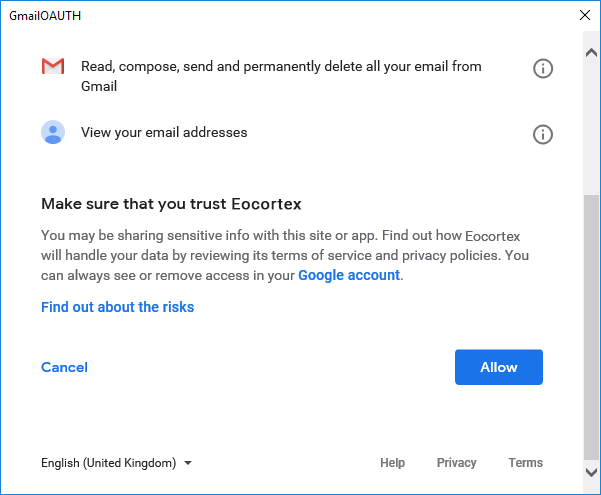
Send notification by email🔗
Sends an email notification from the server to the indicated address.
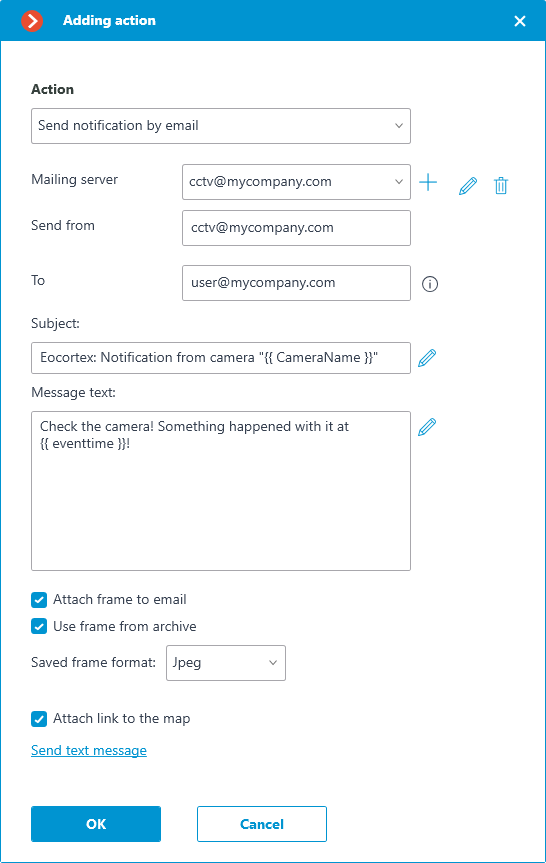
Action parameters:
Mailing server — connection settings with the SMTP server that should be used for sending messages. Allows to perform authorization to Google mail service, as well as to connect a custom SMTP server.
Send from — email address to be used for sending messages. Most often the value will be the same as the user name in the mail server settings window.
To — email address to which the messages will be sent.
Subject: — email header the recipient will see in the message right after the sender's name. Use of template variables is supported.
Message text: — text of the message to be sent to the specified address. Use of template variables is supported.
Attach frame to email — allows to add a frame from the channel taken at the moment of sending the message. The frame file format must be set: JPEG, PNG or BMP.
On the frame, a red frame will highlight the object when the message is sent in response to the following analytics events:
Face recognized
License plate recognized
Abandoned object
Inactive zone
Fire / Smoke
Checked for equipment
No face mask
Use frame from archive — frame from the archive will be used for sending instead of the real time frame. It allows to send more event-synchronized visual data, but causes additional server hardware load.
Attach link to the map — the option that allows to attach a link to the location of the camera on the map to the end of the message text. For this purpose, the camera must be located on the map in the Maps section. The link will be sent to the service (Google, OpenStreetmap), which is configured in the system.
Clicking the Send text message link will cause an attempt to send the message. Depending on the result, a window with a message confirming a successful transmission or an error will appear.
Below are the forms for adding a mail server and sender address, depending on the mail server type: Set manually or Google.
Note
The forms of editing the mail server and sender address are similar to the forms used for adding.
Warning
Changing the SMTP server parameters in the settings for a single action applies only to that action.

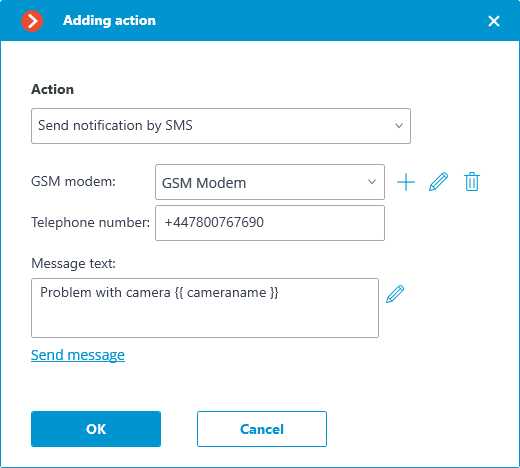
Send notification by SMS🔗
Sends an SMS notification using the GSM modem plugged into a USB port of the server to the indicated address.
Warning
Before using the GSM modem on the server, it is required to install the drivers supplied with the modem, then check the modem’s operability by sending a test message either with the software provided with the modem or using the operating system’s means. After checking the modem’s operability, it is required to close or stop the software used for working with the modem — otherwise the modem may become unavailable for use with the CCTV system.
Note
The number of the COM port to which the GSM is connected may be found in the Windows Device Manager or in the software provided with the modem.
Action parameters:
GSM modem: allows to set the modem to be used for sending SMS messages.
Below is the modem settings form. It is required to set relevant values there. These values are usually can be found or changed in the native software of a modem.
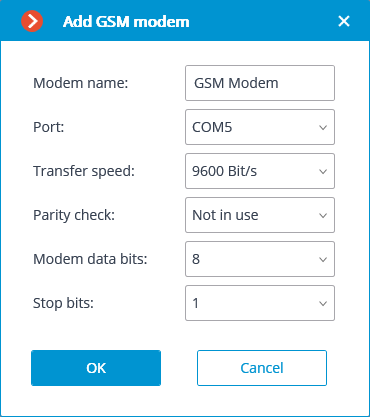
Telephone number: the number of the phone to which the SMS message will be sent.
Message text: the text of the message to be sent to the specified number. Use of template variables is supported. Clicking on the Send message link will attempt to send the SMS message. Depending on the result, a window with a message confirming a successful transmission or an error will appear.
Pause🔗
Allows to set a pause between the actions.
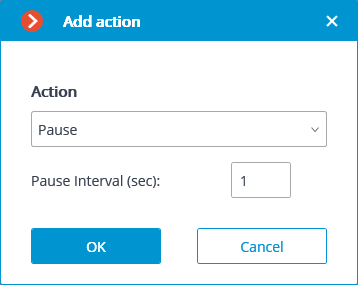
Action parameters:
Pause interval (sec) sets the pause duration.
Send signal to Camera output🔗
The electrical signal is sent to the IP camera’s signal output.
Note
To perform this action, it is required that the support of the signal outputs for this particular IP camera model is implemented in the Eocortex software. Contact Eocortex technical support team for further details.
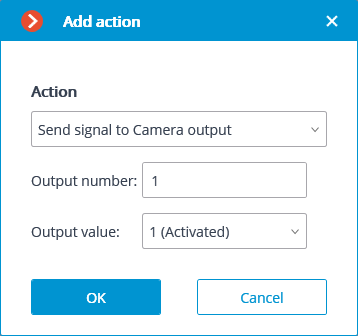
Action parameters:
Output number: sets the number of camera signal output.
Note
Value 0 or 1 is used for most cameras with one output.
Output value: sets the alarm output status: 1 (Activated) / 0 (Deactivated).
Note
Depending on the circuitry employed, different physical statuses of the contacts may correspond to the activation/deactivation of the signal output: circuit closed or opened, voltage present or absent etc. As a rule, the information on the wiring can be found in the engineering documentation for the cameras.
Save frame🔗
Saves a frame on the server.
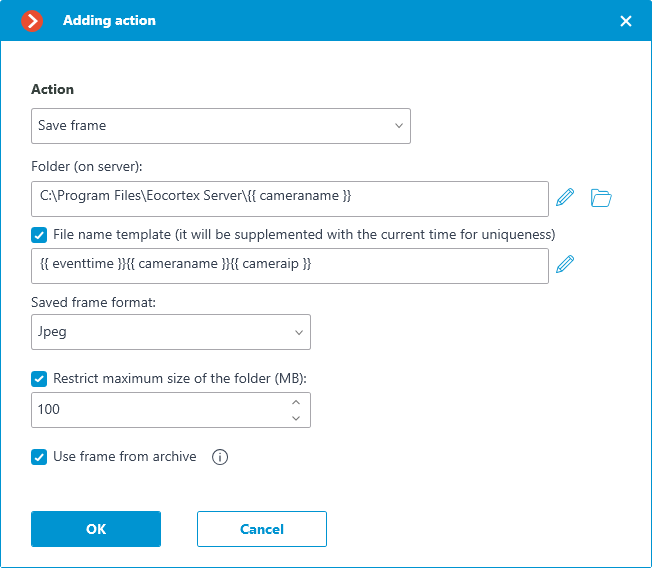
Action parameters:
Folder (on server): sets the path to the folder where the frames will be stored. Use of template variables is supported.
Warning
For servers running GNU/Linux, it is necessary to specify the full path. In this case, it is not allowed to save frames to system drives. For more details, see Technical features of Linux version.
File name template — the name of the saved frame, to the end of which will be added date and time in the format _dd_MM_yyyyy hh.mm.ss to provide uniqueness. If the template name is not specified, it will be formed by default from the name of the camera and the time of the event. Use of template variables is supported. For example, if setting up a template using the {{ cameraname }} variable, the name of the resulting file would be Office_01_11_2022 16.47.59.jpg.
Saved frame format: image file format (JPEG or PNG).
Restrict maximum size of the folder (Mb): allows to set folder size limit. Old files will be deleted when the maximum folder size is reached. If template variables were used in specifying the folder path, then the maximum folder size limit will be applied to the specific folder, the name of which is obtained after the template evaluation.
Note
Filenames will be formed as follows:
ChannelName DD_MM_YYYY hh.mm.ss.ttt.ext, where:
DD_MM_YYYY: day, month, year;
hh.mm.ss.ttt: hours, minutes, seconds, milliseconds
ext: jpg, png.
Use frame from archive — the frame saved in the archive will be used for sending. This allows sending visual information that is more synchronous with the event, but it leads to additional hardware resource consumption of the server.
Set camera position🔗
Puts a PTZ camera into a preset position. The particular preset position must be preliminarily set in the camera own settings.
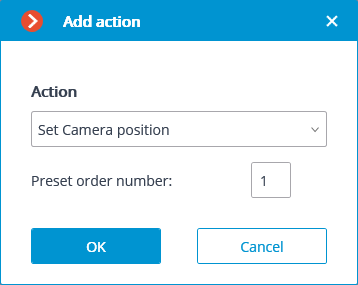
Action parameters:
Preset order number: sequential number of a preset is set.
Start the tour🔗
Starts a tour on one or more cameras.
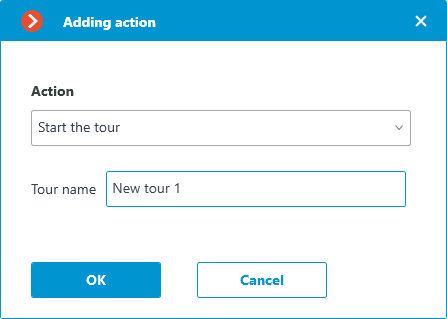
Action options:
Tour name: If the action is configured for a single camera, select the appropriate tour from the drop-down list in this field. If you are configuring an action for several cameras, you must manually enter the tour name in this field; in this case, if any of the selected cameras do not have a tour with the entered name, no action will be performed for that camera; no warnings or error messages will be generated.
Note
This action has a lower priority than the user action.
Stop the tour🔗
Stops a previously launched tour on one or more cameras.

Note
This action has a lower priority than the user action.