Alarms in the guard mode🔗
Alarm is a condition that requires attention. In Eocortex the alarm is always connected with a certain camera and appears in response to the system event or user action.
Warning
The camera will switch to the alarm state if Guard mode is enabled on the camera at the time of the event or action triggers the alarm.
Note
Guard mode and alarm notifications are set up and operated individually at each workstation, independently of other workstations.
Enabling guard mode🔗
Guard mode can be enabled as follows:
Automatically, by schedule. For this, configure the schedule (see Eocortex Client / Workstation settings / Sheduled Guard mode).
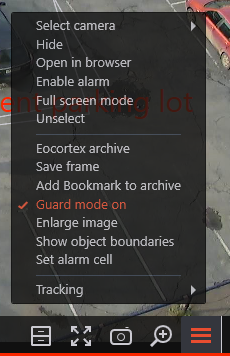
Manually, from the context menu of the camera cell. For this, enable the Guard mode on item in the context menu of the cell.
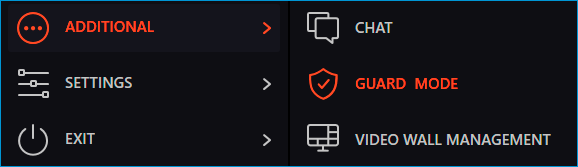
Manually, from the sidebar. For this, in the sidebar, in Additional select Guard mode.
In the opened window, select the cameras to be secured and then press Apply.
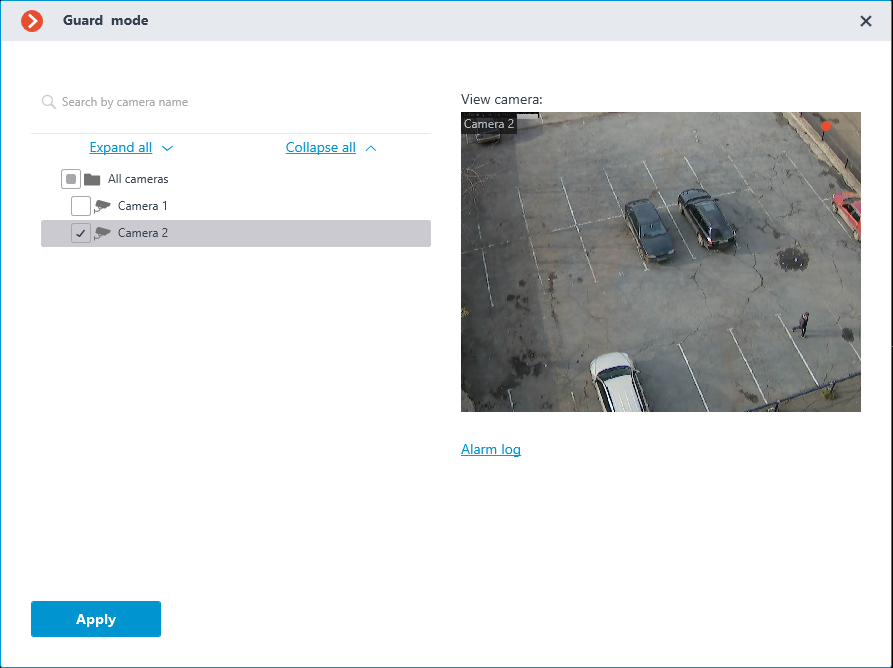
The Alarm log link opens the Events log filtered by alarms.
If the camera is set to the Guard mode, the  indicator will be displayed in the upper right corner of the cell.
Alarm generation🔗
The camera alarm is triggered as follows: (Guard mode must be enabled on the camera):
Automatically, when a certain event occurs on the camera or system, if alarm generation is configured for that event.
Note
The events that trigger alarms are configured by the CCTV Security System Administration
Manually, by clicking the on-screen button
 on the side panel to the right of the clock.
Note
Enabling the display of the alarm button and selecting the cameras which will generate an alarm when pressing the button is performed in the current workplace settings on the Interface and User alarm channels.
Manually, from the context menu of the cell
Manually, when executing a user task, if alarm generation has been configured by the CCTV system administrator for that task.
Display🔗
It is possible to use normal cells, alarm cells and alarm monitor for displaying cameras in the Alarm state:
Normal monitor: The monitor used to display the camera images in normal mode.
Normal cell: The screen grid cell on a normal monitor used to display the camera image in normal mode.
Alarm cell: The screen grid cell on a normal monitor. This cell refers for displaying the image from the camera with an alarm.
Alarm monitor: The monitor intended for displaying the image from the cameras with an alarm.
Possibilities and limitations of alarm monitor:
The maximum number of alarm monitors per workstation — not more than one.
The alarm monitor selects the optimal screen grid automatically. The optimal grid is the one that allows to display all cameras in the Alarm state with the minimum number of empty cells.
The alarm monitor supports the following screen grids: 1, 2×2, 3×3, 4×4, 5×5, 6×5, 6×6, 7×7, 8×8, 9×9, 10×10, 11×10, 15×10; 14×12; 16×16.
When an alarm triggers on one of the cameras with guard mode enabled, the alarm will be displayed in the Eocortex Client application as follows:
If the camera in the Alarm state isn't displayed yet, and the alarm cells or an alarm monitor are used in the workstation, this camera will be placed in a free alarm cell or in a free cell of an alarm monitor.
Note
If both alarm cells and alarm monitor are used, the camera in the Alarm state will be placed in both.
Note
Alarm cells and alarm monitor cells are considered free in the following cases:
If no camera placed in the cell.
If all alarms are accepted, ignored or expired.
After processing all alarms in the camera, this camera is not hidden from the cell, although the cell is considered as free.
Alarm notifications🔗
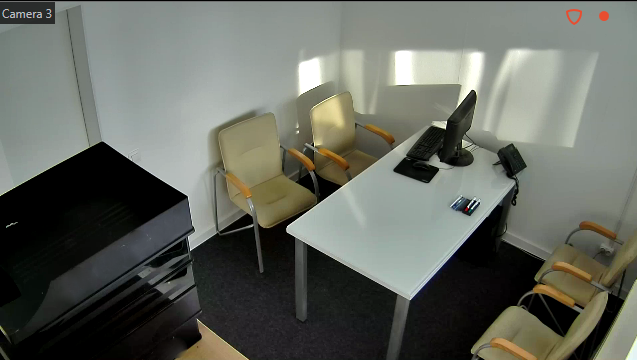
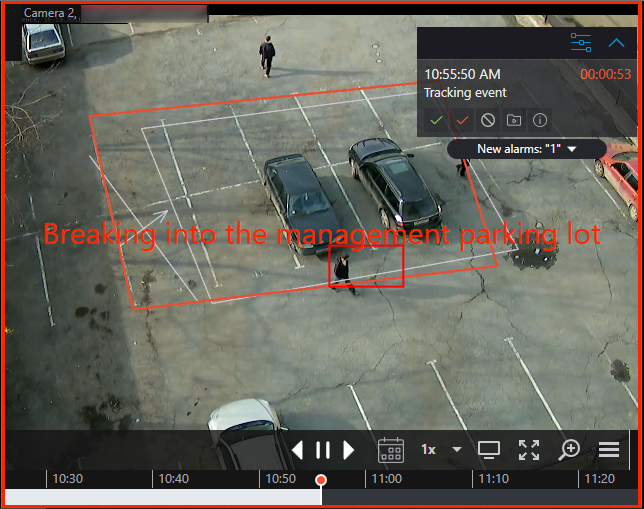
The camera cell in the Alarm state will be highlighted with a colored frame on the screen.
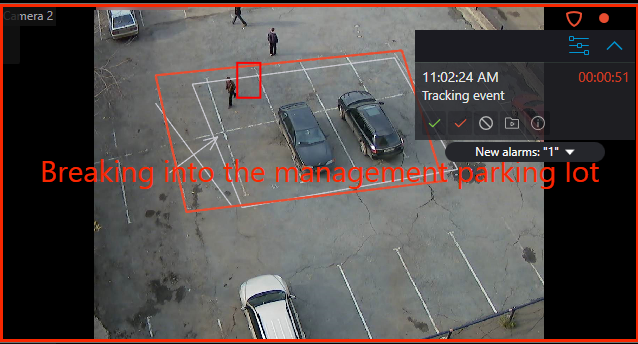
The alarm panel is displayed in the upper right corner of the cell.
Alarm panel allows:
Process (accept, mark as false and ignore) the alarms.
Switch to archive playback mode at the moment of the alarm triggering.
Display the cameras placed near the alarm triggered camera.
Such cameras are opened in an optimal grid, in which it is possible to work as usual: move cameras between cells, switch between live video and archive playback, work with alarms etc.
In order to return to the original view, it is necessary to either close the view with nearby cameras or switch to one of the available views.
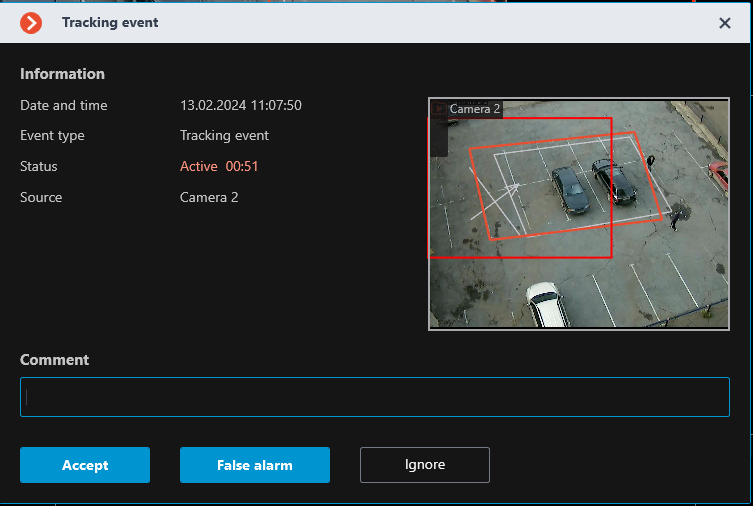
Open the alarm card.
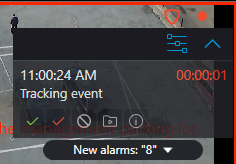
The alarm panel can be minimized to  icon. By clicking on the icon, the alarm panel will be opened.
It is also possible to expand a feed with all unprocessed alarms under the taskbar.
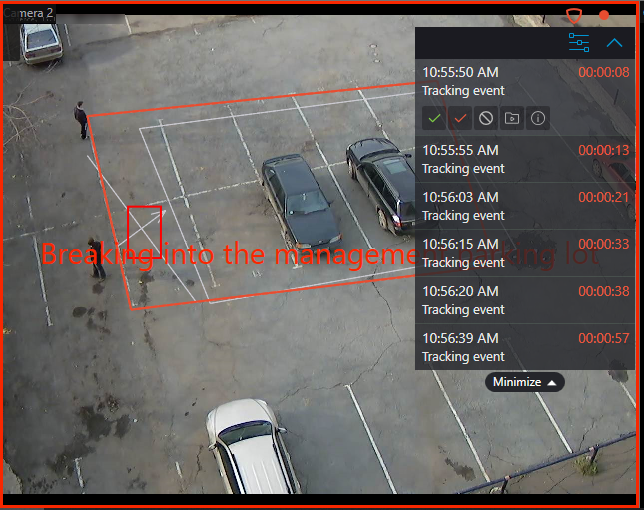
Depending on the settings, it is possible for the cell to output text describing the alarm, as well as frames and other graphic elements indicating the object or situation that triggered the alarm.
In addition to alarm visual notifications, it is possible to set audible notifications.
Note
The alarm parameters that are configured by video surveillance system administrator:
Requirements for the alarm processing.
Timeframe after which the alarms considered missed.
Alarms explanatory inscriptions and visual elements.
Nearby cameras list.
Predefined sound signals.
Note
Alarm parameters that can be configured by video surveillance system operator in the setting of the workstation (if authorized by the video surveillance system administrator)
Default sound signal.
Alarm processing🔗
Each alarm must be processed within the set time.
Processed alarms are accepted, marked as false or ignored alarms.
To process an alarm, it is necessary to press the corresponding button on the alarm panel located in the cell of the camera. The time remaining until the end of the alarm processing time is displayed on the alarm panel in the timer to the right of the alarm name.
Alarm processing settings may include requirements for users to comment on alarms as they are processed. The user must enter a comment and press the acknowledge button within the time limit for processing. After the time expires, the alarm will be missed and the acknowledge button will become unavailable.
An alarm not processed within the set time is considered missed.
If there are missed alarms, the  notification indicator appears in the lower right corner of the screen, clicking on it will open an alarm notifications list.

Clicking on the notification will open Events log, filtered by missed alarms.
Note
The requirements for alarm processing, including the time allotted for processing, are set by the video surveillance system administrator. The administrator can also prohibit certain user groups from marking false alarms and ignoring alarms.
If at one workstation the same camera in the Alarm state is displayed in several cells, including on different monitors, then after the processing of the alarm in one of the cells, the alarm will be automatically processed in the other cells.
If the one camera is in Guard mode at different workstations, alarms from this camera will be displayed at all workstations. In this case,
Alarms that are accepted or marked as false at one workstation will be identified as accepted or false at other workstations.
Alarms that are ignored at one workstation will continue to be unacknowledged at the other workstations.
Sound signal🔗
Audio files for notifications are stored in the Sound folder in root directory of the Eocortex Client application (By default: C:\Users\username\AppData\Local\Programs\Eocortex Client\Sounds).
Playback of the sound signal in case of alarm is carried out according to the following rules:
The audio file will be played regardless of whether the camera is displayed on any monitor or not.
Supported audio file formats: MP3, WAV.
Each new alarm initiates playback of the selected audio file from the beginning.
Note
It is recommended to avoid using long duration files and frequent generation of alarms of the same type when setting up tasks. Otherwise, the sound file will be interrupted with a new playback every time an alarm is generated.
Alarm cell🔗
To assign a cell as alarm cell, call the context menu and select the Set alarm cell item.
Warning
If the camera is configured to display an archive shift when generating an alarm, the date and time settings must be synchronized in the client and server devices.
Placement of the camera in the alarm cell is according to the following rules:
The maximum number of alarm cells per monitor is limited only by the maximum size of the view.
In case of alarm generation, the camera occupies the first suitable alarm cell in the order, following the order from left to right and from top to bottom.
When the alarm state is acknowledged, the camera continues to be displayed in the alarm cell until it will be replaced by another camera in the alarm state.
A camera without an alarm state can be manually assigned to the alarm cell, but it will be automatically replaced with a camera in alarm state if the need arises.
If alarm and regular cells are on different monitors of the same workplace, the camera opened in the regular cell on one monitor will also be opened in the alarm cell on the other monitor. The
alarm indicator will be displayed in both cells.If all alarm cells are occupied by cameras with active (not acknowledged) alarm state, the new camera will not be displayed.
If the Display only on the alarm monitor option is enabled on the client settings alarm mode, cameras will not be assigned to alarm cells.
Camera can be manually removed from the alarm cell by selecting the Hide item of the cell context menu.
Alarm monitor🔗
Warning
If the camera is configured to display an archive shift when generating an alarm, the date and time settings must be synchronized in the client and server devices.
If the Limit the display time of alarm camera on the alarm monitor option is enabled on the client settings alarm mode, the cameras will automatically hide from the alarm monitor after a set time since the alarm was generated.
If the camera is to be left on the alarm monitor, it can be pinned in the cell using the  button located in the upper right corner of the cell.
The cells must be pinned according to the following rules:
The maximum number of assigned cells is limited by the maximum number of alarm monitor cells — 256.
A camera that appears in the alarm monitor cell will not be automatically pinned to this cell.
A camera pinned to the alarm monitor cell will not be hidden by timeout.
If a camera is placed in a assigned cell, it will remain in that cell when the alarm is generated again.
When reducing the screen grid size, the assigned cell may change its position on the screen
When a cell is turned to full screen mode, switched to a video wall, forced to close or restarting the application, all cell pinning is reset.
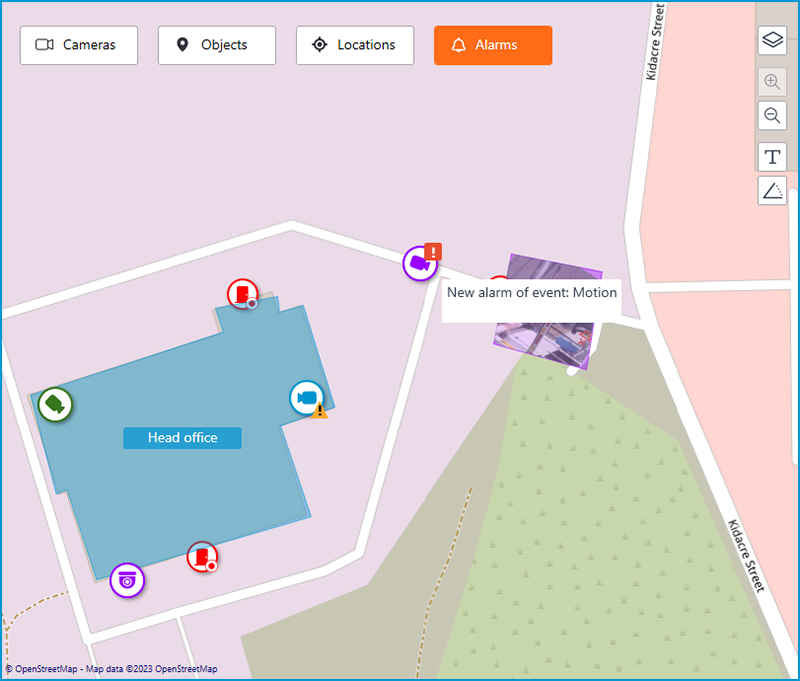
Alarms on maps and object plans🔗
Alarm indicators can be displayed on maps and object plans.
Hovering the cursor over an alarm indicator displays the event that triggered the alarm.
Note
When the connection with the camera is interrupted, the alarm indicator will be hidden. Alarm indicator will be displayed again when the connection is restored and if the alarm has not been accepted before.
Hotkeys🔗
For alarms and the guard mode in the workplace settings it is possible to assign the following hotkeys:
Open guard mode
Guard mode on/off
Acknowledge alarm
Mark alarm as false
Ignore alarm
Open alarm in the archive
Open the alarm card
Open cameras nearby