Basics of working with Eocortex Client🔗
To work with the Eocortex video management system on a computer running Windows, the Eocortex Client application is used.
Launch and login🔗
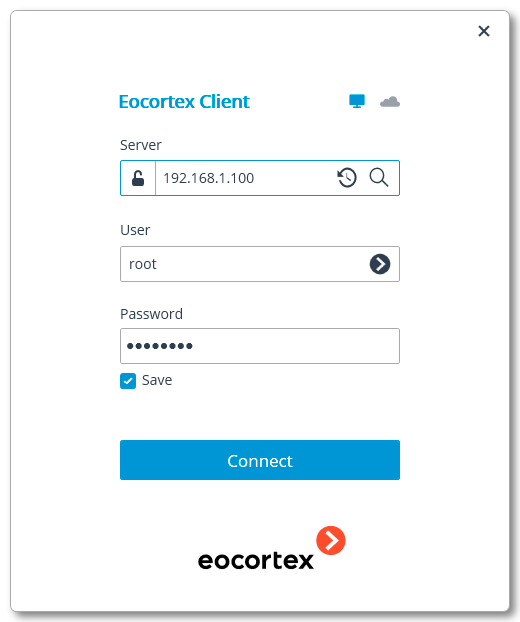
To start the work, launch the Eocortex Client application using the Eocortex Client shortcut on the desktop or quick launch bar. Another way to launch the application is to use the shortcut on the start screen or in the Eocortex group of the Start menu.
The authorization window will open. It is required to indicate the server address there in the Server field (or select the address in the dropdown list to the right of the input field) and the account type (only for Enterprise and ULTRA), username and password, then press the Connect button.
Account type:  Eocortex;
  Active Directory.
For Active Directory accounts, the user name is specified as: username@domain; where domain is the domain name, username is the name of the user in the domain.
Note
Registration under an Active Directory account is available not for all types of licenses.
Main window🔗
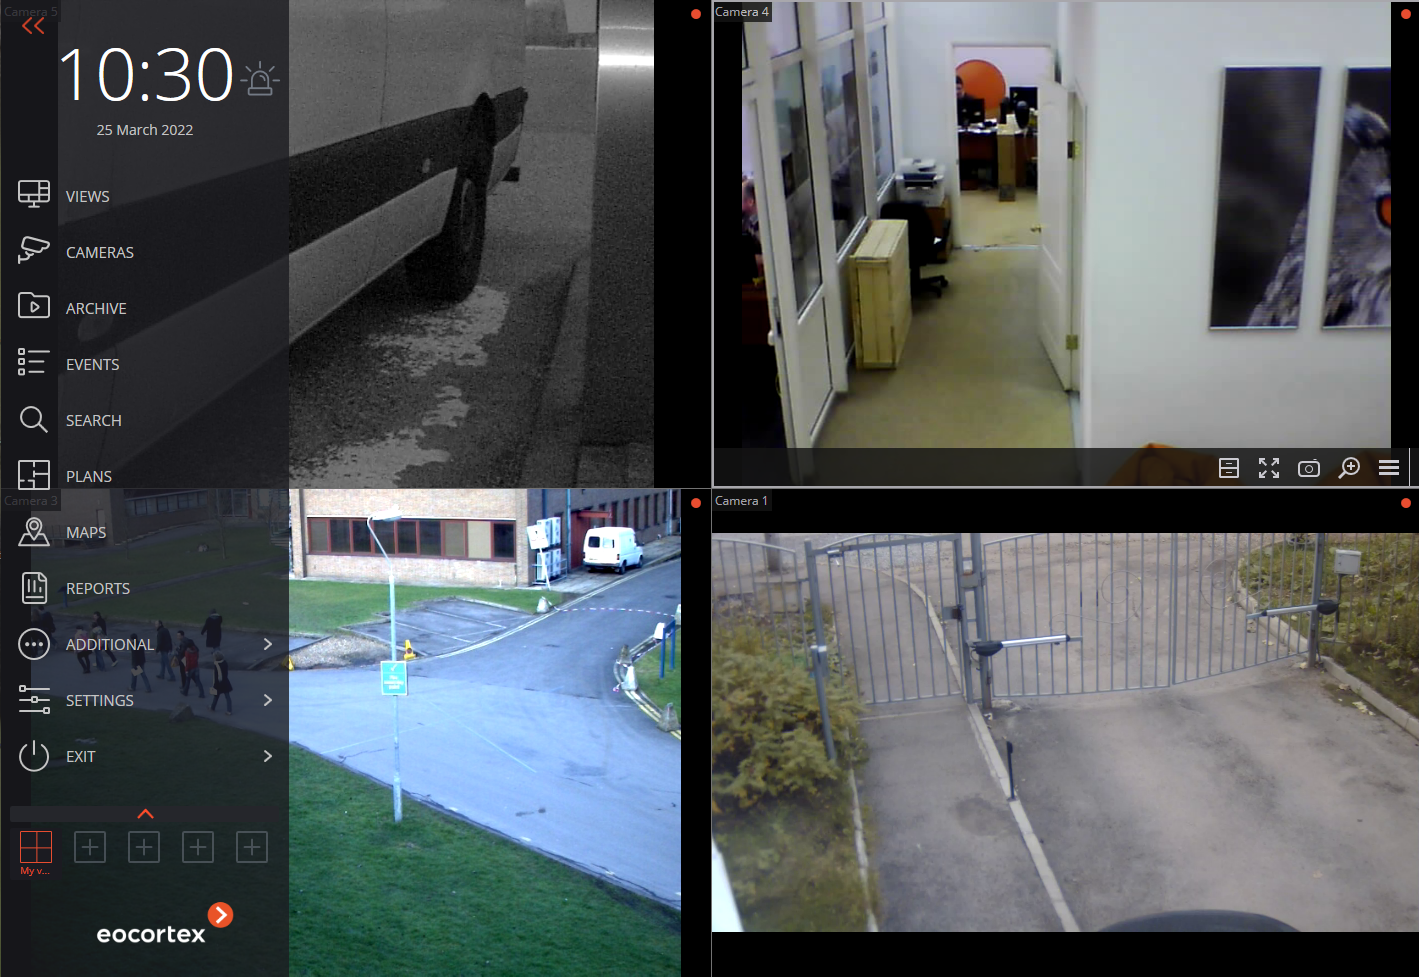
The main window of the Eocortex Client application consists of a workspace (where the channel grid is located) and a control panel (in the left part of the window).
Control panel🔗
In order to display the control panel, it is required to click on the  button located in the upper left corner of the window.
The clock and the user alarm activation button can be found in the upper part of the control panel. The items of the main menu are located under the clock. The view selection menu is in the lower part of the panel.
Note
Some items are only displayed when the corresponding features are available for the user.
The  Alarm activate/deactivate button that enables/disables the user alarm is placed to the right of a clock.
Note
The cameras for which the user alarm is enabled, the actions that are performed upon the activation of the user alarm, and the displaying of the Alarm activate/deactivate button are set in the workstation settings.
Below you will find the description of the control panel items:
 Views opens the Views page.
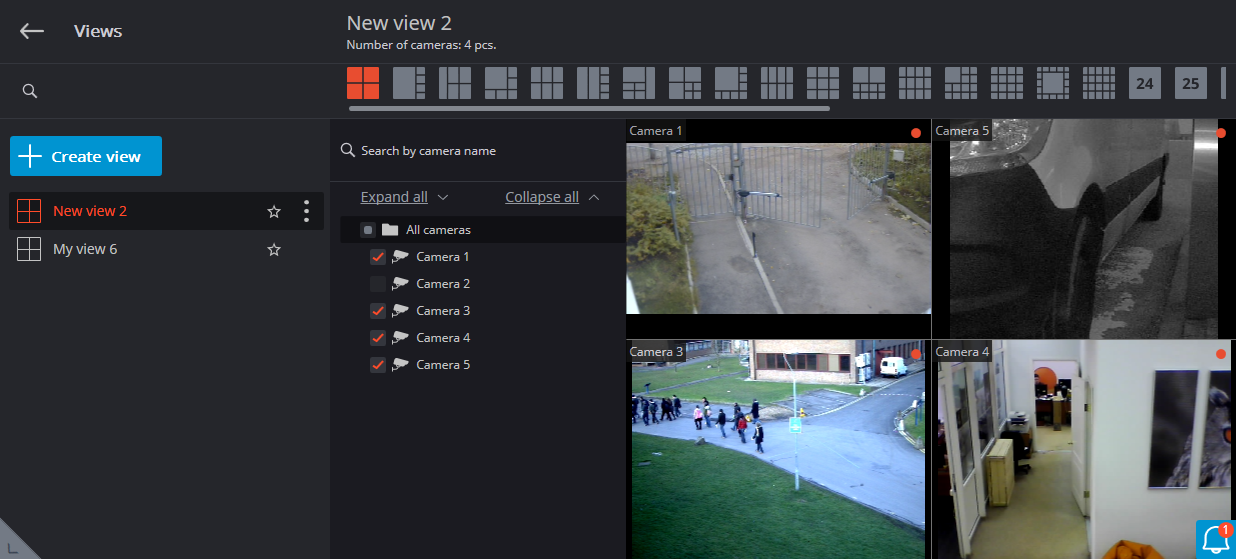
 Cameras item allows you to select the cameras you want to display on the screen.
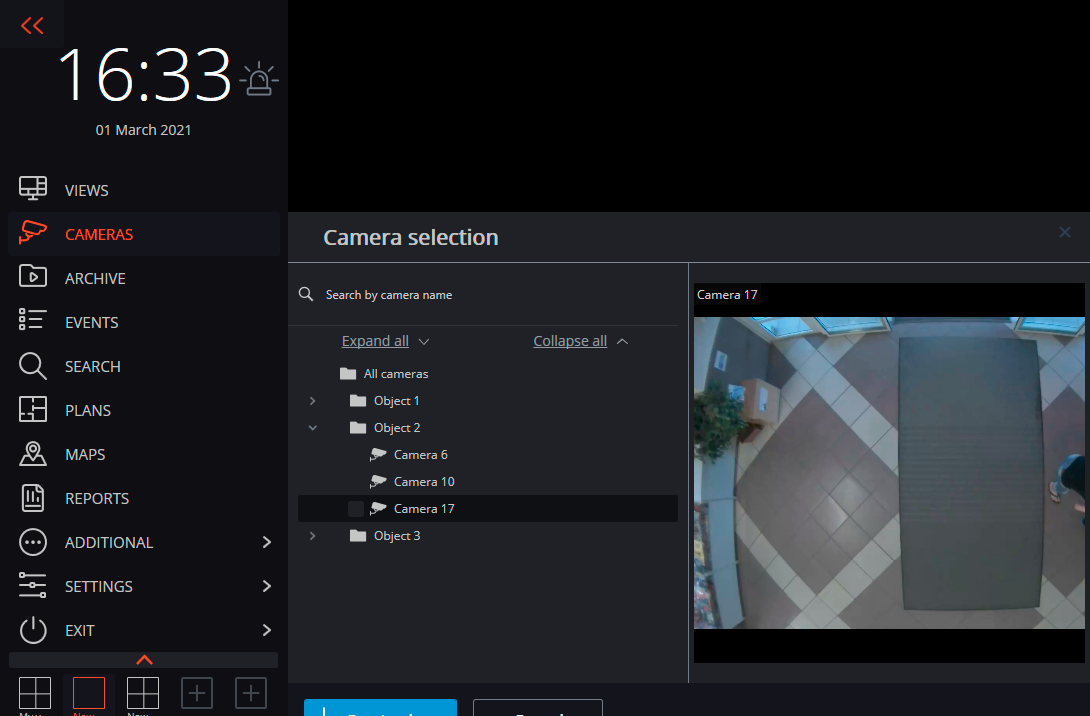
After selecting cameras, press the Create view button. That will display the selected cameras on the screen without names, using the most suitable grid.
 Archive opens the submenu that contains the following items:

Synchronous archive opens the Simultaneous viewing of archive of multiple cameras.
 Fragment mode opens the Fragment mode page.
 Archive bookmarks opens the archive bookmark log.
 Archive export performs export of the archive.
 Events opens the Events log.
 Search opens the Search for Objects and Face Detection.
 Plans opens the Site plans.
 Maps opens the Interactive Maps.
 Reports permits to create reports available for the current user.
 Additional opens the submenu that contains the following items:
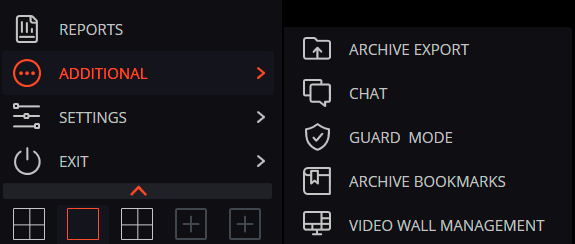
 Chat opens the internal chat.
 Guard mode allows setting up the guard mode.
 Video wall management permits to manage the video wall.
That submenu can also contain items that open the face and license plate recognition databases in case the corresponding modules are used in the system.
 Settings opens the submenu that contains the following items:
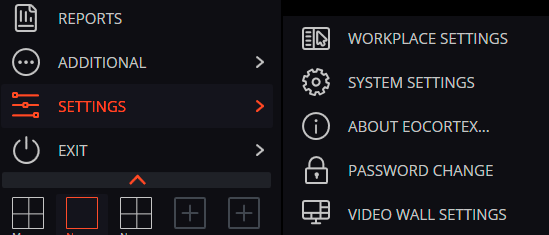
 Workstation settings opens the Current workstation settings.
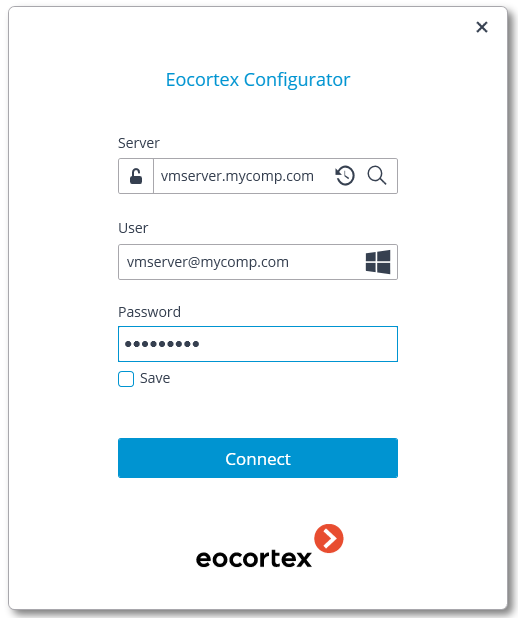
 System settings launches the Eocortex Configurator application.
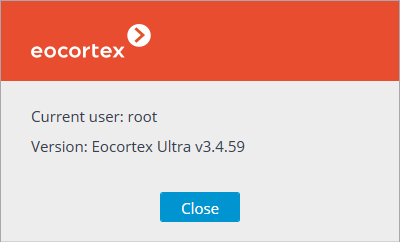
 About Eocortex... opens the information window.
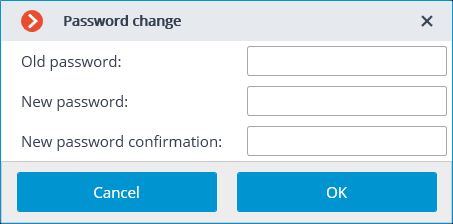
 Change password permits to change the password.
Video wall settings allows to set up the video wall.
 Exit opens the submenu that contains the following items:
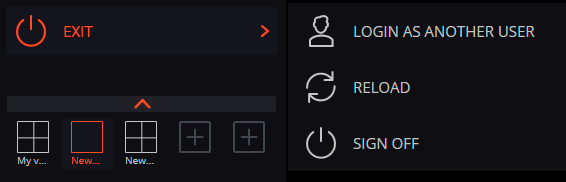
 Login as another user allows changing the user. When you select this item, the main window closes and the authorization window opens.
Sign off shuts down the application.
 Reload restarts the application without the necessity to perform a reauthorization.
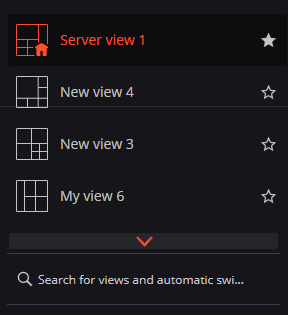
Selection of views🔗
In the lower part of the control panel there is a menu that permits to choose one of the preset screen views, or to activate the automatic screen view switching mode.
Note
Setting the server views and the automatic screen view switching lists is performed by the administrator of a video surveillance system in the Eocortex Configurator application. Client views are set up in the view editor.
Note
This menu does not display views and automatic switches that do not contain any cameras available for the current user.
Note
Views marked with an asterisk (*) are temporary and will be deleted when the application is closed or restarted.
Current view🔗
The cameras can be dragged between the cells of the current view by holding the left mouse button. If the view cell where the camera is being moved is occupied, the cameras swap their places.
One of the cells of the view can be active. The active cell is highlighted by a frame. To activate a cell, it is required to click inside it with the mouse.
By clicking in the empty view cell, it is possible to select a camera in the list that opens, or in the camera selection window.
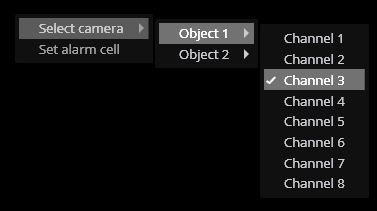
It is also possible to select a camera in the active cell using the context menu by opening it and choosing the Select camera item.
In live view mod, the camera cell can display informational messages instead of the camera image:
Waiting... — an attempt is being made to connect to a camera or server.
No connection — connection to camera or server is not successful.
Live viewing🔗
Note
To display the controls in a grid cell, you need to click inside the cell.
Note
All commands from the icons in the grid cell, can also be called from the context menu.
Note
Some of the icons appear only when the feature is set for the camera, and the current user has access to this feature. The system administrator sets the cameras options and access rights.
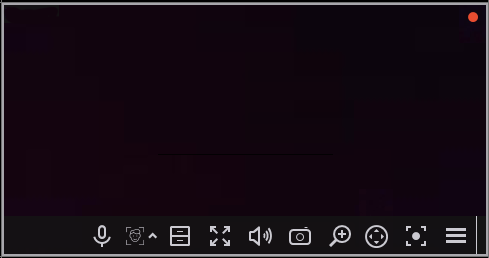
Recording to the archive indicator is displayed during the video recording to the archive.
Microphone allows to transmit sound from the client workspace microphone to the camera speaker. Click on the microphone icon to transmit the sound. The microphone can operate in two modes:
Hold — the microphone works while the button is held;
Switching on/off — by clicking the microphone is activated/deactivated.
Note
The microphone mode is set by the system administrator in the current workspace settings.
Archive — switches the cell to View the separate camera archive.
Full-screen mode — expands the cell full-screen; in full-screen mode — returns to the grid mode.
Note
The transition between the grid mode and full screen mode is also performed by double-clicking in a grid cell.
Save frame — Saves the frame (frame fragment).
Volume control — allows to adjust the sound volume, translated from the camera, and to enable or disable audio playback. Click on the speaker icon to display the volume control. If the design or the camera settings not allowed to broadcast the sound, as in the off playback the icon  is displayed.
Zoom image — performs the Image zoom.
Camera control interface — shows / hides the PTZ control.
Quick recording to the archive — switches the video recording from a camera to the archive for 15 minutes.
The context menu can be accessed in two ways:
by clicking
 in the lower right corner of the cell;
by right-clicking anywhere in the cell.
Note
The number of menu items may be different from below, depending on the settings of camera, archive and client workstation.
Cell context menu:
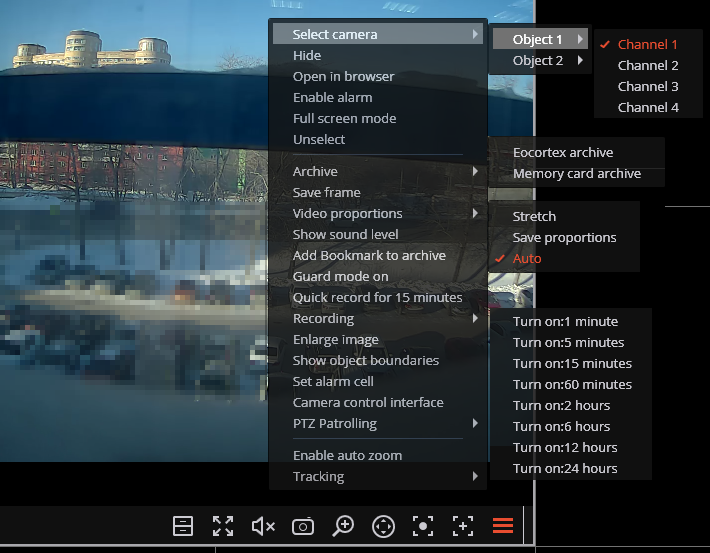
Select camera — allows selecting one of the available cameras to be displayed in a cell grid.
Hide — hides the camera (frees the cell).
Open in browser — opens the camera web interface in browser.
Enable alarm — Set the camera to the Alarm state.
Full screen mode / Exit Full screen mode — expands the cell full-screen; in full-screen mode — returns to the grid mode.
Note
The transition between the grid mode and full screen mode is also performed by double-clicking in a grid cell.
Unselect — removes selection from the cell (makes it inactive).
Archive — switches the cell to View the separate camera archive. The access to the following archive types is possible:
Eocortex Archive — the archive on Eocortex server.
Memory card archive — the archive on the camera memory card.
Save frame — Saves the frame (frame fragment).
Video proportions — allows selecting frame proportions.
Show sound level — displays the volume control element at the bottom of the cell.
Add Bookmark to archive — creates an Archive bookmark.
Guard mode on/off — enables/disables the Guard mode for the camera.
Quick record for 15 minutes — enables the compulsory video recording from the camera to the archive for 15 minutes.
Recording — enables the compulsory video recording from the camera to the archive for the time interval selected in the submenu.
Warning
Compulsory recording to the camera archive will be performed only if the system administrator has set the permission to do that for this camera and user.
Note
If the compulsory recording is enabled, the recording to the archive will be continuous during the specified time, no matter what recording settings are set by the system administrator for this camera.
Note
When the compulsory recording ends, the recording to the archive will be in the mode set by the system administrator for this camera.
Note
When the compulsory recording is enabled the Turn off recording (Remaining record time: XX min.) item will be displayed.

Note
Select this option to disable the compulsory recording.
Note
If Quick Recording to the archive for 15 minutes and Recording items are unavailable then the archive recording for this camera is already permanent or impossible.
Enlarge image — performs the Image zoom.
Show objects boundaries — enables the display of colored rectangular frames for moving objects (when using the software motion detector) and for detected faces (using face detection module).
Set alarm cell — the cameras in the Alarm state will be displayed in the alarm cells.
Camera control interface — shows the PTZ control.
PTZ Patrolling — setting the camera to the selected preconfigured position (Camera preset).
Note
The items associated with the intelligent modules activated for this camera are placed in the bottom of the menu. The description of these items is given in the sections describing the relevant intelligent modules.
Viewing the single camera archive🔗
To open the camera archive (from the real time view mode), click  in the active cell or select Eocortex Archive in the context menu: the cell will switch to the archive view mode.
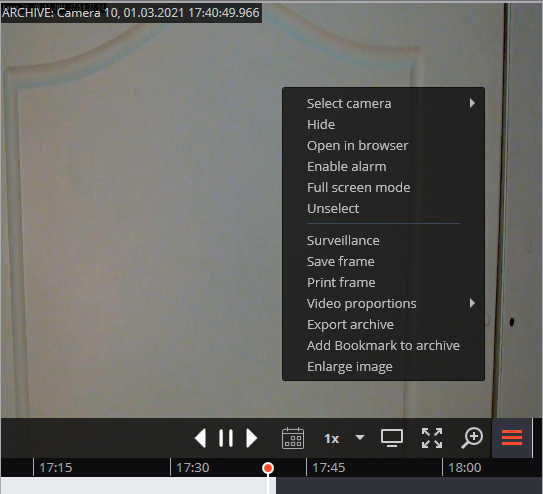
The controls available in the cell in a single camera archive view mode are described below:
Fragments panel — a timeline displaying fragments of video recordings saved in the archive of the selected camera. The vertical bar shows the place in the archive that is being displayed currently. To go to the required time moment, click on the corresponding point on the timeline. To shift the timeline backward or forward, click on it and, holding the mouse button, shift the scale in the required direction. The time scale can be changed by rotating the mouse wheel. Calendar allows going to a particular place in the archive by specifying the exact date and time.
Note
The fragments panel displays archive fragments in the local time of the computer on which the archive is being viewed. At the same time, the server stores the archive with the indication of Coordinated Universal Time (UTC).
Note
For example:
Note
On the server with UTC+03:00 time zone settings, the archive fragment was recorded from 12:00 to 12:05 local time.
Note
If the Eocortex Client application is running directly on the server (i.e., has the same time zone), then it will display this fragment on the timeline from 12:00 to 12:05.
Note
If the Eocortex Client application is running on a computer with the time zone settings UTC+05:00, then the fragment time on the timeline will be from 14:00 to 14:05.
Note
On the contrary, if the Eocortex Client application is running on a computer with the time zone settings UTC+01:00, then the fragment time on the timeline will be from 10:00 to 10:05.
Note
If the archive decimation feature is used for the selected camera, the decimated and non-decimated archive fragments will have different conventions on the timeline.

The playback control buttons are used to play the archive forward and backward, and to stop playback.
Calendar allows going to a particular place in the archive by specifying the exact date and time. Dates for which archive records are available are marked with hatching.
Playback speed — pressing this button opens a slider that allows user to set the archive playback speed from x0.1 to x120.
Note
For frame-by-frame playback, move the mouse pointer to the cell and scroll the mouse wheel (down is forwards, up is backwards).
Warning
Frames encoded in H.264 may freeze when playing backward because only key frames (intra-coded frames) are displayed. The reason is the specifics of H.264 codec: since for decoding intermediate frames it is necessary to keep the entire sequence of frames in RAM, starting from the last key frame, when playing backward, this may cause an unreasonable waste of computer resources.
Hide/show fragment panel — switches on/off the demonstration of the fragment panel in the camera cell.
Surveillance — switches the cell in the real time video viewing mode.
Cross camera tracking — transition to the Cross camera tracking window.
Note
Cross camera tracking is only available for cameras for which the Search for objects module is enabled.
Full screen mode / Exit Full screen mode — cell reversal full screen / return to grid mode.
Note
The transition between the grid mode and full screen mode is also performed by double-clicking in a grid cell.
Save frame — saves the frame (frame fragment).
Volume control allows adjusting the sound volume, translated from the archive, and enabling or disabling audio playback. Click the speaker icon to display the volume control. If the sound recording is not set for the archive, then the icon is displayed as in case of the disabled playback. This icon is displayed only when the sound recording to the archive is set for the camera.
The context menu can be accessed in two ways:
by clicking
in the lower right corner of the cell;by right-clicking anywhere in the cell.
Note
The number of menu items may be different from below, depending on the settings of camera, archive and client workstation.
Select camera — selects one of the cameras available for display in the grid cell.
Hide — hides the camera (frees the cell).
Open in browser — opens the camera web interface in browser.
Enable alarm — set the camera to the Alarm state.
Full screen mode / Exit Full screen mode — expands the cell full-screen; in full-screen mode — returns to the grid mode.
Unselect — removes selection from the cell (makes it inactive).
Surveillance — switches the cell in the real time video viewing mode.
Save frame — saves the frame (frame fragment).
Print frame — prints the frame (frame fragment).
Video proportions — allows selecting frame proportions.
Volume control — displays the volume control element at the bottom of the cell.
Export archive — transition to the Export archive window.
Add bookmark to the archive — creates an Archive bookmark.
Enlarge image — performs the Image zoom.
Set alarm cell — the cameras in the Alarm state will be displayed in the alarm cells.
Fragment mode: shows the archive as fragments.
Note
The items associated with the intelligent modules activated for this camera are placed in the bottom of the menu. The description of these items is given in the sections describing the relevant intelligent modules.