Cameras🔗
To set up cameras in the Eocortex Configurator application, you need to go to the  Cameras page.
Note
The Camera term in the Eocortex system has an extended interpretation because, in addition to cameras, one can connect video server and video encoder channels to the system, as well as video recorders, door phones, sound capture devices, thermal cameras, and digital to analog converters.
Warning
Not all the features of the devices are supported by Eocortex, even if such features are available in the Eocortex Configurator application.
List of cameras🔗
Note
A list of supported cameras and devices can be found at eocortex.com, on the Support / Supported Devices page. For information about support of additional camera functions (second stream, audio, PTZ, etc.), contact Eocortex technical support.
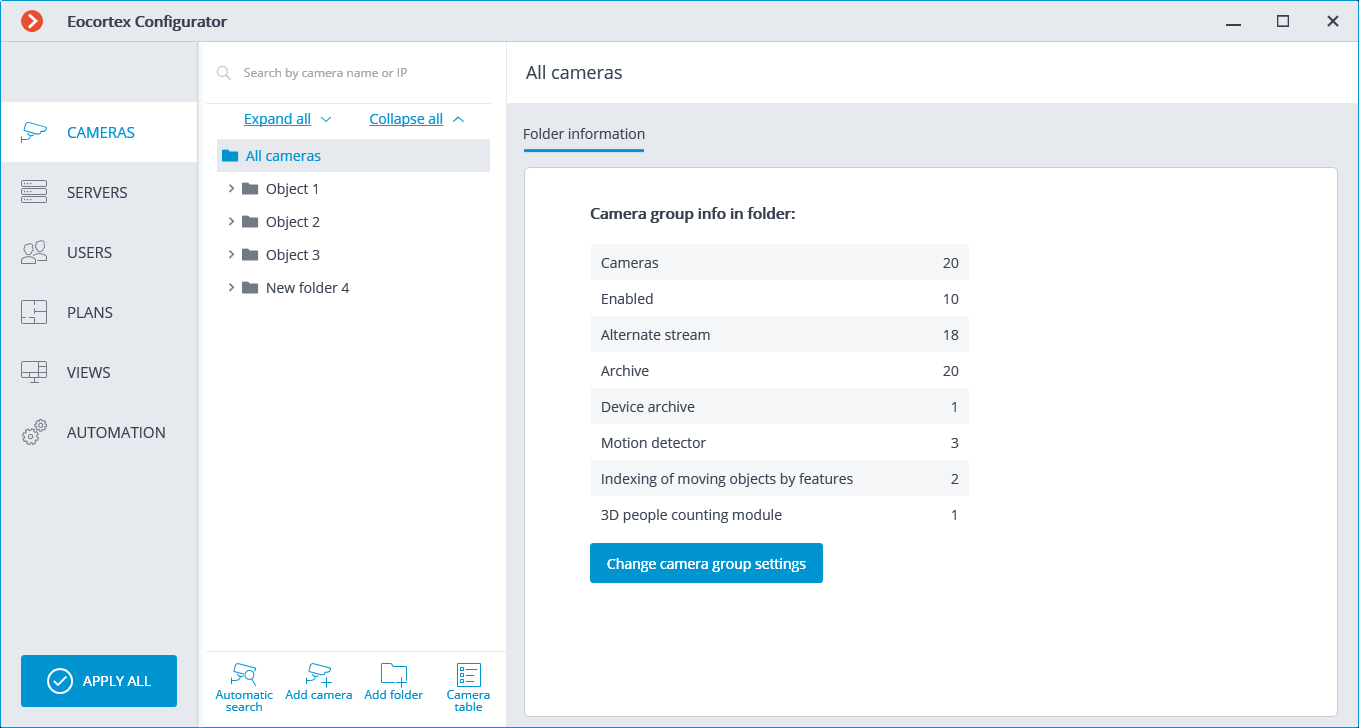
The list of cameras in the Eocortex system has a tree structure and uses Folders, which may contain cameras or other folders. Such hierarchy is easy to use for navigation through the list and for grouping cameras by various characteristics.
Note
In particular, it is possible to create a tree by the territorial principle; for example, City / Building / Floor / Room. Also, for convenience, on one of the levels of the tree, one can group the cameras by type, for example, Fixed, Controllable, Video recorders. Moreover, it is possible to group the cameras based on security principles, for example, Shared access and Restricted access.
Camera settings🔗
For setting up a particular camera, select it in the tree. The settings page of this camera appears in the right part of the window.
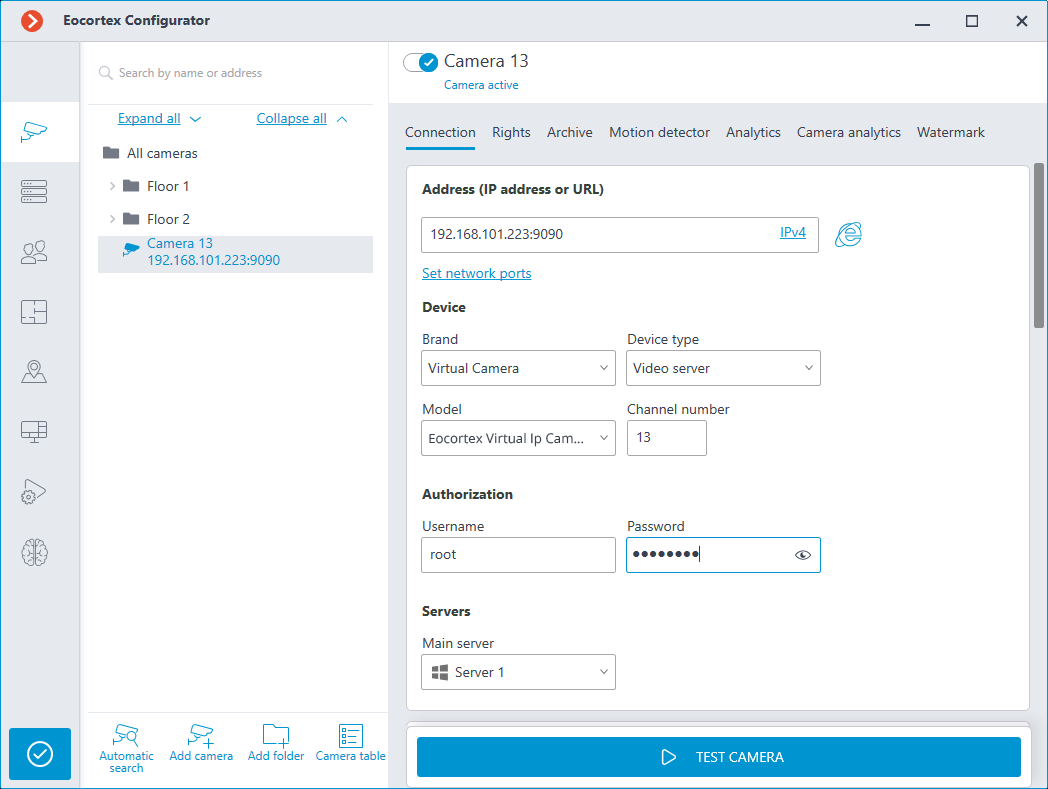
At the top of the camera settings page is the full name of the camera, including the path to it in the tree. To the left of the camera name is a  switch that allows you to disconnect the camera from the system without removing it from the tree.
Note
A disconnected camera is disregarded by the license protection.
For example, a single-server system has a license for 100 IP cameras, two of which have the ability to connect a face recognition module. There are 100 cameras connected to the server, including two cameras with face recognition. If 20 cameras are disconnected, including one with face recognition, then an additional 20 cameras can be connected, including one with face recognition.
The camera settings page also contains several tabs:
Connection setup: Camera connection settings.
Access rights settings: Camera access rights settings.
Setting up the archive: Camera archive recording settings.
Motion detector: Motion detector settings.
Video analytics setup: Video analytics settings.
Watermark: Watermark on video in a camera cell settings.
The set camera parameters are automatically displayed in the camera tree.

To hide the camera properties, click the  .
.
Filtering cameras by attributes🔗
To open filtering window, click the  button.

The camera tree can be filtered by the following parameters:
Camera settings: Shows only the properties that have been set on the cameras.
The filter can be in three states: the parameter is not considered  (by default); only cameras with the enabled parameter
  ; only cameras with the disabled parameter
  .
.

Video analytics: Shows only set video analytics modules.

Tags: Shows all set tags.

Actions🔗
To find cameras and folders in the tree, use the search field located above the list.
The commands that can be executed using buttons, the context menu, or shortcut keys are described below.
Warning
Hotkeys in the Eocortex Configurator application cannot be re-assigned.
Camera auto search,
 button: Performs the automatic search of the available cameras in the local network and connects them to the system.
Add camera,
 button or Ctrl+N: Adds a new camera to the selected current folder.
Add folder,
 button or Ctrl+Shift+N: Adds a new folder to the selected current folder.
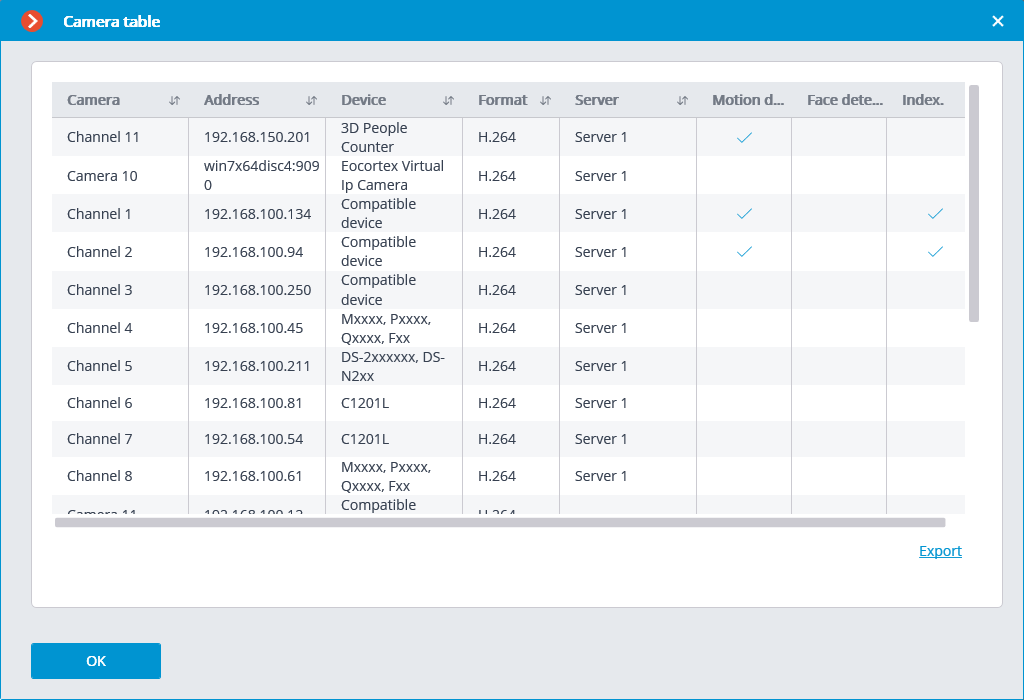
Camera table,
 button: Opens the table with the information about all the cameras connected to the system. The table can be exported to CSV, XPS and Excel formats.
Camera configuration export,
 button or F5: Saves the settings of a selected camera or all the cameras and folders within the selected folder to disk. The user sets the name and location of the destination file in the process of uploading.
Camera configuration import,
 button or F6: Loads the previously saved camera and folder settings from the disk. The loading is performed to the selected folder.
Warning
The loading of the camera settings file from the disk does not cause the deletion of all the current folders and cameras. Thus, if the same settings file is imported to the same folder twice, the uploaded files and folders will be duplicated.
Move to folder,
 button or Ctrl+M: Moves the selected items (cameras and folders) to another folder in the tree structure.
To move a camera, select it in the camera tree, click the Move to folder button, select the target folder in the opened tree structure window and click the Move button.
Note
To move several items, switch to group mode using the  button.

Create a group of cameras based on the selected one,
 button or Ctrl+Shift+G: Adds several new cameras in the specified range of IP addresses based on the selected camera.
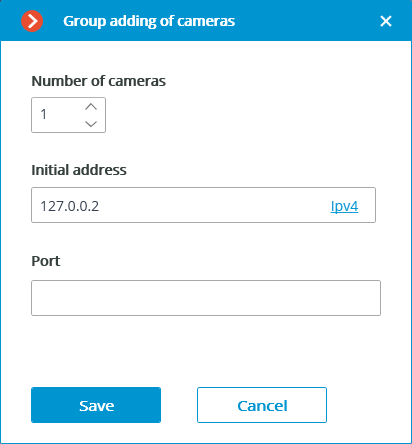
The maximum number of cameras that can be added is 999.
In the Initial address field, the IP address values are automatically assigned: IP address of the highlighted camera + 1.
For example, if the IP address of the selected camera in IPv4 format is 192.168.10.12, the Initial address field contains 192.168.10.13. It is possible to change the address if required.
Note
You can enter the Initial address in two formats: IPv4 and IPv6.
If the values exceed 254, the boundary number counter is increased by 1. For example, if the specified initial address is 192.168.100.254 and the number of cameras is 2, their addresses will be 192.168.100.1 and 192.168.101.2. Addresses with 255 and 0 are ignored.
Note
If the address of the selected camera is in IPv6 format, the following address is specified in the initial address field but in full format.
For example, if the address is [fe80::aecc:8eff:fe13:24f4], the settings window shows [fe80:0000:0000:0000:aecc:8eff:fe13:24f5].
Note
If the selected camera has a URL address, the Initial address field is empty. The URL address is not copied.
Note
Filling in the Port field is optional. When adding cameras, the default port is used.
Switch off camera,
 button or Ctrl+Q: Disconnects a camera. Removes it from the system but keeps it in the tree preserving all its settings.
Switch on camera,
 button or Ctrl+Q: Enables a camera. Adds it to the system.
Delete,
 button or Del: Removes the selected camera or folder.
Move up,
 button or Ctrl+W: Moves the camera or folder up within the parent folder.
Move down,
 button or Ctrl+S: Moves the camera or folder down within the parent folder.
Warning
After adding folders and cameras, the Move up and Move down actions may not work correctly. For proper operation, it is recommended to refresh the page or apply the configuration.
Warning
In group mode, the Move up and Move down commands can only be executed if 1 folder or 1 camera is selected.
Rename,
 button or F6: Allows to rename the selected folder or camera. To do so, type a new name and press Enter.
Copy,
 button or Ctrl+C: Copy camera or folder to the clipboard for its subsequent pasting.
Paste,
 button or Ctrl+V: Pastes camera or folder from the clipboard.
Cut,
 button or Ctrl+X: Copy camera or folder to the clipboard for its subsequent moving.
Enable group mode, F4: Enables group mode, allowing to configure cameras from different folders simultaneously.
Disable group mode, F4: Disables group mode, allowing cameras to be configured separately again.
Create new camera based on the highlighted one, Ctrl+G: Adds a new camera on the basis of the selected one.
Copy the RTSP address of the main stream, Ctrl+D1: Copies a URL to the clipboard that allows you to receive a main video stream from the camera.
Copy the RTSP address of the additional stream 1, Ctrl+D2: Copies a URL to the clipboard that allows you to receive the additional video streams from the camera.
Tags: Allows you to create and set up tags for cameras. Use the context menu to open the tag management window, sett the name and select the color of the tag. Click the Add button.

To delete a tag, hover over it and click the .

Note
When servers are combined into a multiserver system, tag lists for the cameras are unified. When one of the system servers is disconnected, the full tag list will be saved on each server.
Expand folder
 : Expands the selected folder.
Collapse folder
 : Collapses the selected folder.