Integration with Paxton Net2🔗
Eocortex is integrated with Paxton Net2 systems.
Eocortex allows obtaining Paxton Net2 events and register them in the event log, as well as to set up a response to these events in Eocortex.
It is also possible to set sending of an Eocortex event that initiates the opening of a door to Paxton Net2.
Note
Integration is available in version Eocortex 3.3 and higher.
Events log🔗
All received events from Paxton Net2 ACS can be viewed in the Eocortex Client Events Log.
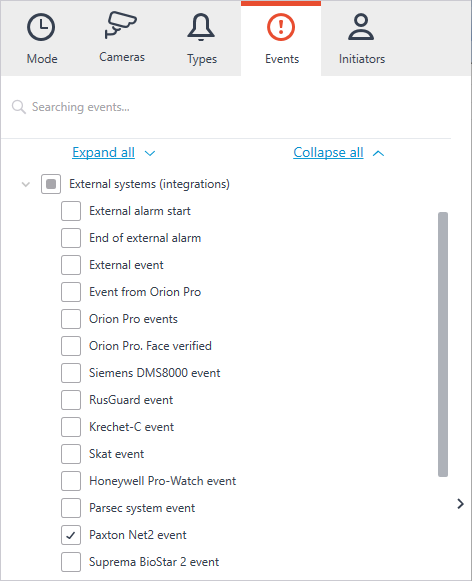
Additionally, Paxton Net2 events can be filtered in the Events log.
Configuring tasks by events🔗
To configure tasks performed in response to events occurred in the Paxton Net2 ACS, open the Eocortex Configurator application and go to the  Automation tab. Select an individual camera or entire folder in the camera tree and switch the Tasks by event tab on the page that opens.
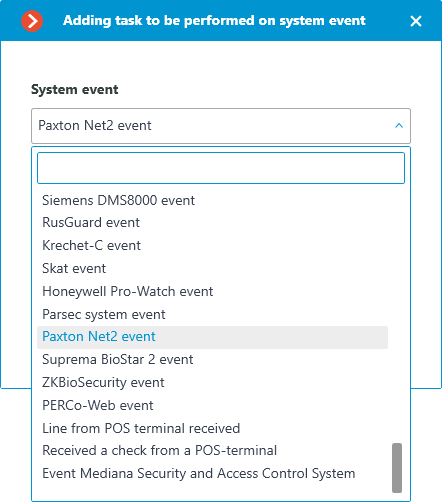
Create a new task by event with the Paxton Net2 event selected in the top field.
All standard actions are supported for creation of tasks by Paxton Net2 event.
The event allows setting up various runtime conditions required to met for execution. If several conditions are set, the action will be performed only if all of them are met. If no conditions are set, the action will be performed when any event from Paxton Net2 is received.
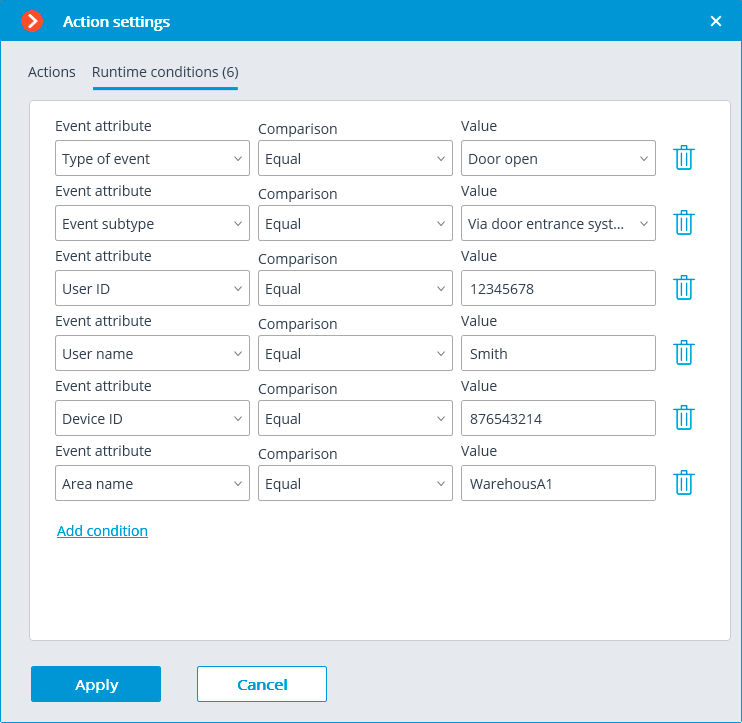
The following attributes are available as runtime conditions:
Type of event: select from the listed types of events used by Paxton Net2 ACS. The following types are available:
Door open (user action)
Door open
Door closed
Door did not open
Door unblocked
Event subtype: select from the listed subtypes of events used by Paxton Net2 ACS. The following types are available:
Open
Closed
Via network instruction
Via door entrance system
User ID: unique user identifier that is internal to the ACS;
Username: the name of the employee or visitor as it is set in the Paxton Net2 ACS;
Device ID: numeric identifier of the device as it is set in the Paxton Net2 ACS;
Area name: the string value of the zone name where the event has occurred as it is set in the Paxton Net2 ACS.
Configuring Open door Paxton Net2 action🔗
To allow the Eocortex server sending commands to Paxton Net2 ACS to open doors, run the Eocortex Configurator application and go to the Automation tab. Select an individual camera or entire folder in the camera tree. On the page that opens, depending on the desired type of task, go to the tab Scheduled tasks or Tasks by event and create a new task with the Open door Paxton Net2 action.

When setting up the action, configure the following parameters:
Paxton Net2 server address: IP address or domain name of the Paxton Net2 server
REST port: Port for sending REST API requests to the Paxton Net2 server (usually the same as SignalR)
Username: Name of the Paxton Net2 account used for connection
Password: Password of the Paxton Net2 account used for connection
Client ID: Identifier contained in the Paxton Net2 license filename
Door name: The door name as it is set in the Paxton Net2 ACS
Configuring events reception in the Eocortex Configurator application🔗
To allow the Eocortex server responding to the Paxton Net2 ACS events, run the Eocortex Configurator application and go to the Automation tab. Select the camera in the list and switch to the Integrations tabs on the page that opens.
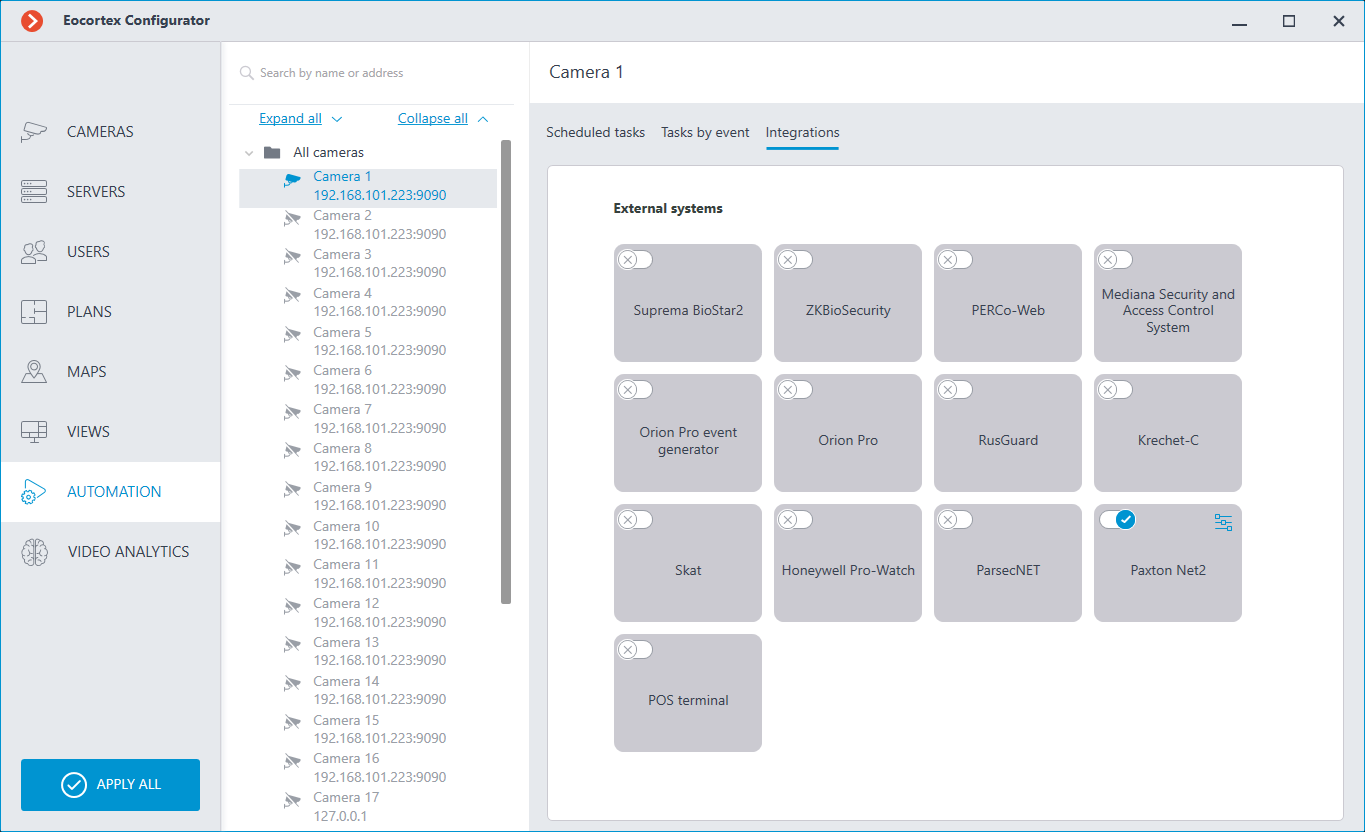
On the tab, enable integration with Paxton using  switch, then configure the integration by clicking
  button.
The following tabs are available in the integration settings:
General settings;
Camera settings.
General settings🔗
The General settings tab is used for setting up the connection to the Paxton Net2 ACS server.
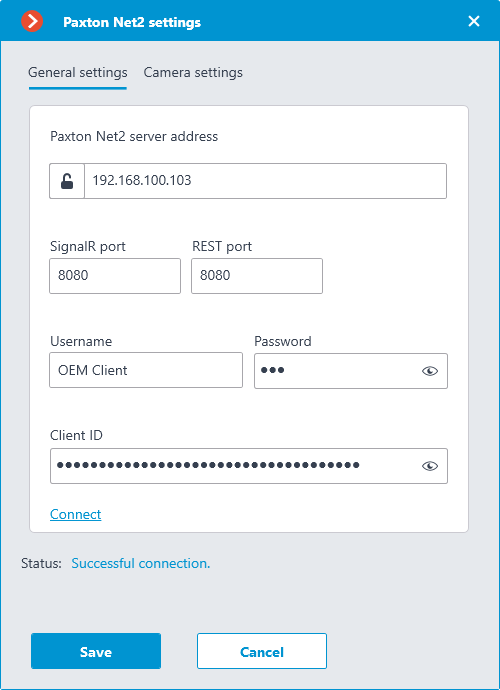
To configure the connection, specify the following parameters:
Paxton Net2 server address: IP address or domain name of the Paxton Net2 server
SignalR port: Paxton Net2 server connection port
REST port: Port for sending REST API requests to the Paxton Net2 server (usually the same as SignalR)
Username: Name of the Paxton Net2 account used for connection
Password: Password of the Paxton Net2 account used for connection
Client ID: Identifier contained in the Paxton Net2 license filename
To test the connection with the provided settings, click the Connect button. The Status section will display the result of the test.
If the connection is successful, further settings should be made on the Camera settings tab.
Camera settings🔗
The Camera settings tab is used for setting up the registration of events from Paxton Net2 objects in Eocortex.
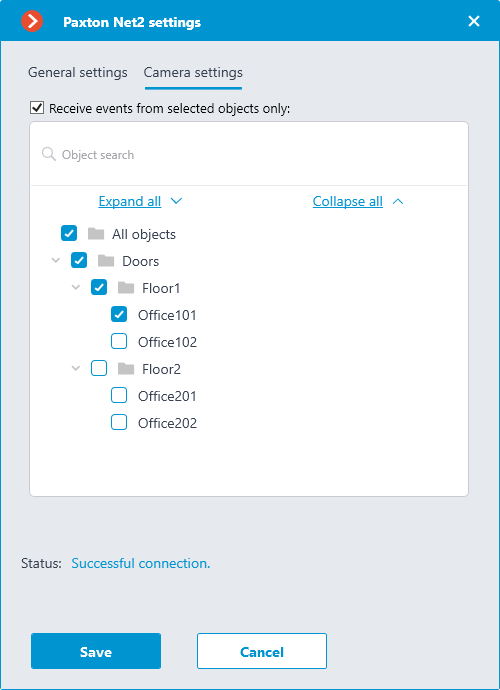
To receive events only from certain objects, enable the Receive events from selected objects only: option and check the selected objects.
If the Receive events from selected objects only: option is disabled, Eocortex will register all Paxton Net2 events as related to the selected camera.
Warning
Eocortex registers events for the camera independently of the settings of other cameras, so the same Paxton Net2 object can cause the reaction of the system and create an entry in the Events Log for multiple cameras simultaneously.