Technical features of Linux version🔗
Location of server files🔗
The essential files of the Eocortex server are located on the following paths:
Server folder: /opt/EocortexServer
Server logs: /opt/EocortexServer/Eocortex/Logs_EocortexServer
Server configuration: /opt/EocortexServer/EocortexServerConfigs
Automatic drive mounting when launching a server🔗
At startup, the Eocortex server automatically mounts all suitable drive partitions to the /mnt/{uuid} folder, where uuid is the universal unique identifier of the drive partition. This is done to ensure that when the system is rebooted, the Eocortex server can still write the archive even if the partitions have not been mounted by the user beforehand. It is not recommended to mount drive partitions and configure recording of the archive to them independently and without a particular need.
Automatic drive mounting is not performed for system drives, software RAID drives, etc, i.e. disks flagged as:
boot
esp
bios_grub
legacy_boot
msftres
irst
root
swap
raid
Eocortex only works with devices in /dev, so the only supported network storage option is iSCSI. NFS or SMB will not work.
The list of flags for a partition can be obtained by using the command:
parted -l
The following file systems are supported:
ext2
ext3
ext4
btrfs
reiserfs
ntfs
The file system can be identified by using the command:
df -Th | grep "^/dev"
Adding new drives to the system🔗
When manually adding a new disk to the system, it is required to physically connect the disk, format it and create a partition on it. After that, the Eocortex server will automatically mount this disk at startup, as described above.
fdisk utility🔗
Disks can be added manually with the fdisk utility:
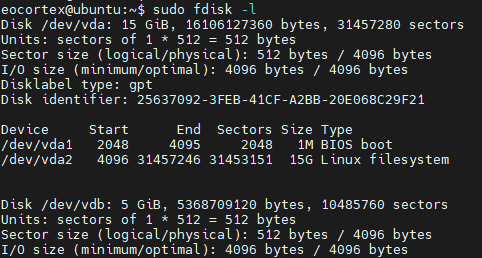
Check the information about the disk:
sudo fdisk -l
Create a partition on the disk:
sudo fdisk /dev/vbd
To further configure the default disk, enter the n character, then press Enter four times and enter the w character.
If necessary, the partitions and sectors can be configured at your discretion, following the requirements from the section above "Automatic drive mounting when launching a server".

Please note that the fdisk utility uses MBR (Master Boot Record) by default, which does not allow you to create a partition larger than 2 TB. To create a partition larger than 2 TB, you must use GPT (GUID Partition Table), that is, specify the g key at the very beginning of working with the disk.
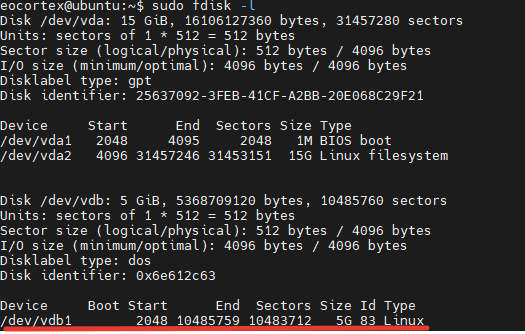
Check if the partition was created correctly:
sudo fdisk -l
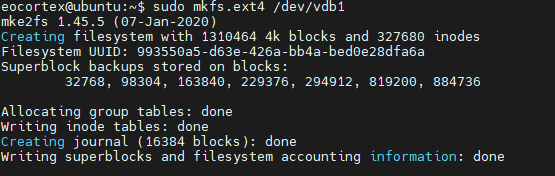
Create an ext4 file system in the new partition:
sudo mkfs.ext4 /dev/vdb1
Restart Eocortex:
sudo systemctl restart eocortex
Once restarted, set up the archive in the Eocortex Configurator application.
parted utility🔗
To create a partition larger than 2 TB, use GPT (GUID Partition Table). To create a GPT partition, use parted instead of fdisk.
Drives can be added manually with the parted utility:
Check the information about drives and partitions:
sudo lsblk
Example response:
NAME   MAJ:MIN RM  SIZE RO TYPE MOUNTPOINT
sda    253:0    0   40G  0 disk
└─sda1 253:1    0   40G  0 part /
sdb    253:16   0  100G  0 disk
The example represents two drives:
/dev/sda — system drive.
/dev/sdb — new data drive.
Run the parted utility to operate on the /dev/sdb drive:
sudo parted /dev/sdb
Example response:
GNU Parted 3.1
Using /dev/sdb
Welcome to GNU Parted! Type 'help' to view a list of commands.
(parted)
To view the current partition layout of a drive, enter the command:
sudo parted /dev/sdb print
Error: /dev/sdb: unrecognised disk label
Model: ATA VBOX HARDDISK (scsi)
Disk /dev/sdb: 107GB
Sector size (logical/physical): 512B/512B
Partition Table: unknown
Disk Flags:
(parted)
If the Partition Table parameter is set to "unknown", it means that there is no partition layout on the drive.
Set the GPT layout for partition tables using the following command:
mklabel gpt
Note
When changing the table layout of a partition, all data on the drive is deleted.
To view the current partition layout of a drive, enter the command:
(parted) print
Model: ATA VBOX HARDDISK (scsi)
Disk /dev/sdb: 107GB
Sector size (logical/physical): 512B/512B
Partition Table: gpt
Disk Flags:

Number  Start  End  Size  File system  Name  Flags
Set the drive measurement unit in sectors:
unit s
In the example below, a single partition will be created for the new drive, starting at 2048 and using 100% of the rest of the drive. To set the parameters, run the command:
mkpart test 2048s 100%
Example response:
mkpart opt 2048s 100%
To view information about the new drive partition, enter the command:
(parted) print
Example response:
Model: ATA VBOX HARDDISK (scsi)
Disk /dev/sdb: 107GB
Sector size (logical/physical): 512B/512B
Partition Table: gpt
Disk Flags:

Number  Start  End         Size        File system  Name  Flags
 1      2048s  209713151s  209711104s               test
To close the parted utility, enter the command:
(parted) quit
Example response:
Information: You may need to update /etc/fstab.
To view information about a drive partition, run the command:
sudo lsblk
Example response:
NAME   MAJ:MIN RM  SIZE RO TYPE MOUNTPOINT
sda    253:0    0   40G  0 disk
└─sda1 253:1    0   40G  0 part /
sdb    253:16   0  100G  0 disk
└─sdb1 253:17   0  100G  0 part
For the /dev/sdb drive, the created /dev/sdb1 partition is displayed.
Create an ext4 file system in the new partition:
sudo mkfs.ext4 /dev/sdb1
Restart Eocortex:
sudo systemctl restart eocortex
Once restarted, set up the archive in the Eocortex Configurator application.
Note
When adding a drive with an existing partition to the system, no additional settings are required.
Warning
The Eocortex server only works with drives that have been partitioned. On drives with no partitions but with a file system, the correct operation of the application and the archive is not guaranteed. To use such a drive, follow the steps described above, as when adding a new drive to the system. Note that in this case, the data on the drive will be erased.
Operating aspects of Firebird database🔗
After installing the Eocortex server, a situation may arise when writing to the archive is being performed but the database is absent (that is, the events are not saved in the log). This can happen after the drive for writing the archive to has been mounted in the user's folder. To solve this issue, it is necessary for the operating system user under whose credentials the database is accessed (the user firebird) to provide read access at the mounting point of the drive to which the archive is written.
This can be achieved using two methods described below.
Remounting the drive for writing to the archive in the system folder rather than in the folder of the current user.
Checking the path from the root (/) to the mounting point of the drive. The user firebird must have read access for every directory. It is possible to view directory permissions using the command:
sudo ls -l
Note
The user firebird belongs to other users.
To give the user firebird a permission to read the current directory, use the command:
sudo chmod o+r
Warning
The second method should be used only when it is required to mount the drive in the selected folder, or when it is not permitted to change the mounting point.
Saving frames to drive🔗
In the settings for saving frames to drive (by schedule, in response to a system event, or by user command), it is necessary to specify the full path to the directory where the frames are to be saved.
Warning
Saving frames is allowed on any drive except the system drive.
If the frames are not saved, ensure that the drive selected for saving is not a system drive (see the section Automatic drive mounting when launching a server above).
For example, to save frames to an archive drive, it is necessary to determine the full path to it using the following command:
ls -la /mnt/
The list will contain a directory named after the drive's UUID.
Next, a directory should be created to store the frames. For example, camframes:
sudo mkdir /mnt/1aa5a91e-4456-4e6e-842e-3ef45946581e/camframes
The resulting path should be added to the action settings Save frame:

Access to cameras by domain names🔗
By default, Linux prioritizes IPv6 addresses when resolving a domain name. Some camera plugins in Eocortex may not work with IPv6 addresses.
To solve this issue, it is required to add the following entry to the file /etc/gai.conf:
precedence ::ffff:0:0/96 100
As a result, when resolving all domain names, preference will be given to the IPv4 addresses.
If it is required to set an IPv4 address for a specific name, it is possible to add a corresponding entry to the file /etc/hosts. For example:
192.168.100.1 cam-1.mycompany.com
Server shutdown and restart🔗
The commands that control the state of the Eocortex server are shown below.
Server shutdown:
systemctl stop eocortex.service
Server launch:
systemctl start eocortex.service
Server restart:
systemctl restart eocortex.service
Server status check (active/inactive):
systemctl status eocortex.service