Configuring the License Plate Recognition module🔗
To use the module, enable and configure it.
To do that, launch the Eocortex Configurator application, go to the  Cameras tab, select a camera in the list located on the left side of the page, then go to the Analytics tab on the right side of the page, and enable the module using the
  switch.

Clicking the  button opens the module setup window.
The module settings description is provided below.
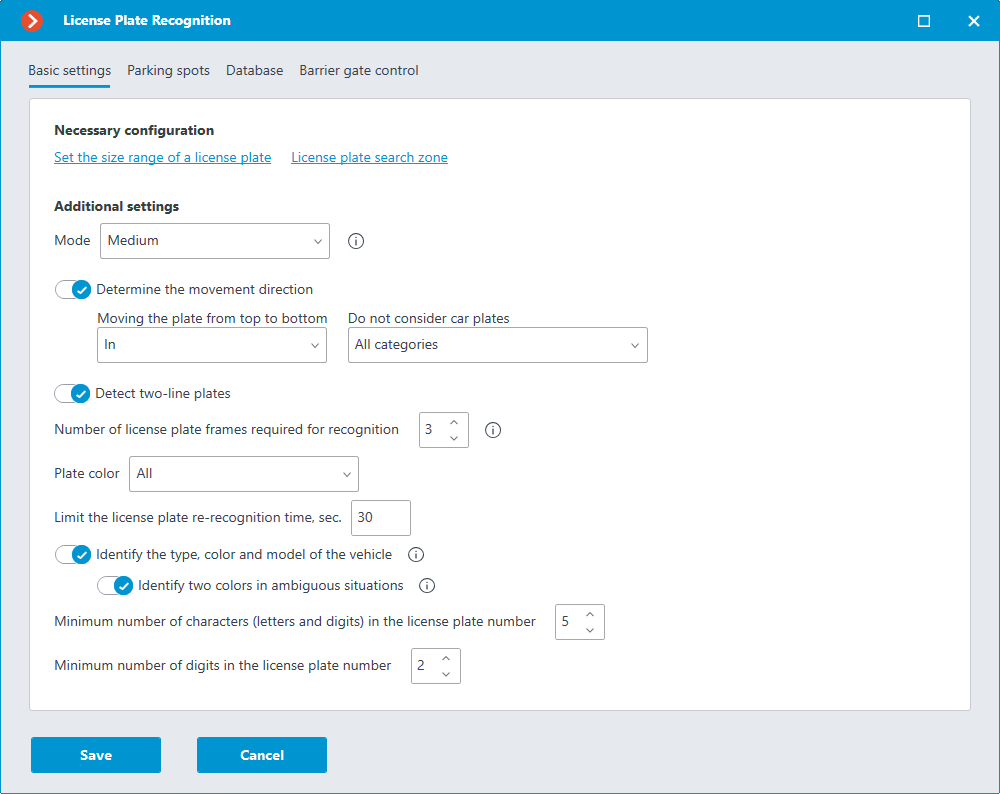
Basic settings🔗
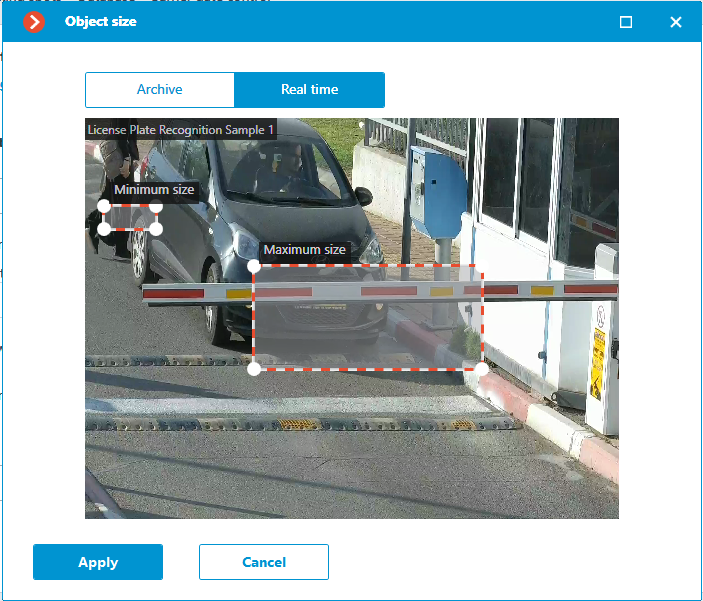
Set the size range of a license plate: Opens the settings window for the minimum and maximum width of recognized license plates.
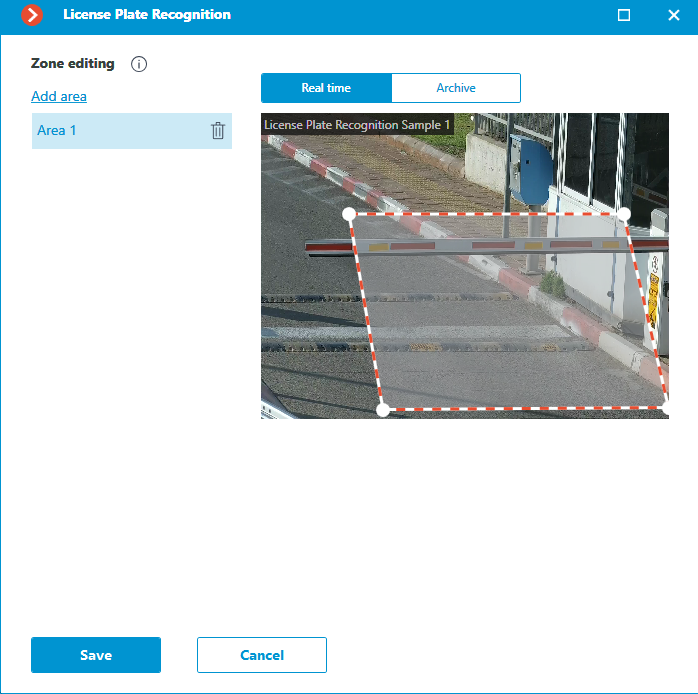
License plate search zone: Opens the zones settings window within license plates will be recognized.
Mode: Selecting the license plate detection mode based on the speed of vehicle movement.
Mode options:
Slow: This mode is useful for license plates recognition of cars stopped in front of barriers or gates.
Medium: This mode is useful for license plate recognition of cars that are moving without stopping in yards, driveways, industrial sites and other similar places.
Fast: This mode is useful for license plate recognition of vehicles driving on city streets, highways and expressways.
Determine the movement direction: Enabling this option allows you to specify which direction of vehicle movement will be considered as entry and which as exit.
You can also configure a parameter that will not consider certain vehicle license plates:
Upon entry
Upon exit
For undetermined direction.
Detect two-line plates: Enabling this option allows the detection of two-line license plates.
Number of license plate frames required for recognition: The module accuracy settings. The License Plate Recognition event will be created only when the license plate is recognized on the specified number of frames. A higher value reduces the number of false recognitions, but may lead to the recognition failure of license plates moving fast in the frame.
Plate color: Selecting the color of the license plate for detection.
Available colors:
White
Black
Blue
Orange
Limit the license plate re-recognition time, sec.: Specifying the time interval after which the number will be re-recognized.
Identify the type, color and model of the vehicle: Enabling this option makes it possible to recognize vehicle type, color, and brand.
Identify two colors in ambiguous situations: Enabling this option makes it possible to recognize two colors of the vehicle. Two colors will be displayed in the license plate recognition event, if the accuracy of the first color recognition is less than 80%.
Minimum number of characters (letters and digits) in the license plate number and Minimum number of digits in the license plate number: Specifying a limit on the number of characters and letters in the number. If the number does not meet at least one of the set limits, it will be rejected.
Warning
For the Minimum number of characters (letters and digits) in the license plate number parameter, it is recommended to set a value less than the total number of characters (letters and numbers) in the license plate.
Parking spots🔗
The Parking spots tab specifies the parking areas settings.
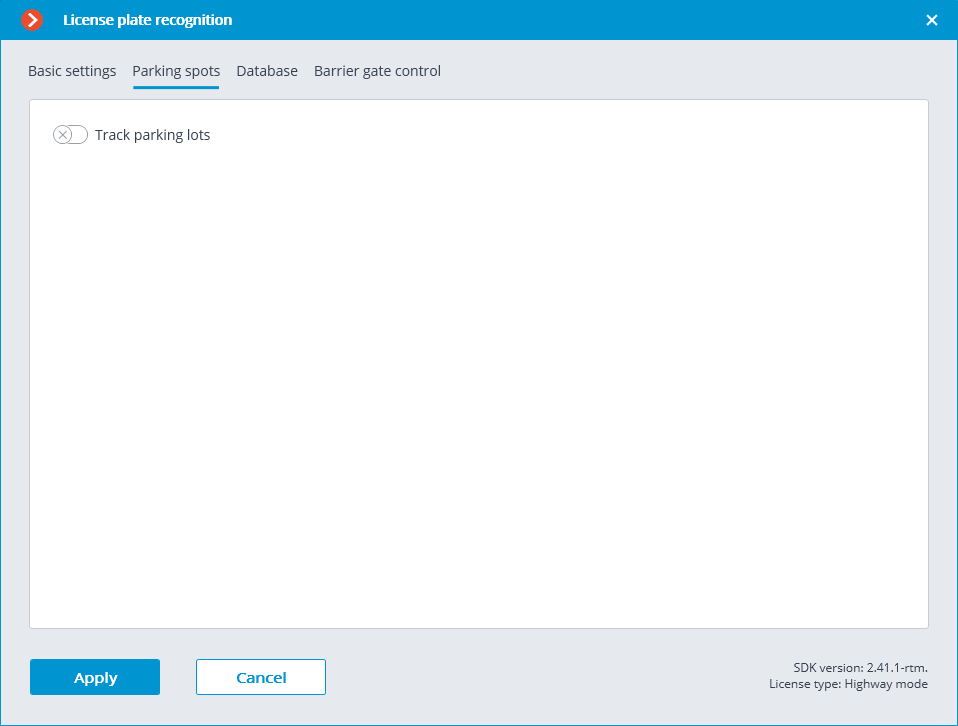
To access parking areas settings, the Track parking lots switch must be enabled.
Note
Parking settings are set for the entire system.
In the settings, you can add, modify and delete parking areas.
To add a new parking area, click the Expand all button at the bottom of the window.
To rename a parking area, click the  button to the right of the area's name.
To delete a parking area, click the  button to the right of the area's name.
To change the parking area's settings, click the  button to the right of the area's name.
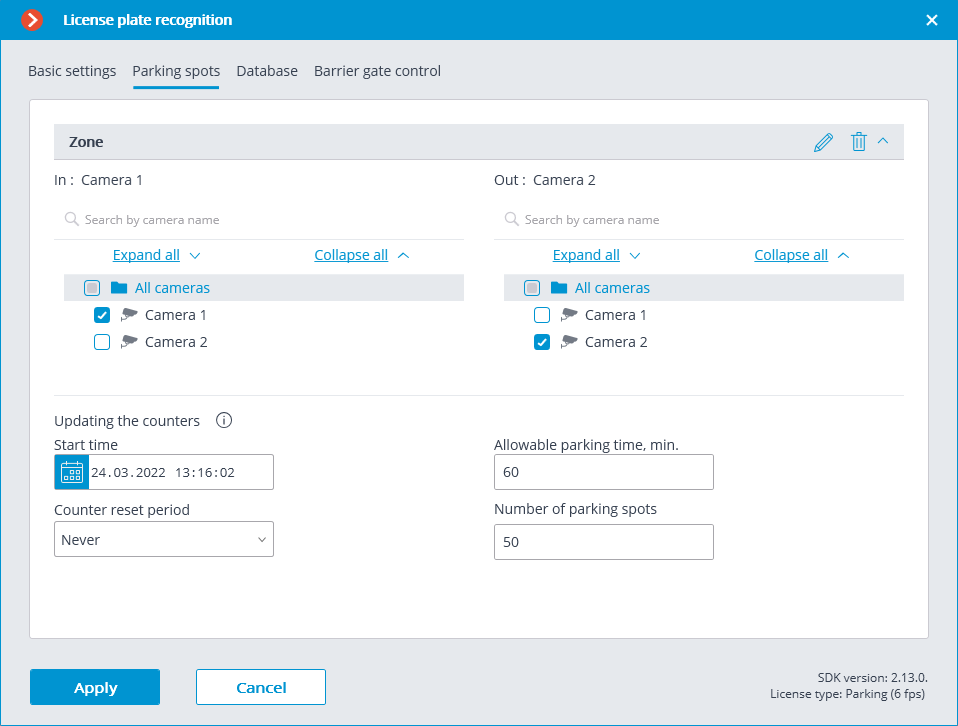
In the parking area settings, set the cameras that will count vehicles entering and exiting, the number of parking spaces, and the time to reset the counters.
Eocortex automation processes can use the following events generated when parking lots are configured:
Parking vehicle counter has been changed
Parking event
Parking lot occupancy has changed
To prevent a user from changing the number of occupied parking lots in the Eocortex Client application, the user must be a member of a group with the right of Adjusting the number of occupied parking spots turned off. This permission is enabled by default.
Database🔗
The access to the license plate database can be set on the Database tab.
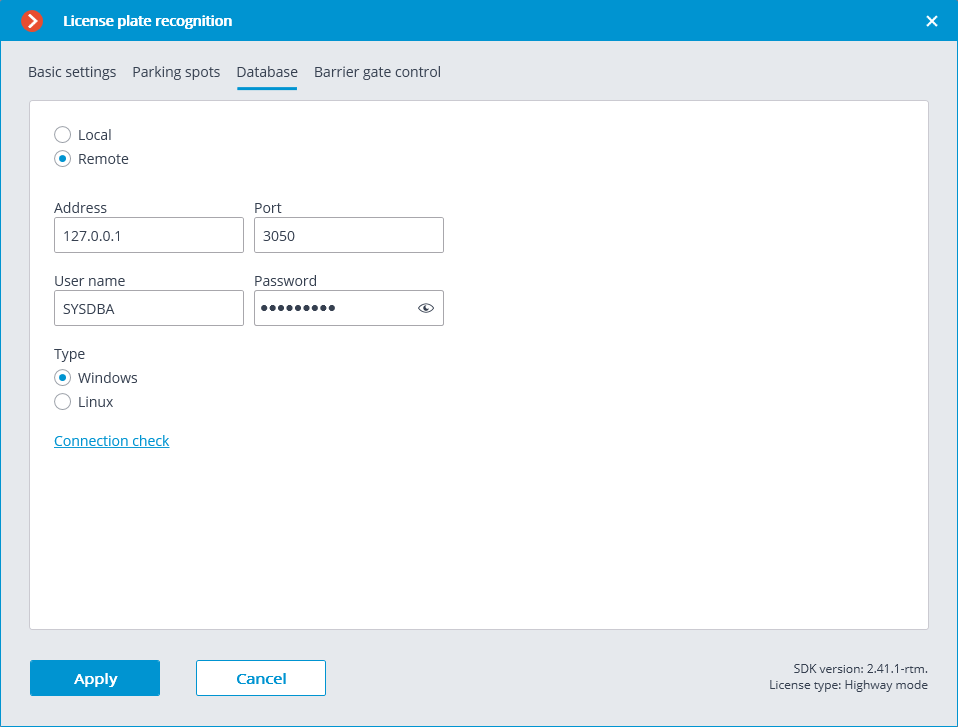
Two database deployment options are available: Local or Remote.
If the recognition process runs on only one server, it is recommended deploying the database on this server by selecting Local.
If the recognition process is running on several servers, the database should still be hosted only on one of them. For this purpose, select the Remote option for all cameras and specify the database connection parameters: server address, name and password of the database administrator. The same applies when the database of the module is deployed on one server, and the camera with the module enabled is attached to another one.
Note
Eocortex version 3.6 and lower uses Firebird DBMS with the following default values:
Port: 3050
Username: SYSDBA
Password: masterkey
Note
Starting from version Eocortex 4.0, the module's database is handed over to the PostgreSQL DBMS with the following default values:
Port: 5432
Username:
For Windows: postgres
For Linux: eocortex
Password: masterkey
Warning
Remote access to databases is not allowed by default in PostgreSQL and must be additionally configured if remote databases are used for analytics. All settings must be done for the server where the database is stored. Settings are slightly different for Windows and Linux operating systems.
When the server is running for the first time after upgrading Eocortex to version 4.0 or higher, the existing module database will be automatically transformed to be compatible with PostgreSQL.
Warning
If connecting to a Remote database, use the DBMS Username and Password that are valid for the server storing the database.
Warning
Independent of the database location, the recognition events (date and time of recognition, coordinates of the object in the frame, binding of the recognized object to the database) will always be stored on the server to which the camera with the corresponding events is bound.
Warning
Synchronization with the database located on a remote server can take some time.
Note
When using a remote database, the remote database replication mechanism will be applied.
It is possible to check the availability of the database clicking the Connection check link. If the server is unavailable, the corresponding message will be displayed.
Barrier gate control🔗
The settings of the module’s interaction with a rising arm barrier can be configured on the Barrier gate control tab.
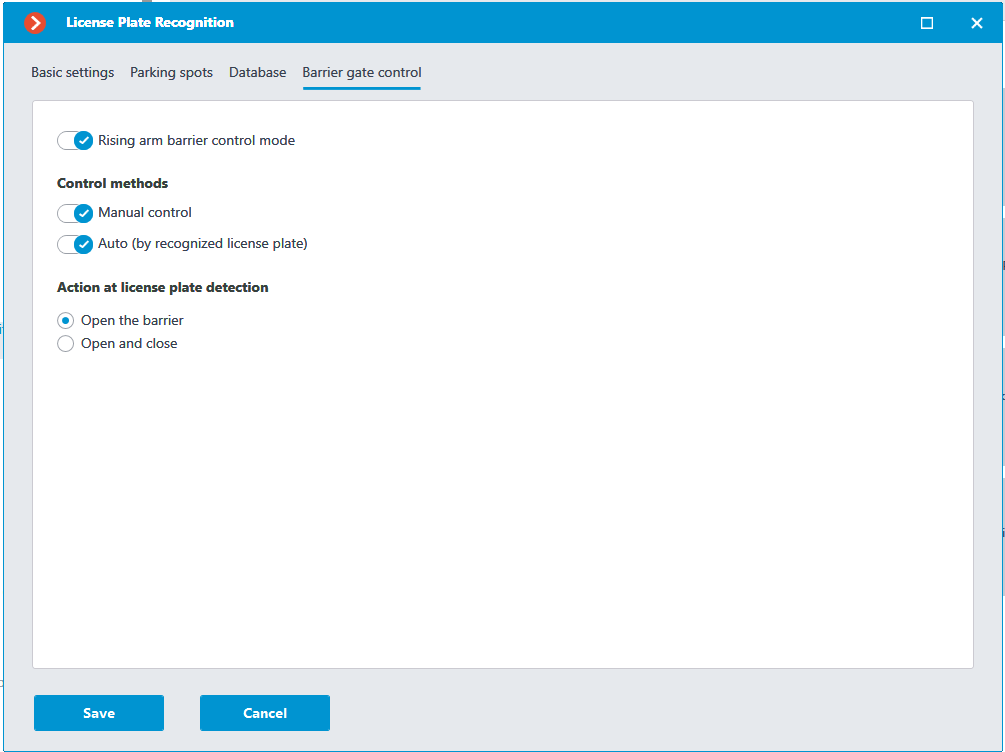
The Rising arm barrier control mode must be activated to access the settings of the module’s interaction with a rising arm barrier.
When the rising arm barrier control mode is activated, the following capabilities are available:
Control methods:
Manual control: allows the operator to open and close the barrier using the Eocortex Client application.
Auto (by recognized license plate): allows to open the rising arm barrier automatically if the recognized number is in the white list, i.e. is included in the group of vehicles for which the automatic opening of the barrier is envisioned.
In case the automatic rising arm barrier control is activated, the following options are available:
Open the barrier: if the recognized number is in the white list, the Eocortex server generates a command to open the barrier.
Open and close: if the recognized number is in the white list, the Eocortex server generates a command to open the barrier; then, in a number of seconds set in the Close after opening in (sec) field, a command for closing the barrier is generated.
Note
Most of the modern rising arm barriers automatically close after the passing of one vehicle. For such barriers, the Open the barrier option shall be selected.
Warning
When the Open and close option is selected, it is imperative that the barrier itself has a feature of preventing its closing when a car is below the rising arm. It means that after generating the closing command the barrier’s automatics must check if there is a vehicle or a person on the line of closing, and proceed with the closing only in the absence of the above.
Note
Both in manual and in automatic barrier control mode, the opening or closing command is understood as the generation of the Request to open rising arm barrier or Request to close rising arm barrier event, correspondingly. To control the rising arm barrier, it is required to set the actions for these events depending on the control wiring diagram of the particular barrier.
Click the Save button to save the module settings.
Warning
The module will start working only when the settings are applied.
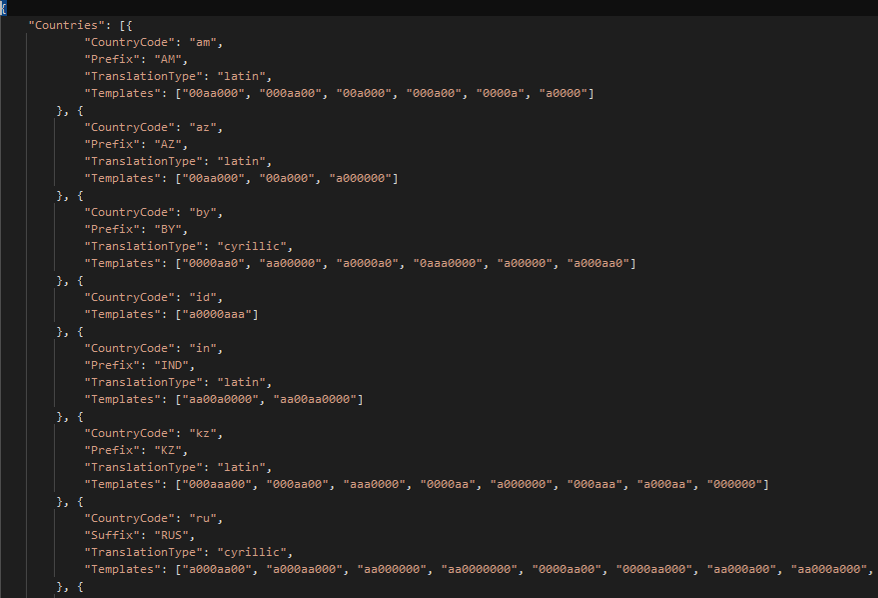
Configuring the language layout of the letters in the number🔗
By default, Latin alphabet is used for letters in the license plates of all recognized countries, except for the Russian Federation and Belarus. In the license plates of the Russian Federation and Belarus, Cyrillic alphabet is used by default.
To change the layout of letters in Russian and Belarusian license plates you should change the TranslationType parameter in the templates.json file. The templates.json file is located in the C:\Program Files\Eocortex Server\Plugins\PlateRecognition folder.