Integration with POS terminals🔗
The integration with POS terminals that allows to receive and display receipts from POS terminals has been implemented in Eocortex. This feature makes it possible to search for transactions and archive fragments for different purposes, e.g., to determine at which checkout an item was purchased.
Note
POS terminals are integrated as external devices, which means that they must be linked to cameras in Eocortex (one POS terminal per camera).
Note
The integration is available only for servers running on Windows OS.
Note
An additional license required to use the integration and connect a POS terminal.
Note
Integration is available in version Eocortex 3.5 and higher.
List of terms🔗
POS (Point of sale) — the place where the purchase occurs. This place is equipped with POS terminal.
POS terminal — external device that sends text messages to the Eocortex. Such a device can be a cash register or any other that is capable of outputting text.
Receipt — text message sent from the POS terminal to the Eocortex.
Transaction — a sequence of data associated with an individual cash receipt. A transaction begins and ends with messages signaling the start and end of a receipt, respectively. If the message about the closure of the receipt is not received within the specified time, the transaction is terminated by a timeout. Also, the previous transaction may be terminated when a beginning message for a new receipt is received.
ESC/POS — receipt printer control language developed to control POS terminals.
POS terminal transaction log — log of all receipts received from POS terminals.
Advantages🔗
Receive data from POS terminals about cash receipts.
Store received cash receipts.
View received cash receipts both in real time and in the archive.
Filter stored cash receipts by cameras and content.
Use data of cash receipts in Automation scenarios.
Watch the video related to the transaction both frame-by-frame and step-by-step.
Navigate through the archive on the timeline by data of received cash receipts.
Features🔗
Service commands of the ESC/POS protocol are removed from the message without affecting its display.
Cash receipts from POS terminals can be received only via TCP/IP.
POS terminal should operate in server mode. In other words, Eocortex initiates the connection.
Displaying of graphical images in the cash receipt is not supported.
Setting the integration in Eocortex Configurator🔗
To set up integration with POS terminals, run the Eocortex Configurator application and go to the  Automation section. Select the camera that will be associated with the terminal from the list, then switch to the Integrations tab on the page that opens and enable the slider for the POS terminal tile. To configure the integration, click the
  button.
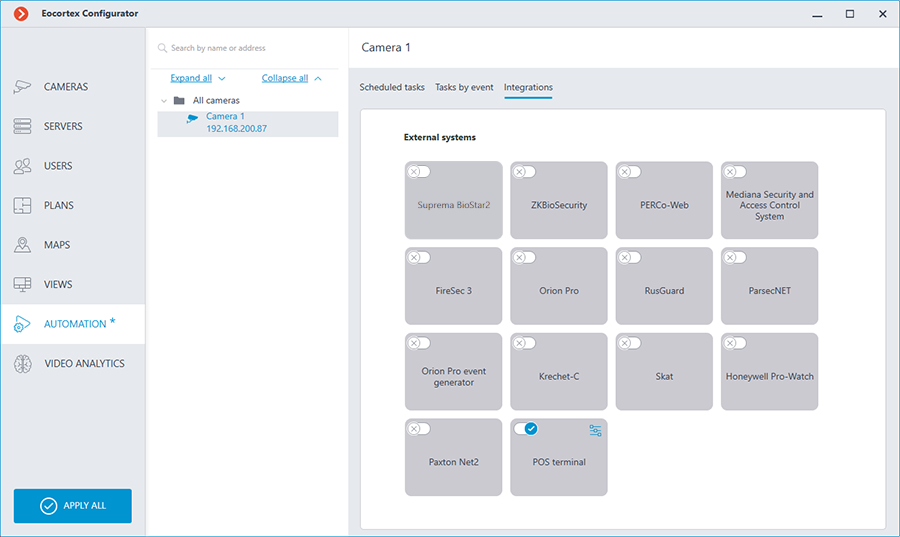
This will open the window with settings or the POS terminal integration for the selected camera.
The following tabs are available:
Connection;
Receipt borders;
Receipt total amount;
General settings.
Connection🔗
The Connection tab contains settings for connecting to the terminal.
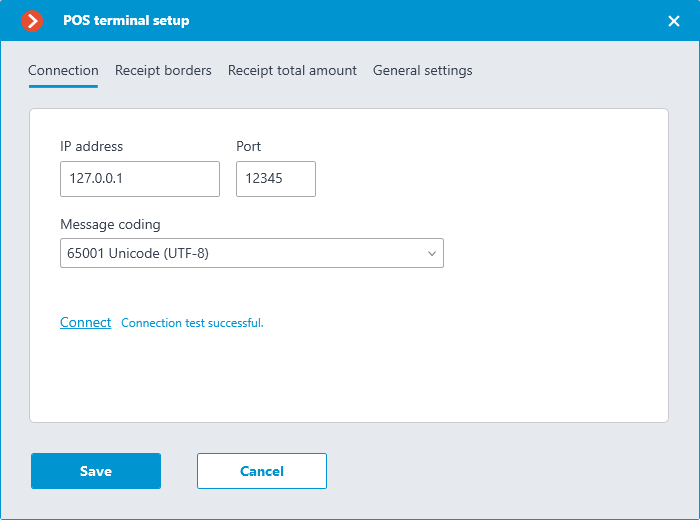
Note
The POS terminal to be connected must operate in server mode.
The Message coding field requires to select the encoding in which the data comes from the POS terminal. Availability of encodings depends on the operating system of the computer where the Eocortex Configurator application is running. At the same time, it should be noted that the selected encoding must be supported by the server to which the camera is bound as well.
When the settings are defined, the connection can be tested by clicking on the Connect button.
Receipt borders🔗
The Receipt borders tab contains the rules for separating receipts from each other, since the data from the POS terminal comes as a continuous stream.
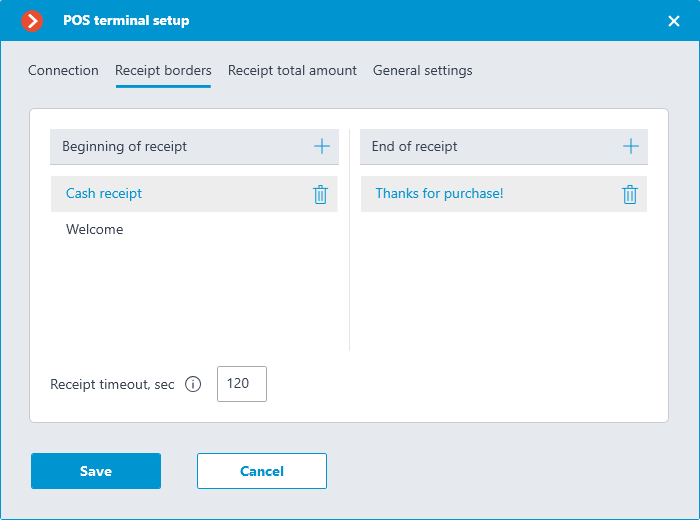
The Beginning of receipt and End of receipt lists allow specifying signal substrings indicating the opening (beginning) and closing (end) of a cash receipt, respectively. Each received line will be inspected for the presence of signal substrings. For the system, the check will start with a line containing any of the substrings specified in the Beginning of receipt list and will end with a line containing values from the End of receipt list.
Warning
The match between the text of the signal substring and the text in the received line of the cash receipt must be precise, including the case.
Note
As a beginning of a cash receipt there can be, for example, the name of the store, captions like Welcome or Receipt, and so on. The end of a cash receipt is often the store's website address or the caption like Thanks for purchase!
The Receipt timeout, sec field allows specifying the time of waiting between opening and closing the receipt. The receipt will be closed if no new line has come since the last line was received within this time period.
Note
A receipt will also be closed when one of the following commands is received from the POS terminal:
Full cut (of paper).
Partial cut (of paper).
Receipt total amount🔗
The Receipt total amount tab allows specifying signal substrings that contain the total amount of a cash receipt.
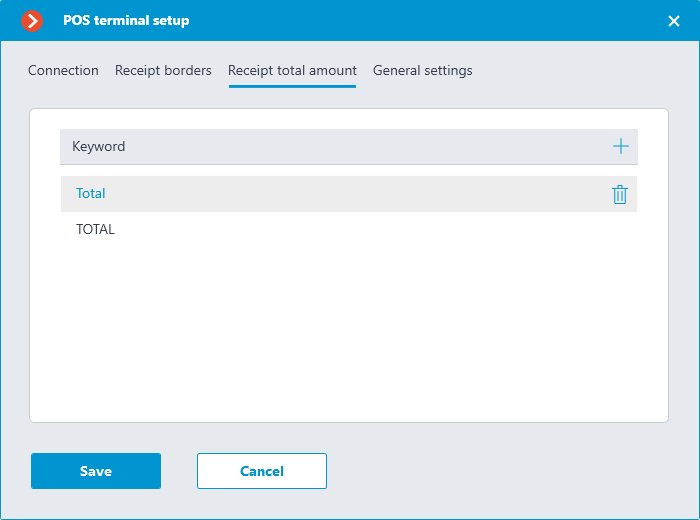
As the total amount will be considered the value behind the specified signal substring.
Note
Signal substrings are case-sensitive. For example, the Total and TOTAL lines should be set as two different substrings.
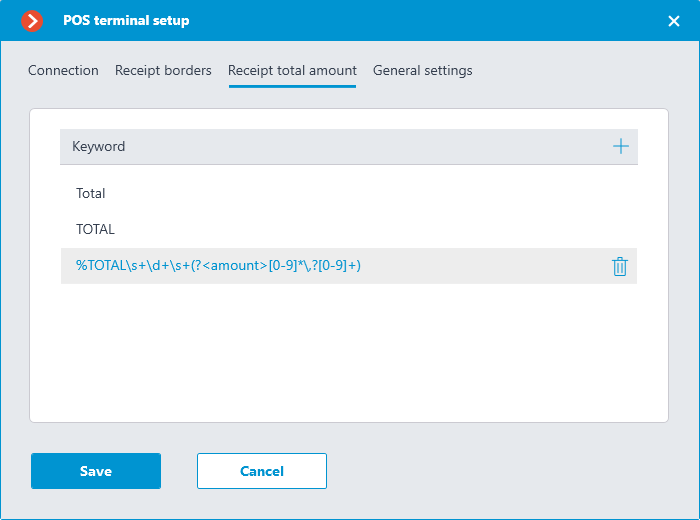
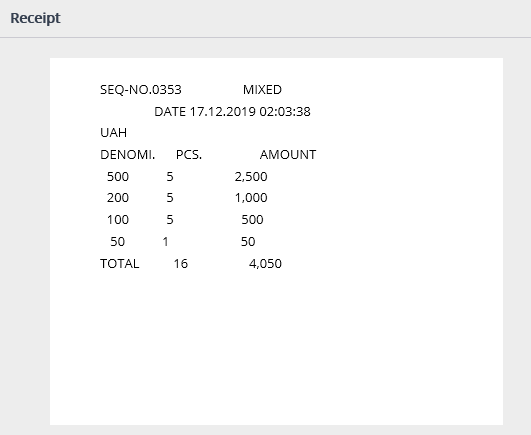
For more flexible configuration for getting the total amount of the receipt, a regular expression can be used as a signal substring. Such line must start with the % sign and contain a named group with the amount name.
As an example, below is a receipt from which the value of the total amount can not be obtained using the signal string containing plain text — the value of the TOTAL line will be 164050.
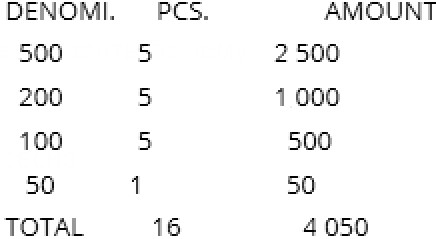
In such case, to get the total amount as 4050, the signal substring can be set as a regular expression as displayed below.
General settings🔗
The General settings tab contains the settings for pointing on the timeline in the archive of the video associated with the received cash receipt.
If the Play the archive from the beginning of the receipt option is enabled, the pointer to the beginning of such video will be set on the timeline to the time of the receipt beginning, including the time shift specified in the Play the archive from the beginning of the receipt field. If this option is disabled, the pointer to the beginning of the video will be set to end of the receipt.
For example, below is the pointer to the video with the time shift of 10 seconds from the beginning of the receipt.
Position of the pointer on the timeline may have a slight inaccuracy.
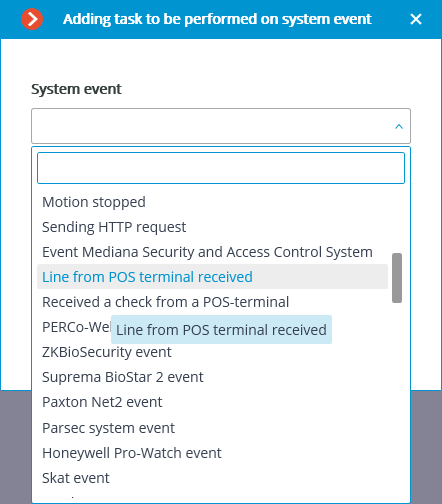
Setting tasks by events🔗
The system is able to perform actions in response to events occurring with Automation scenarios. To set up such a scenario, go to the Automation section of the Eocortex Configurator application. Select a specific camera or a group of cameras in the camera tree and on the page that opens, select the Tasks by event tab.
For the Line from POS terminal received event, it is possible to set up any standard task.
For the scenario, the runtime conditions based on the content of the line can be set:
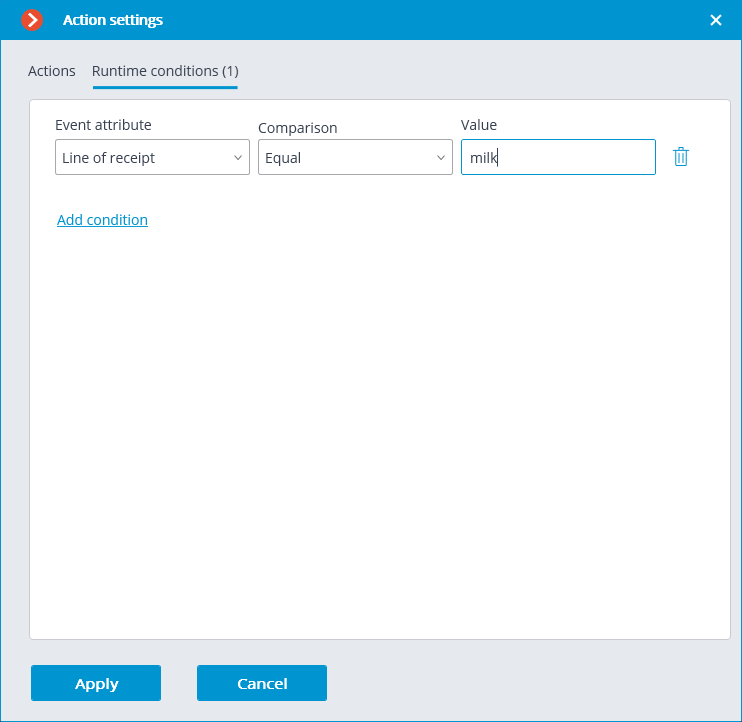
By this way, it is possible to make the scenario executable only in the specific cases. For example, enable the archive recording if the cash receipt contains an item that has any restrictions on the sale.
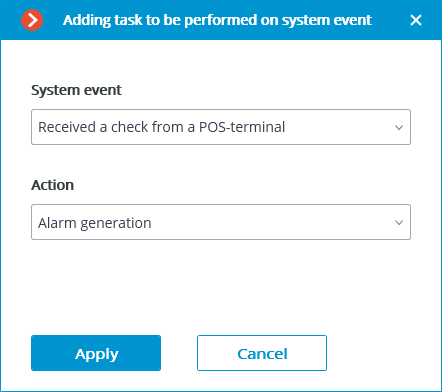
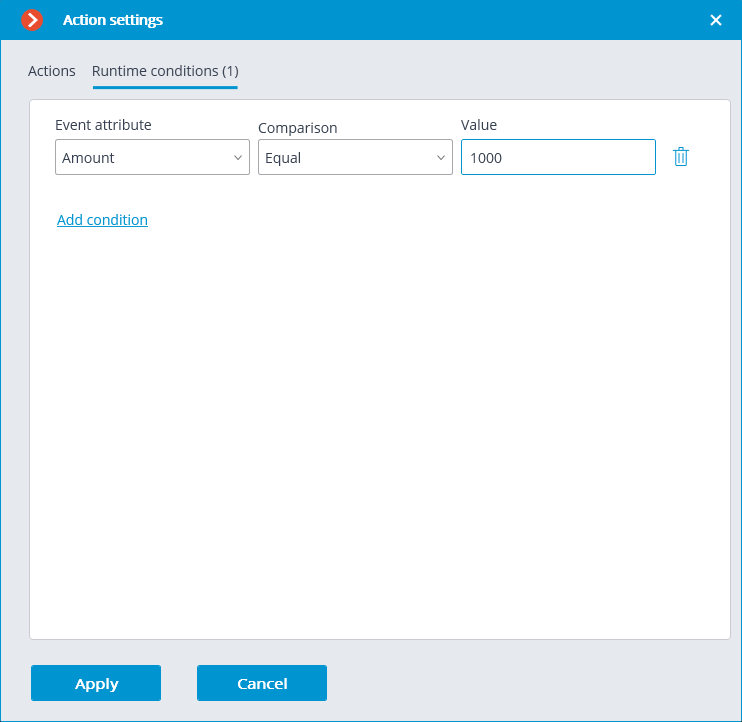
Also, the scenario can be set up for the Received a check from a POS terminal event.
As a runtime condition for such task, the total amount value can be used.
Eocortex Client🔗
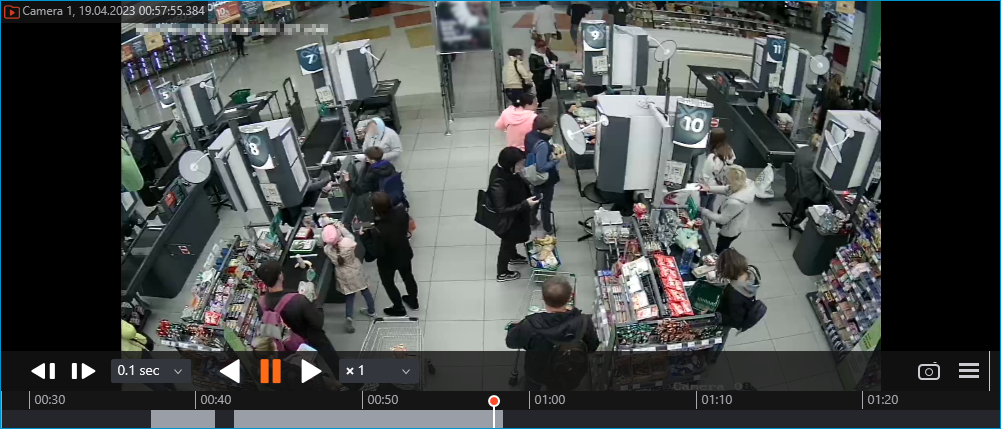
When the integration with POS terminal is enabled, the new button  will appear in the bottom part of the camera cell. This button enables and disables the panel for displaying cash receipts in the camera cell.
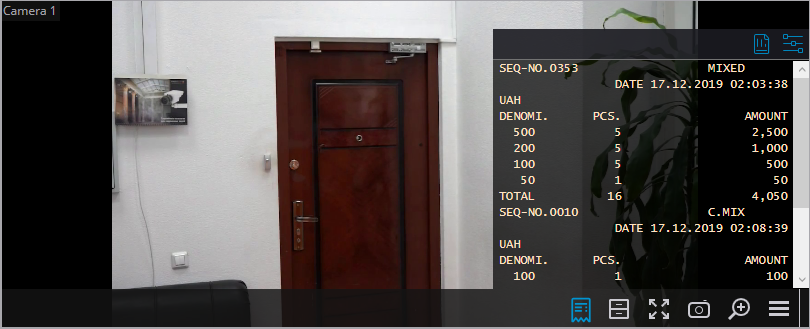
By default, the panel is located in the upper right corner of the cell. The panel itself has two additional buttons  ; the first one opens the POS terminal transaction log, when the second opens the Visualization settings window.
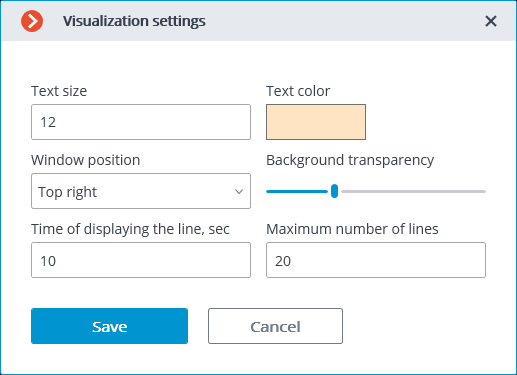
Visualization settings🔗
Transaction log🔗
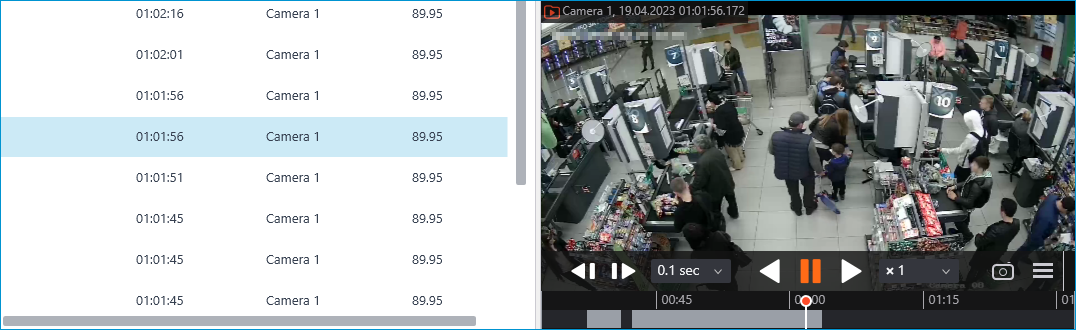
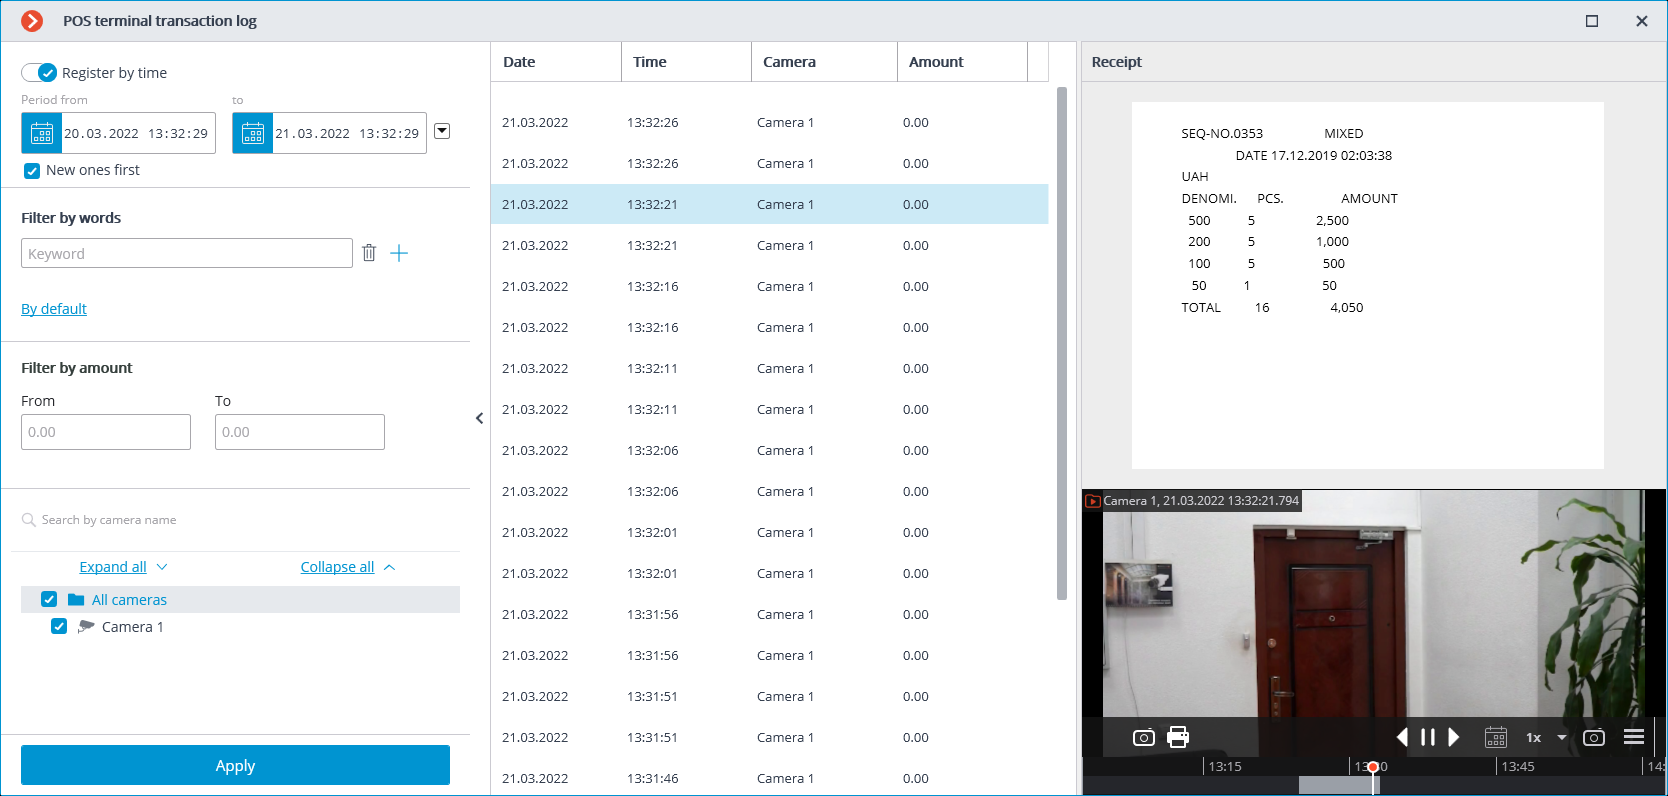
In the POS terminal transaction log, the user is able to view cash receipts stored in the Eocortex database, filter cash receipts by various parameters, view the archive for the moment of time the cash receipt was generated.
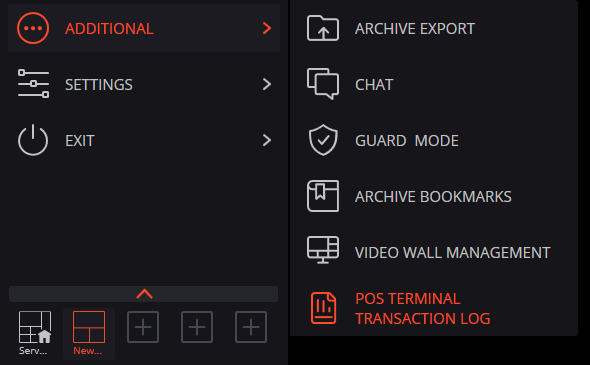
The transaction log can be opened by the corresponding button in the  Additional section of menu or from the panel for displaying cash receipts.
The transaction log is divided into three work areas (left to right):
filtering area where search parameters for cash receipt are configured;
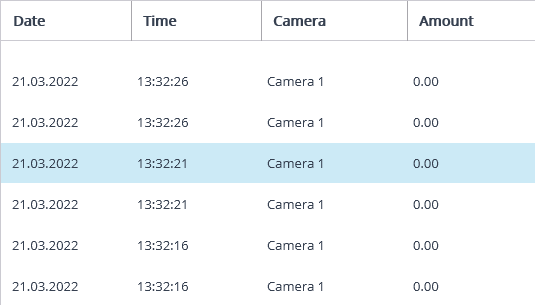
list of transactions;
display area of a cash receipt, which corresponds to the selected transaction.
Stored cash receipts can be filtered by various parameters:
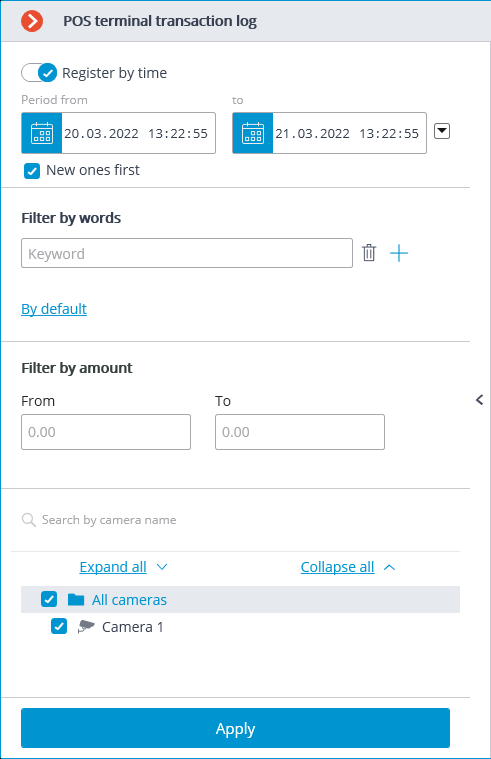
By filtering by keywords, only those cash receipts that contain the specified words will be displayed. The system will search for all the specified keywords in the cash receipt, and not just one of them.
With applying the filters, a search is carried out for cash receipts that match the filtering parameters. If the found cash receipt is related to any camera and previously was displayed in the camera cell, the list of transactions will contain this camera name. Each line in the list of transactions corresponds to a single cash receipt.
Note
If the total amount of the receipt cannot be determined, the value in the Amount column will be displayed equal to 0.00.
The total amount for all receipts collected in versions before 3.6 will always be displayed as 0.00.
The total amount of the receipt in the hundreds of millions may be slightly rounded off.
The right side of the transaction log displays the receipt corresponding to the selected position in the list of transactions.
Below the cash receipt, an archive fragment that corresponds to the selected receipt in Eocortex can be viewed.
Step-by-step transaction view🔗
To view transactions step by step, select the view step length on the left side of the bottom cell panel.
Warning
When viewing in step-by-step mode, transaction event filters will be disabled.