Configuring the License plate recognition (Complete) module🔗
Warning
This module uses additional libraries that are not included in the basic Eocortex distribution package. Before configuring and using the module, it is necessary to install these libraries on the server to which the cameras selected for recognition are connected. After installation, an additional license key must be activated on this server to license the module.
Warning
Only one of the License Plate Recognition modules can be installed on the same server: either License Plate Recognition (Complete) or License Plate Recognition (Light).
To use the module, enable and configure it.
Launch the Eocortex Configurator, go to the  Cameras tab, select a camera in the list located on the left side of the page, and set up the motion detector on the Motion detector tab on the right side of the page.
Then switch to the Analytics tab and enable the module using the  toggle.
Warning
If this module is not installed on the server, it will not show in the Analytics tab.
Clicking the  button opens the module setup window.
Warning
In the software motion detector settings, the minimum width and height of the object must be smaller than the dimensions of a vehicle.
Additionally, it is recommended to set the whole frame as the detection area for the software motion detector to ensure reliable recognition.
The right bottom corner of the module settings window contains the version of the SDK libraries used by the License plate recognition module.
The module settings are described below.
Basic settings🔗
The settings of the license plate recognition can be set on the Basic settings tab.
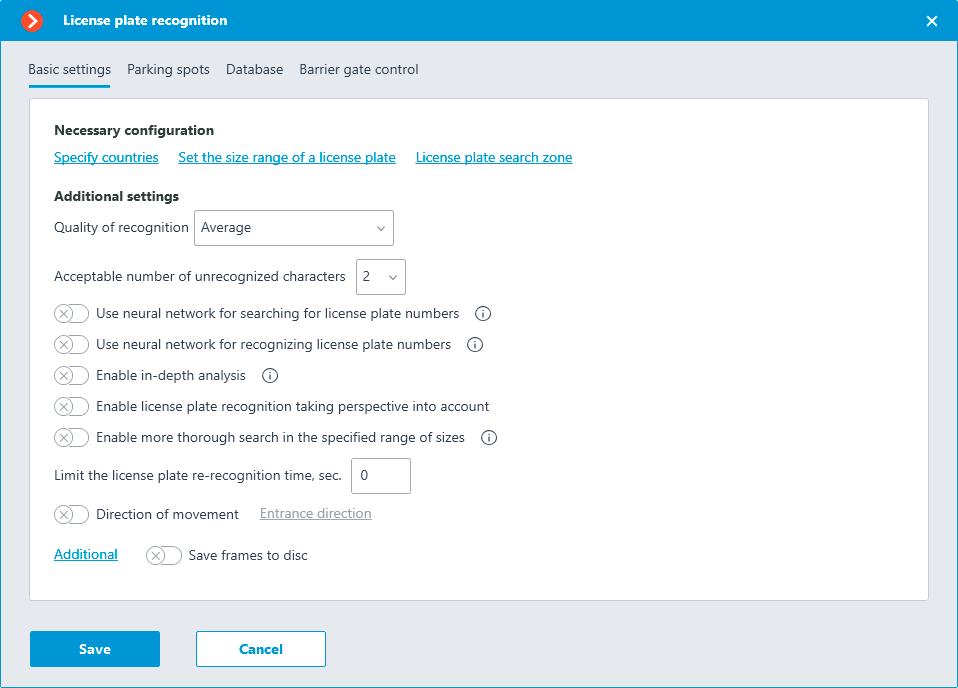
Specify countries: opens a window where license plates and countries that should be recognized can be selected.
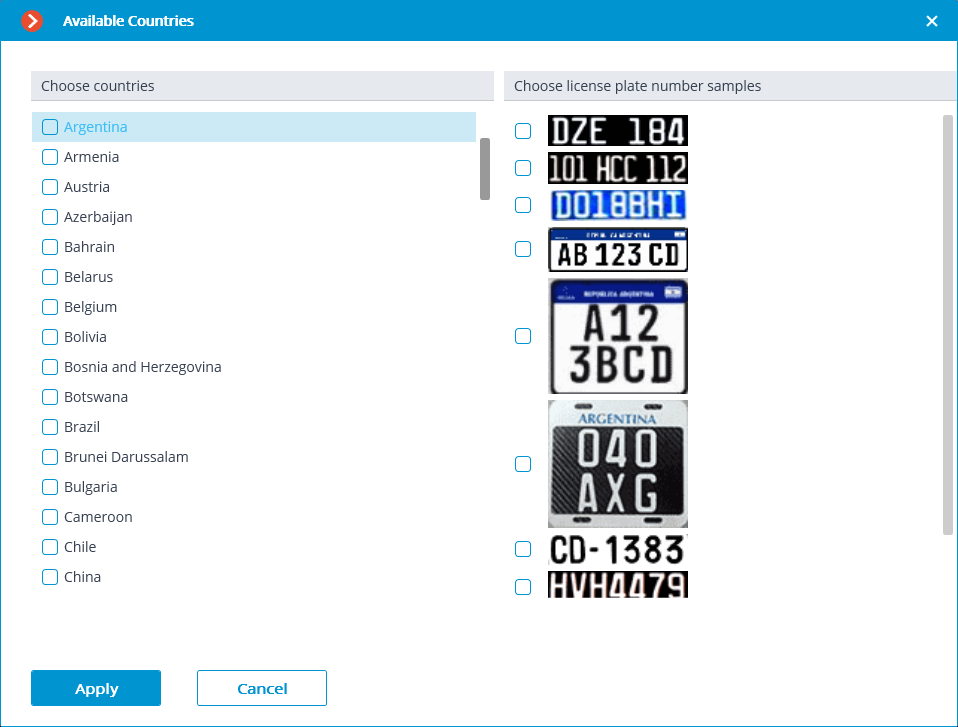
In the window that opens, mark the countries whose license plates should be recognized and select license plate templates for each selected country. Unmarked countries and templates will not be recognized.
Warning
The empty list of countries means that the License plate recognition (Complete) module is not installed, or that errors occurred during its installation, or that there is no protection key, or its activation encountered problems.
Warning
The more countries and samples have been selected for recognition, the higher the computing load on the server. When the processor load exceeds 80%, the recognition quality may drop significantly.
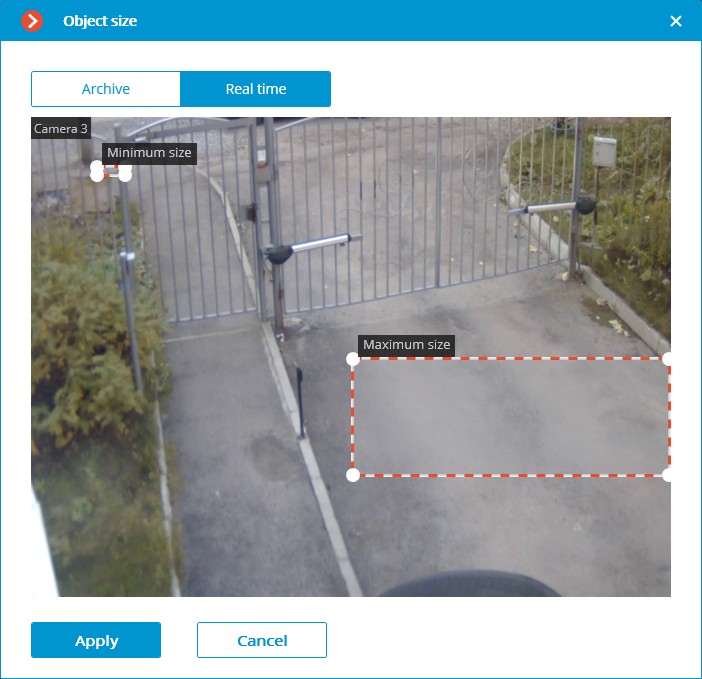
Set the size range of a license plate opens the window of setting the minimum and maximum width of the license plates to be recognized.
License plate search zone opens the window of setting up the zones of the frame where the license plate numbers to be recognized will appear.
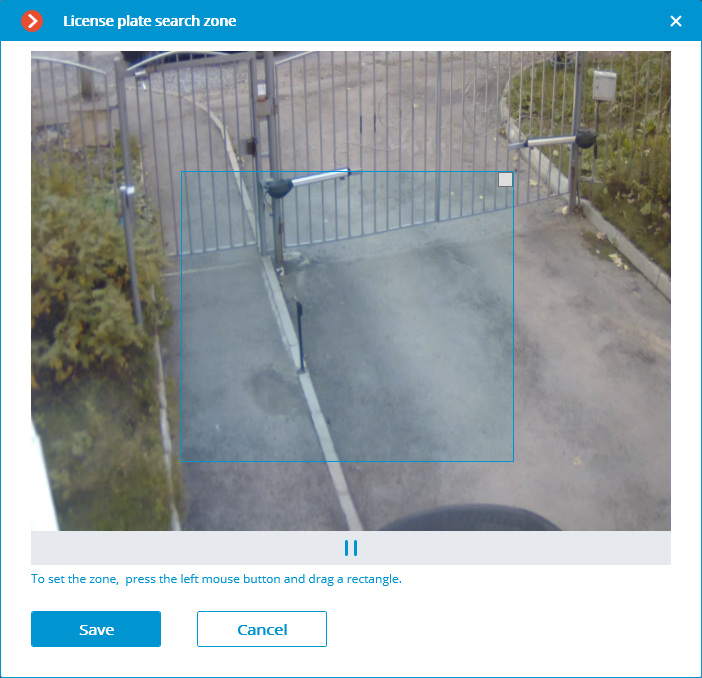
For creating a new zone, it is required to press the left mouse button and, holding it, select a rectangular area. The total area uniting all the set zones will be used for recognition. To delete the zone, click on the close icon in the upper right corner of the zone.
Quality of recognition is the internal parameter of the module’s operation. It sets the filtering by the quality of recognition, meaning that the license plates the reliability of whose recognition is lower than a preset value will be automatically discarded. The value of this parameter shall be selected tentatively: when it is higher, the reliability of the recognized numbers will be higher, but the total quantity of the recognized numbers will be smaller; when it is lower, the quantity of the recognized numbers will be larger, but the number of recognition mistakes will increase.
The Acceptable number of unrecognized characters setting filters the license plate numbers by the quantity of the unrecognized symbols: the plates where the number of unrecognized symbols is bigger than the preset value will be automatically discarded.
Use neural network for searching for license plate numbers: Enabling this option allows to increase accuracy of searching for number plates. However, this will increase the load on server CPU.
Use neural network for recognizing license plate numbers: Enabling this option will increase accuracy of license plate symbols' recognition. However, this will increase the load on server CPU..
Enable in-depth analysis: Enabling this option allows to improve License Plate Recognition accuracy under unfavorable conditions, e.g. when the camera's parameters are not in complete conformance with the relevant requirements, or when the weather conditions are poor. Using this option leads to the increase of the frame processing time of 20 to 30%. Under normal conditions, this parameter has no effect on the recognition quality.
Enable license plate recognition taking perspective into account: allows to make allowance for a perspective distortion.
Enable more thorough search in the specified range of sizes: Enabling this option allows to improve recognition accuracy in a case when the difference between the minimum and the maximum dimensions of the license plate number is very big (more that three times). In this case, the load on the server from the given camera will increase 30% approx..
Limit the license plate re-recognition time, sec.: sets the time from the initial license plate recognition, during which the same license plate will not be recognized repeatedly.
Note
This setting may be useful, for example, for the situations involving the automatic opening of a rising arm barrier, when the vehicle stops before the barrier and the module may attempt to recognize its license plate one more time after the vehicle starts to move again. Such repeated recognition may also happen when the license plate was temporarily blocked by some object.
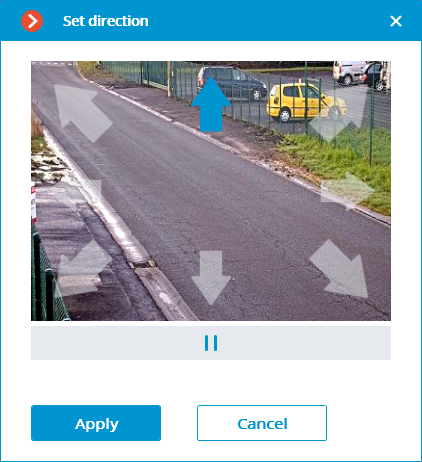
Determine the movement direction: enabling this option allows to configure the definition of the movement direction of the plate on the camera frame. After enabling this option, it is needed to set the entry direction by clicking the Entrance direction link and selecting the arrow in the opened window. At the same time, vehicles moving in the opposite direction will be considered as driving out.
Additional: Allows importing and exporting settings of the license plate recognition module.
Save frames to disc: Allows saving frames with detected license plates to a folder on the server.
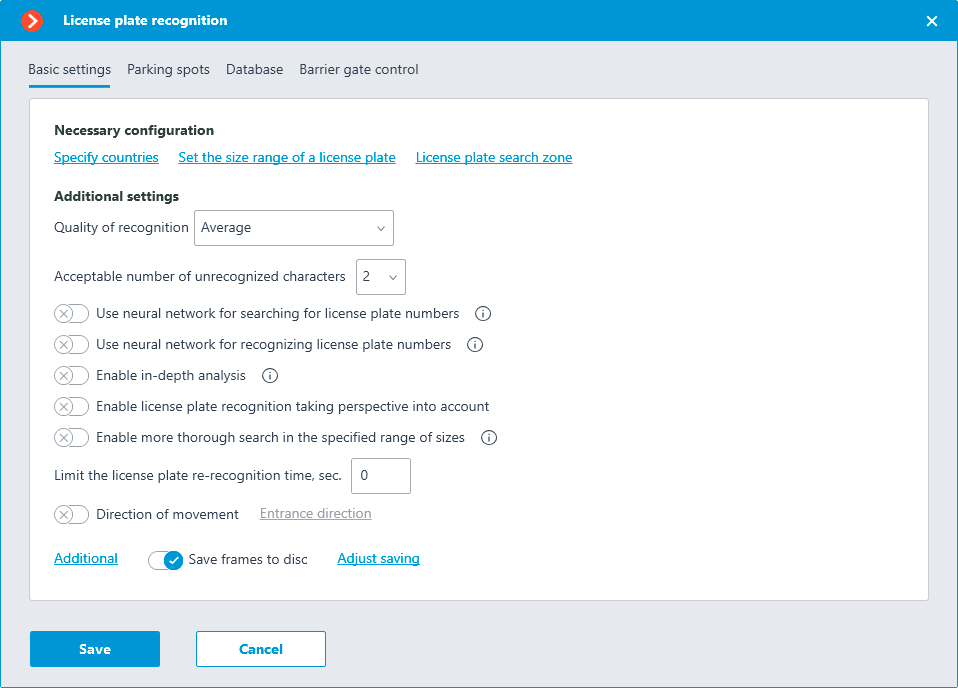
The option must be configured after enabling by clicking the Adjust saving link.
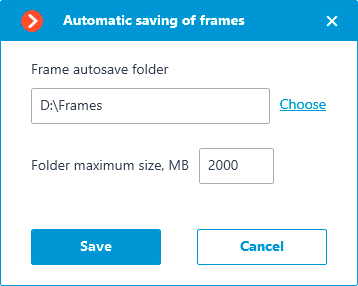
In the opened window, specify the path to the directory where the frames should be stored, as well as its maximum size.
Parking spots🔗
On the Parking spots tab, it is possible to configure the settings for the parking lots.
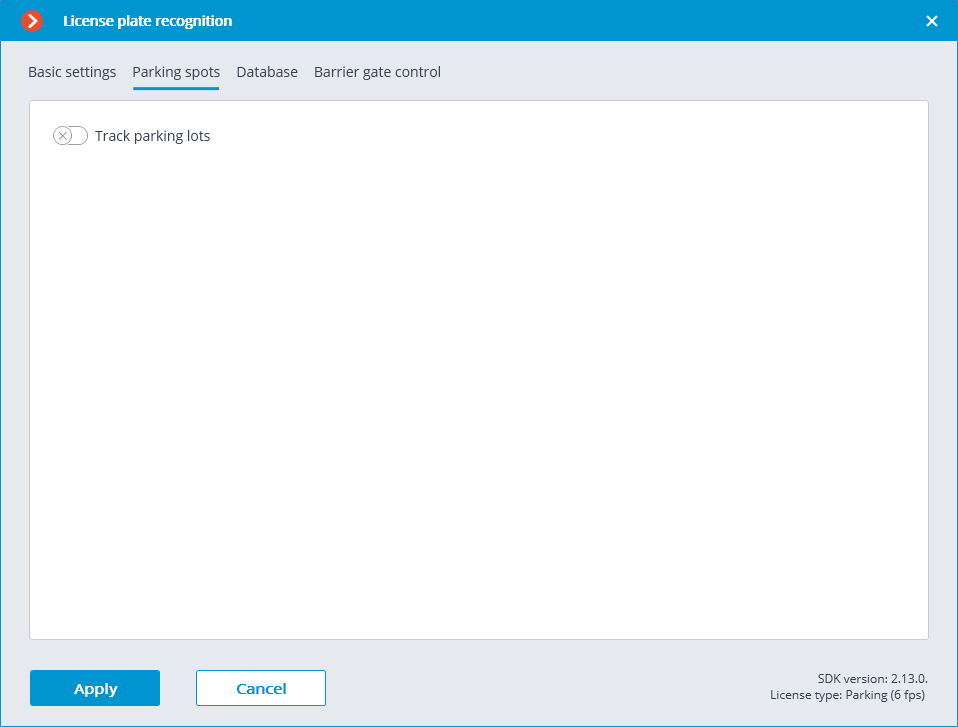
To access the settings for parking lots, turn on the Track parking lots slider.
Note
Parking lot settings are set for the entire system.
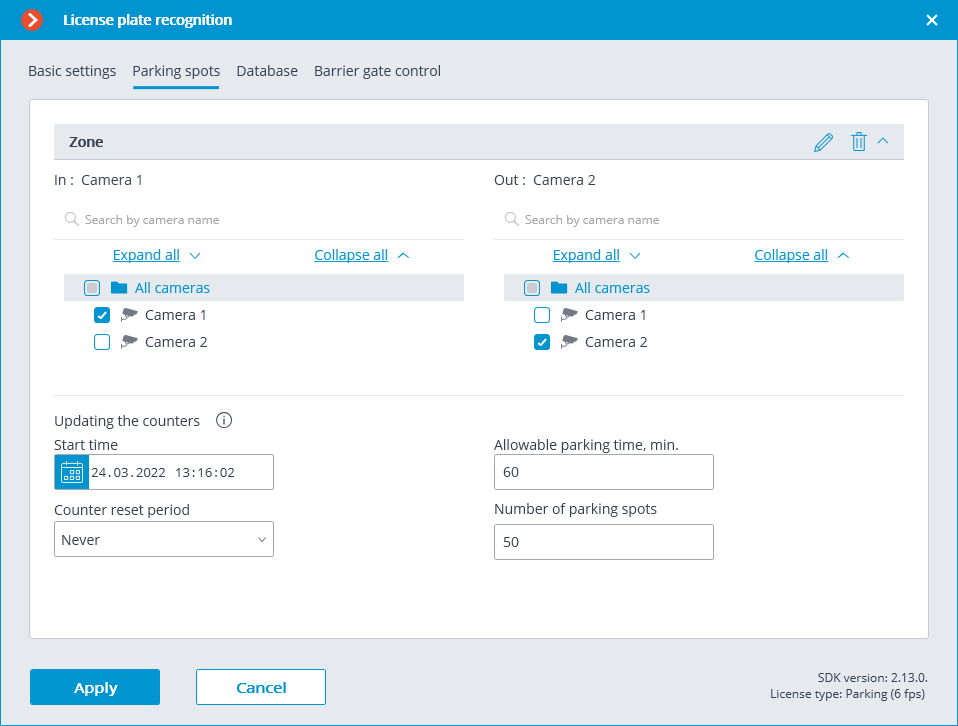
In the settings window, it is possible to perform the following actions:
create a new parking lot;
edit or delete an existing parking lot.
For a parking lot you configure the following settings:
name;
one or more cameras working as entry and exit points;
permissible parking time;
number of parking spots;
period and time of resetting the counter.
The following events were added to the Tasks by event tab of the Automation section:
Parking vehicle counter has been changed
Parking event
Parking lot occupancy has changed
A new user right, Adjusting the number of occupied parking spots has been added to the Users section. This right allows the user to change the value of the occupied parking spots counter in the Eocortex Client application. By default, this right is enabled.
Database🔗
The access to the license plate database can be set on the Database tab.
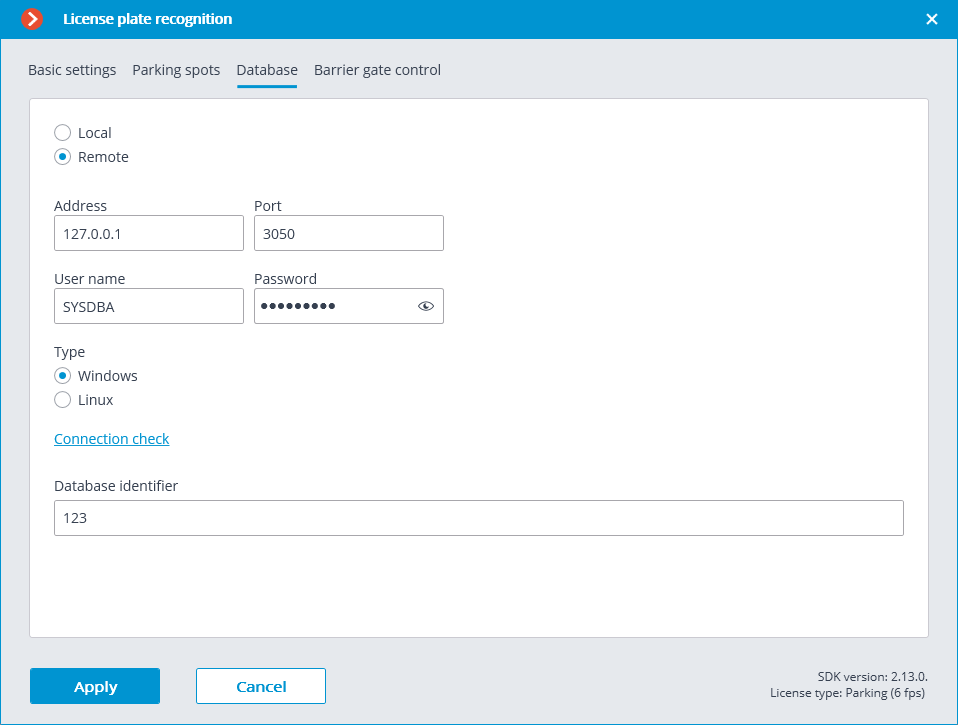
Two database deployment options are available: Local or Remote.
If the recognition process runs on only one server, it is recommended deploying the database on this server by selecting Local.
If the recognition process is running on several servers, the database should still be hosted only on one of them. For this purpose, select the Remote option for all cameras and specify the database connection parameters: server address, name and password of the database administrator. The same applies when the database of the module is deployed on one server, and the camera with the module enabled is attached to another one.
Note
Eocortex version 3.6 and lower uses Firebird DBMS with the following default values:
Port: 3050
Username: SYSDBA
Password: masterkey
Note
Starting from version Eocortex 4.0, the module's database is handed over to the PostgreSQL DBMS with the following default values:
Port: 5432
Username:
For Windows: postgres
For Linux: eocortex
Password: masterkey
Warning
Remote access to databases is not allowed by default in PostgreSQL and must be additionally configured if remote databases are used for analytics. All settings must be done for the server where the database is stored. Settings are slightly different for Windows and Linux operating systems.
When the server is running for the first time after upgrading Eocortex to version 4.0 or higher, the existing module database will be automatically transformed to be compatible with PostgreSQL.
Warning
If connecting to a Remote database, use the DBMS Username and Password that are valid for the server storing the database.
Warning
Independent of the database location, the recognition events (date and time of recognition, coordinates of the object in the frame, binding of the recognized object to the database) will always be stored on the server to which the camera with the corresponding events is bound.
Warning
Synchronization with the database located on a remote server can take some time.
Note
When using a remote database, the remote database replication mechanism will be applied.
It is possible to check the availability of the database clicking the Connection check link. If the server is unavailable, the corresponding message will be displayed.
The Database identifier field sets its own license plate database for an individual camera or groups of cameras.
Warning
The field Database identifier is not initially displayed at the launch of the module.
Note
To use this capability, it is required to set Database identifier via REST API.
Barrier gate control🔗
The settings of the module’s interaction with a rising arm barrier can be configured on the Barrier gate control tab.
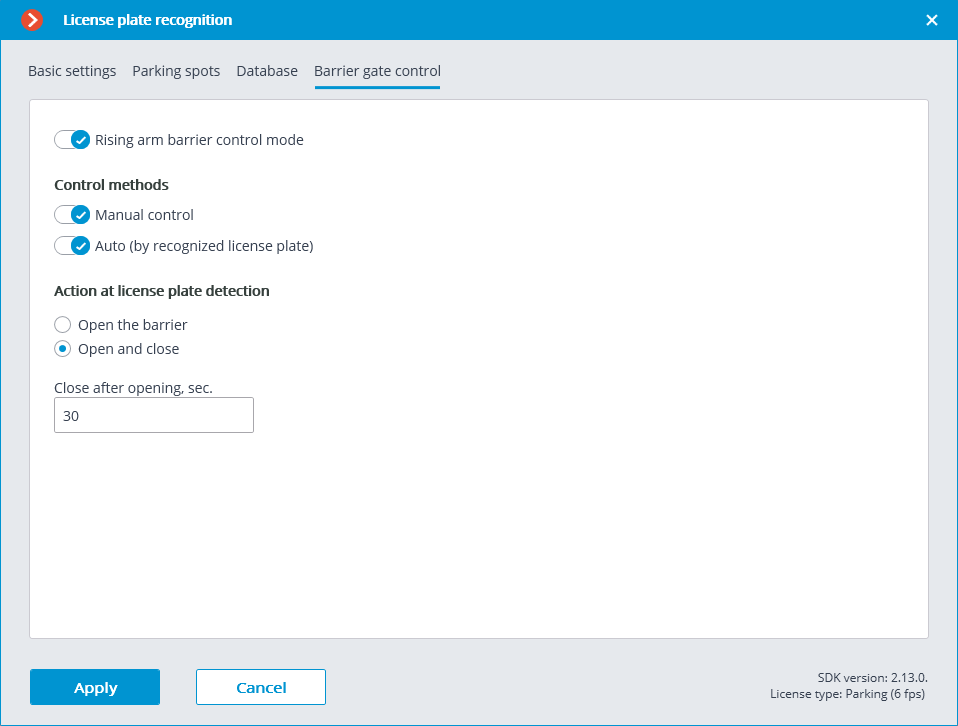
The Rising arm barrier control mode must be activated to access the settings of the module’s interaction with a rising arm barrier.
Note
To use the module only for controlling a rising arm barrier, the License plate recognition (Complete) module license or protection key is not required. However, for ensuring the abovementioned functionality, it is necessary to have the License plate recognition (Complete) module support indicated in the Eocortex license file or software key for the corresponding quantity of cameras.
When the rising arm barrier control mode is activated, the following capabilities are available:
Control methods:
Manual control: allows the operator to open and close the barrier using the Eocortex Client application.
Auto (by recognized license plate): allows to open the rising arm barrier automatically if the recognized number is in the white list, i.e. is included in the group of vehicles for which the automatic opening of the barrier is envisioned.
In case the automatic rising arm barrier control is activated, the following options are available:
Open the barrier: if the recognized number is in the white list, the Eocortex server generates a command to open the barrier.
Open and close: if the recognized number is in the white list, the Eocortex server generates a command to open the barrier; then, in a number of seconds set in the Close after opening in (sec) field, a command for closing the barrier is generated.
Note
Most of the modern rising arm barriers automatically close after the passing of one vehicle. For such barriers, the Open the barrier option shall be selected.
Warning
When the Open and close option is selected, it is imperative that the barrier itself has a feature of preventing its closing when a car is below the rising arm. It means that after generating the closing command the barrier’s automatics must check if there is a vehicle or a person on the line of closing, and proceed with the closing only in the absence of the above.
Note
Both in manual and in automatic barrier control mode, the opening or closing command is understood as the generation of the Request to open rising arm barrier or Request to close rising arm barrier event, correspondingly. To control the rising arm barrier, it is required to set the actions for these events depending on the control wiring diagram of the particular barrier.
Note
For the License Plate Recognition (Complete) module, the following types of Automatic reports can be configured: License plate recognition, Entry/exit time recording, Vehicle counting.
Warning
The module will start working only when the settings are applied.