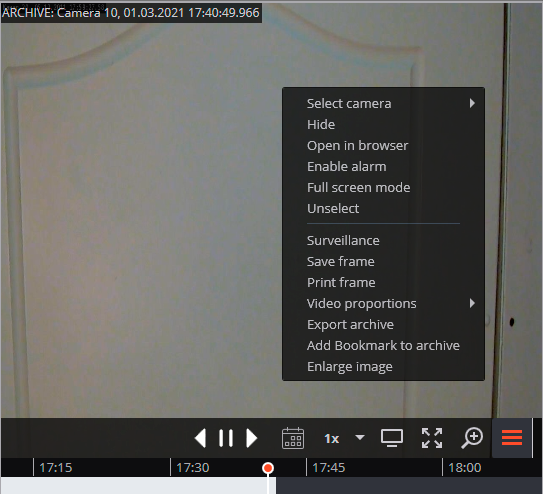
Viewing the single camera archive🔗
To open the camera archive (from the real time view mode), click  in the active cell or select Eocortex Archive in the context menu: the cell will switch to the archive view mode.

In the bottom part of the cell, there is a Timeline with the fragments marked in grey that correspond to the video recordings of the given camera that have been saved in the archive.
Note
The decimated archive is marked with hatching.

The vertical bar shows the place in the archive that is being displayed currently.
To go to the required time moment, click on the corresponding point on the timeline.
To shift the timeline backward or forward, click on it and, holding the mouse button, shift the scale in the required direction.
The time scale can be changed by rotating the mouse wheel while holding the Ctrl button.
Calendar allows going to a particular place in the archive by specifying the exact date and time.
Note
The timeline displays the time of the archive recordings in accordance with the local time of the computer on which they are viewed, while the server stores the archive according to the Universal Coordinated Time (UTC).
As an example:
The server with the UTC+03:00 time zone settings recorded a fragment of the archive from 12:00 to 12:05 server time.
When viewing this fragment in the Eocortex Client application running directly on the server, it will be displayed on the timeline between 12:00 and 12:05.
But when viewing this fragment on a computer with UTC+05:00 time zone settings, the fragment time on the timeline will be from 14:00 to 14:05.
And when viewing the same fragment on a computer with UTC+01:00 time zone settings, the fragment time on the timeline will be from 10:00 to 10:05.
Warning
Frames encoded in H.264, H.265 and MPEG-4 may freeze during playing, since only the reference frames are displayed. This is due to the specifics of H.264, H.265 and MPEG-4 codec, because the decoding of intermediate frames requires the whole chain, starting with the last reference frame; when playing backwards it can lead to unnecessary consumption of computer resources.
The playback speeds in the range of 0.1x to 120x are available.
Note
For frame-by-frame playback, move the mouse pointer to the cell and scroll the mouse wheel (down is forwards, up is backwards).
The context menu can be invoked in two ways:
By clicking the
 icon in the right bottom corner of the cell.
By right-clicking anywhere in the cell.
Note
The number of menu items may be different from below, depending on the settings of camera, archive and client workstation.
Select channel: Allows selecting one of the available cameras to be displayed in the selected cell.
Hide: Removes the camera from the cell (frees the cell).
Open in browser: Opens the camera web interface in browser.
Enable alarm: Turns on the alarm in the cell.
Full screen mode / Exit Full screen mode: Switches the camera display between full screen and grid mode.
Note
Switching between grid mode and full screen mode can also be done by double-clicking in a cell.
Unselect: Removes selection from the cell (makes it inactive).
Surveillance: switches the cell in the real time video viewing mode.
Save frame: Saves the frame (frame fragment) to the selected location.
Print frame: Prints the frame (frame fragment).
Video proportions: Allows selecting frame proportions.
Show sound level: Displays the volume control element at the bottom of the cell.
Export archive: Exports the archive.
Add Bookmark to archive: Opens the Archive bookmark creation window.
Enlarge image: Allows to zoom in on a selected fragment of the frame.
Set alarm cell: The cell in the alarm mode will display the cameras on which the Alarm was triggered
Fragment mode: shows the archive as fragments.